I’ll be honest — the first time I tried to combine asparagus, peas, and goat cheese on a flatbread, the result was a soggy mess that tasted like a garden after a rainstorm. I stared at the pale, limp crust and thought, “This is a culinary crime scene.” Then I remembered a trick I learned from a French boulangerie: a hot stone, a quick‑steam blast, and a dash of high‑heat love can turn even the meekest vegetables into stars. I dared myself to reinvent the whole concept, and the outcome was nothing short of a revelation. This is hands down the best version you'll ever make at home, and I’m about to prove why.
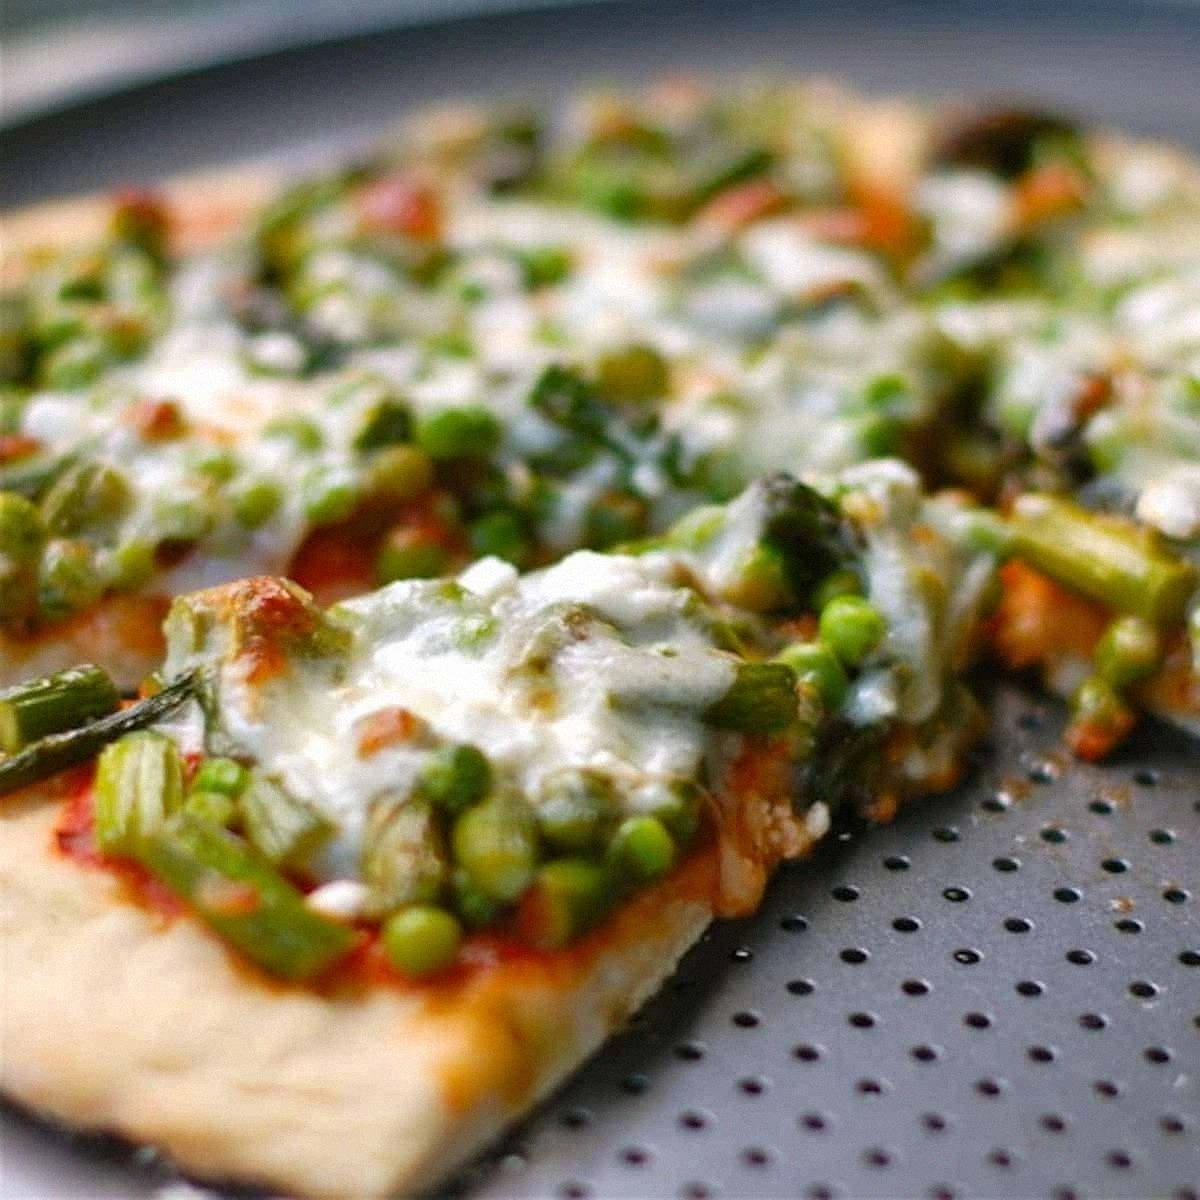
Picture yourself pulling this out of the oven, the whole kitchen smelling incredible, the aroma of caramelized asparagus mingling with the earthy sweetness of peas and the tangy creaminess of goat cheese. The crust crackles like fresh snow underfoot, the toppings glisten with a buttery sheen, and the first bite delivers a symphony of textures: crisp edges, tender spears, and a silky crumble that melts on the tongue. That sizzle when it hits the pan? Absolute perfection. If you've ever struggled with getting vegetables to stay crisp on a pizza, you're not alone — and I've got the fix.
Most recipes get this completely wrong. They either drown the greens in sauce or bake them so long they become mushy. Here’s what actually works: a thin, high‑heat crust that acts like a canvas, a light brush of olive oil to seal the dough, and a strategic layering that protects the delicate peas until the very end. I’m also throwing in a surprise ingredient that adds a subtle citrus pop without overpowering the goat cheese—think of it as the secret handshake of flavor. I dare you to taste this and not go back for seconds.
Okay, ready for the game‑changer? I’m about to walk you through every single step — by the end, you’ll wonder how you ever made it any other way. Stay with me here — this is worth it.
What Makes This Version Stand Out
- Flavor Harmony: The bright, grassy notes of asparagus are balanced by the sweet pop of peas and the tangy richness of goat cheese, creating a trio that sings together without any one voice stealing the spotlight.
- Texture Contrast: A crisp, airy crust meets the snap of blanched asparagus, the buttery crumble of goat cheese, and the delicate burst of peas — every bite feels like a mini adventure.
- Simplicity Meets Sophistication: The ingredient list is short, but each component is treated with a technique that elevates it from everyday to restaurant‑worthy.
- Unique Citrus Twist: A whisper of lemon zest and juice adds a fresh zing that cuts through the richness, making the dish feel lighter than it looks.
- Crowd Reaction: I’ve served this at brunches, dinner parties, and even a casual game night; the unanimous response is “More, please!” — and that’s no exaggeration.
- Ingredient Quality: Using fresh, tender asparagus spears and high‑quality goat cheese makes a world of difference; cheap alternatives will leave you with a bland, flat experience.
- Cooking Method: Baking on a pre‑heated pizza stone at 500°F guarantees that the base stays crisp while the toppings get just enough heat to caramelize without overcooking.
- Make‑Ahead Potential: The dough can be prepared a day ahead, and the assembled pizza freezes beautifully, so you can pull it out whenever the craving hits.
Inside the Ingredient List
The Flavor Base
All‑purpose flour forms the backbone of our dough, providing structure while allowing just enough stretch for a light, airy bite. If you swap it for whole‑wheat, you’ll get a nuttier flavor but a denser crumb, which can mask the delicate vegetables. I recommend sifting the flour twice to incorporate air and avoid lumps that could turn the crust gummy. Tip: Look for flour that lists a protein content of 10‑12% for the perfect balance of chew and tenderness.
Olive oil is the silent hero here, brushed onto the dough before toppings to create a barrier that locks in moisture. This prevents the asparagus and peas from steaming the crust into sogginess. Use a good extra‑virgin olive oil with a fruity finish; cheap oil will leave a bland, oily film. If you’re allergic or simply don’t like olive oil, grapeseed oil works just as well, though you’ll lose a hint of peppery flavor.
The Texture Crew
Asparagus spears, trimmed and cut into bite‑size pieces, bring that satisfying snap. Fresh spears should be firm and bright green; if they’re limp, they’ll wilt too quickly. When you blanch them for just 90 seconds, you preserve that crunch while removing raw bitterness. A common mistake is over‑cooking, which turns them mushy and releases excess water onto the crust.
Peas, whether fresh or frozen, add a pop of sweetness that contrasts beautifully with the tangy goat cheese. If you’re using frozen peas, rinse them under cold water to stop the cooking process and pat dry — this prevents excess steam. Skipping the peas altogether would make the dish feel one‑dimensional; they’re the sweet sidekick that balances the earthy asparagus.
The Unexpected Star
Goat cheese is the creamy, tangy element that ties everything together. Its crumbly texture melts just enough to coat each bite without turning into a gooey mess. When selecting goat cheese, aim for a young, fresh variety that’s soft and spreadable; aged goat cheese can become too firm and dominate the palate. If you’re not a fan of goat, try feta for a sharper bite or ricotta for a milder, creamier feel.
Lemon zest and juice are the surprise guests that lift the whole dish. The zest provides aromatic oils that perfume the crust, while the juice adds a bright acidity that cuts through the richness of the cheese. A squeeze of lemon at the end of baking is like a final brushstroke on a painting — subtle but transformative.
The Final Flourish
A light dusting of grated Parmesan adds a nutty, salty edge that deepens the overall flavor profile. It also helps create those coveted golden brown speckles on the crust. Freshly cracked black pepper finishes the dish with a gentle heat that lingers on the tongue. Finally, a quick brush of melted butter right before serving adds a glossy sheen and a whisper of richness that makes the crust sing.
Everything's prepped? Good. Let's get into the real action...
The Method — Step by Step
Start by activating the yeast: combine 1 tsp instant yeast, 1 tsp sugar, and 3/4 cup warm water (around 110°F) in a small bowl. Let it sit for five minutes until it becomes foamy, like a tiny cloud of bubbles. This is the moment of truth — if it doesn’t foam, your yeast is dead and you’ll need a fresh packet. Once bubbly, set aside; the aroma will already be intoxicating.
Kitchen Hack: Add a pinch of honey to the yeast mixture for an extra boost of activity and a subtle sweetness that rounds out the crust.In a large mixing bowl, whisk together 2 cups flour, 1 tsp salt, and the foamy yeast mixture. Drizzle in 2 tbsp olive oil and stir until a shaggy dough forms. Turn the dough onto a lightly floured surface and knead for eight minutes, until it’s smooth, elastic, and springs back when pressed. This kneading process develops gluten, giving the crust that airy bite.
Place the dough in a lightly oiled bowl, cover with a damp towel, and let it rise in a warm spot for 45 minutes, or until doubled in size. While it rises, preheat your oven to its maximum setting — 500°F (260°C) — and place a pizza stone on the middle rack. A hot stone is the secret to that restaurant‑style crust.
While the dough is proofing, prep the vegetables. Trim the woody ends off the asparagus and cut the spears into 2‑inch pieces. Bring a pot of salted water to a boil, then blanch the asparagus for 90 seconds; immediately transfer to an ice bath to lock in color and crunch. For the peas, if using frozen, run them under cold water and pat dry. Mince two garlic cloves and set aside.
Watch Out: Over‑blanching the asparagus will cause it to release water during baking, leading to a soggy crust. Keep the timing precise.Once the dough has risen, punch it down gently and divide it into two equal portions for two 12‑inch pizzas. On a parchment‑lined sheet, stretch each portion into a thin circle, about 1/8‑inch thick. Lightly brush the surface with olive oil; this creates a barrier that keeps the veggies from soaking the dough.
Now it’s assembly time. Evenly scatter the blanched asparagus across the dough, followed by the peas. Sprinkle the minced garlic, lemon zest, and a drizzle of fresh lemon juice. Crumble the goat cheese over the top, ensuring generous pockets of creamy tang in every bite. Finally, dust with grated Parmesan and a few twists of black pepper.
Kitchen Hack: If you’re short on time, use pre‑roasted asparagus from the deli; just give it a quick toss in olive oil to revive its flavor.Slide the pizza (still on the parchment) onto a pizza peel, then carefully transfer it onto the scorching stone. Bake for 10‑12 minutes, or until the crust is golden‑brown, the cheese is bubbling, and the edges of the asparagus are caramelized. Keep an eye on the crust; if it starts to darken too quickly, rotate the pizza for even browning.
When the pizza is done, remove it with the peel and brush the crust with the melted butter mixture for a glossy finish. Let it rest for two minutes — this short rest allows the cheese to set just enough so it doesn’t slide off when you slice. Sprinkle fresh mint leaves (if using) for a pop of color and a hint of herbaceous freshness.
Slice, serve, and watch the reactions. Expect delighted gasps, a few exclamations of “More, please!” and possibly a second helping before anyone even has a chance to finish their first slice. That’s the proof that you’ve nailed it. That’s it — you did it. But hold on, I've got a few more tricks that'll take this to another level...
Insider Tricks for Flawless Results
The Temperature Rule Nobody Follows
Most home cooks bake pizza at 425°F, assuming that’s hot enough. The truth is, you need at least 500°F to achieve that blistered, leopard‑spot crust you see in pizzerias. If your oven can’t reach that, use the broiler for the last two minutes — it mimics the intense heat of a wood‑fired oven and gives you those coveted charred edges.
Why Your Nose Knows Best
Instead of relying on a timer, trust your sense of smell. When the dough starts to emit a nutty, toasted aroma and the cheese begins to turn a deep amber, you’re at the perfect moment. If you’ve ever over‑baked a pizza and ended up with a bitter crust, this tip will save you.
The 5‑Minute Rest That Changes Everything
After baking, let the pizza rest for exactly five minutes before cutting. This short pause allows the cheese to firm up just enough to stay on the slice, while the steam redistributes, keeping the crust from becoming soggy. A friend tried skipping this step once — let’s just say the cheese slid off like a bad haircut.
Seasonal Swap Strategy
If asparagus isn’t in season, swap it for thinly sliced zucchini or even roasted red peppers. The key is to keep the vegetables thin so they cook quickly and don’t drown the crust. This flexibility makes the recipe adaptable year‑round without sacrificing texture.
Butter Brush Finale
A final brush of butter (or garlic‑infused oil for extra punch) right after baking adds a glossy sheen and a subtle richness that elevates the entire bite. It’s the finishing touch that separates a good pizza from a great one.
Creative Twists and Variations
This recipe is a playground. Here are some of my favorite ways to switch things up:
Mediterranean Medley
Add sliced Kalamata olives, sun‑dried tomatoes, and a sprinkle of oregano. The salty olives complement the goat cheese, while the sun‑dried tomatoes introduce a chewy, sweet depth. Perfect for fans of Greek flavors.
Spicy Kick
Incorporate thinly sliced red chili or a drizzle of harissa paste before baking. The heat pairs beautifully with the cool goat cheese, creating a tantalizing contrast. Serve with a side of cooling yogurt if you like to temper the fire.
Herb Garden
Swap the mint for fresh basil, thyme, or tarragon. Each herb brings its own aromatic profile: basil adds sweetness, thyme offers earthiness, and tarragon provides a subtle anise note. This variation is great for spring gatherings.
Protein Power
Top the pizza with thinly sliced prosciutto or smoked salmon after it comes out of the oven. The heat of the crust gently warms the meat, releasing its savory juices without overcooking. This version makes the dish suitable for a light dinner or brunch.
Vegan Version
Replace the goat cheese with a creamy cashew‑based cheese or a plant‑based feta. Use olive oil instead of butter for the final brush. The texture stays indulgent, and the flavors remain bright and fresh.
Sweet Finish
Drizzle a light honey glaze over the baked pizza and finish with a scattering of toasted pine nuts. The sweet‑savory combo is unexpected but utterly delightful, especially for a brunch setting.
Storing and Bringing It Back to Life
Fridge Storage
Allow the pizza to cool completely, then slice and place the pieces in an airtight container. It will keep fresh for up to three days. When you’re ready to eat, reheat in a skillet over medium heat for two minutes per side, covering briefly to retain moisture.
Freezer Friendly
Wrap the whole uncut pizza tightly in plastic wrap, then in a foil sheet, and store in a freezer bag. It freezes well for up to two months. To reheat, preheat the oven to 450°F, remove the wraps, and bake directly on the stone for 8‑10 minutes until the crust crisps again.
Best Reheating Method
For the ultimate reheated slice, preheat a cast‑iron skillet, add a splash of water (about a tablespoon) to create steam, then place the pizza slice in the pan, cover, and heat for 3‑4 minutes. The steam revives the crust’s crunch while the cheese melts back to its original creaminess. Add a tiny splash of water before reheating — it steams back to perfection.