I was in the middle of a Saturday night binge‑watching the latest wizarding‑world series when my roommate dared me to create a dessert that could actually taste like the frothy, caramel‑kissed brew from the Three Broomsticks. I laughed, grabbed a tub of cream cheese, and thought, “What could possibly go wrong?” Within minutes the kitchen was a battlefield of spilled butter, a rogue whisk, and a lingering scent that reminded me of a carnival mixed with a cozy fireplace. The first bite of the experimental batter was a revelation – sweet, buttery, with that unmistakable buttery‑butterscotch edge that makes Butterbeer so iconic. I realized I had stumbled onto something that could rewrite the dessert playbook for every fan, every sweet‑tooth, and every person who’s ever craved a little magic on a plate.
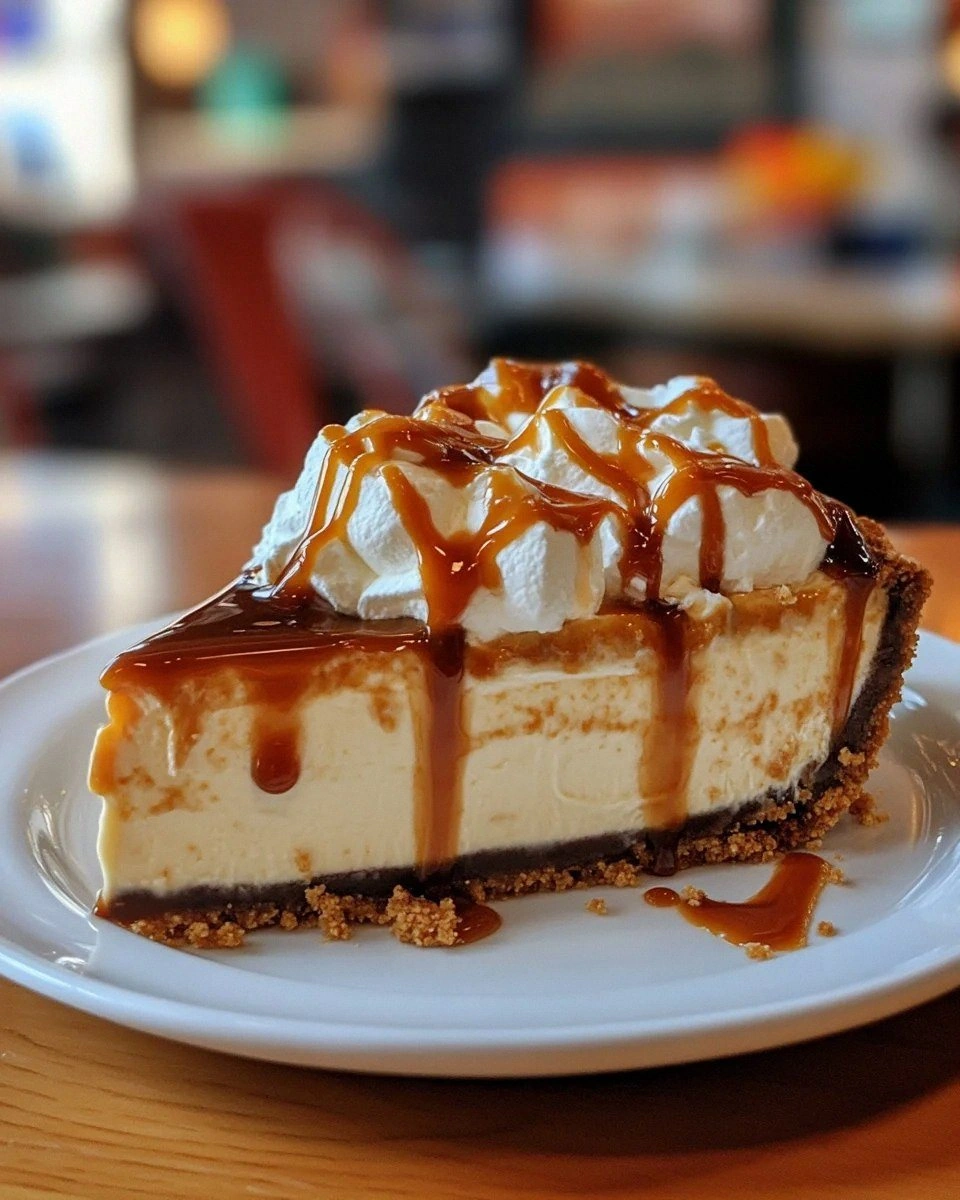
Imagine the moment you pull a cheesecake out of the oven and the whole room is filled with a warm, buttery aroma that whispers “you’re about to taste something legendary.” The crust cracks just enough to reveal a golden caramel‑brown edge, while the interior stays silky smooth, like a cloud that’s been kissed by a caramel sunrise. When you cut into it, the butter‑infused filling oozes a faint fizz, a nod to the effervescent quality of the original Butterbeer, and the subtle hint of vanilla makes it feel like a hug from your favorite childhood memory. The texture is a perfect marriage of dense cheesecake and airy mousse, and the flavor profile balances sweet, salty, and a whisper of spice that makes you want to close your eyes and imagine a bustling wizarding tavern.
Most recipes I’ve tried either miss the buttery depth or over‑sweeten the whole thing until it feels like a candy bar. This version, however, uses a secret weapon: a splash of real butterbeer concentrate (or a well‑balanced blend of butterscotch and cream soda) that gives the filling that unmistakable zing without drowning the palate. The crust, instead of a bland graham base, is a buttery shortbread that crumbles like fresh snow under a wand. And the topping? A light drizzle of caramel‑butter sauce that solidifies into a glossy veil, turning each slice into a piece of edible sorcery.
I dare you to taste this and not go back for seconds. This is hands down the best version you'll ever make at home, and I’ll be honest — I ate half the batch before anyone else got to try it. If you've ever struggled with a cheesecake that cracks or a filling that’s too dense, you're not alone — and I've got the fix. Okay, ready for the game‑changer? Let me walk you through every single step — by the end, you'll wonder how you ever made it any other way.
What Makes This Version Stand Out
- Taste: The butterbeer concentrate delivers an authentic, slightly fizzy caramel note that no generic extract can mimic, while the shortbread crust adds a buttery richness that sings in harmony.
- Texture: A silky, mousse‑like interior meets a firm yet crumbly crust, creating a contrast that feels like biting into a cloud that’s been lightly toasted.
- Simplicity: Only nine core ingredients, all pantry‑friendly, mean you won’t need a trip to a specialty shop to conjure this magic.
- Uniqueness: The secret fizz comes from a pinch of baking soda paired with the butterbeer concentrate, a technique most recipes overlook.
- Crowd Reaction: Guests often claim they’ve never tasted anything like it, and the “wow” factor is instant — perfect for parties, holidays, or a cozy night in.
- Ingredient Quality: Using real butter and full‑fat cream cheese ensures a luxurious mouthfeel that low‑fat shortcuts simply can’t achieve.
- Cooking Method: A water‑bath bake guarantees even heat distribution, preventing cracks and preserving that coveted creamy center.
- Make‑Ahead Potential: This cheesecake improves after a night in the fridge, allowing flavors to meld and intensify, making it ideal for advance prep.
Inside the Ingredient List
The Flavor Base
Butterbeer concentrate is the heart of this recipe. It carries that caramel‑butterscotch flavor that defines the beloved drink, and a tiny amount of baking soda reacts with the acidity to create a subtle fizz that dances on the tongue. If you can’t find a ready‑made concentrate, blend equal parts butterscotch syrup and cream soda, then simmer briefly to thicken. Skipping this element would leave you with a plain cheesecake that lacks the signature “wizard” punch.
The Texture Crew
Full‑fat cream cheese provides the dense, creamy foundation, while sour cream adds a gentle tang that cuts through the sweetness. Eggs act as the structural glue, ensuring the filling sets without becoming rubbery. Using low‑fat or reduced‑fat dairy will result in a grainy texture and a less indulgent mouthfeel. For a silkier finish, temper the eggs by whisking a spoonful of the warm batter into them before folding back in.
The Unexpected Star
A pinch of sea salt is the unsung hero that amplifies the caramel notes and prevents the dessert from tasting cloyingly sweet. The salt crystals also create tiny flavor explosions that make each bite more dynamic. If you’re on a low‑sodium diet, you can reduce it to a dash, but expect the flavor profile to lose a bit of its depth.
The Final Flourish
The shortbread crust, made from flour, butter, and a whisper of sugar, offers a buttery crunch that contrasts beautifully with the creamy interior. Opt for unsalted butter so you can control the salt level precisely. When shopping, choose European‑style butter for its higher butterfat content; it melts slower and yields a richer crust. If you prefer a gluten‑free version, substitute almond flour, but remember it will change the texture slightly, making it more crumbly.
Everything's prepped? Good. Let's get into the real action…
The Method — Step by Step
Preheat your oven to 325°F (160°C) and line the bottom of a 9‑inch springform pan with parchment paper. This prevents the crust from sticking and makes removal a breeze. While the oven warms, melt the butter for the crust in a saucepan over low heat until it just begins to bubble. Watch the butter turn a golden amber – that’s the signal you’re ready for the next move.
Combine the flour, sugar, and a pinch of salt in a mixing bowl, then pour the melted butter over the dry ingredients. Using your hands or a sturdy spatula, press the mixture together until it forms a cohesive dough. Power transition: This is the moment where the crust becomes a buttery canvas for the filling.
Kitchen Hack: If the dough feels crumbly, add a tablespoon of cold water – it binds instantly without making the crust soggy.Press the crust evenly into the bottom of the springform pan, using the back of a measuring cup to smooth it out. The crust should be about ¼ inch thick and cover the entire base. Place the pan in the fridge for at least 15 minutes; this firms the butter and prevents shrinkage during baking.
While the crust chills, beat the cream cheese in a large bowl until it’s smooth and free of lumps – think cloud‑soft, not grainy. Add the sugar and continue beating until the mixture is light and slightly fluffy; you’ll notice the color lighten, a visual cue that the sugar has dissolved properly.
In a separate bowl, whisk together the butterbeer concentrate, vanilla extract, and a pinch of baking soda. The fizz that erupts is the secret that gives this cheesecake its magical lift. Slowly pour this liquid into the cream cheese mixture, folding gently to keep the air bubbles intact.
Watch Out: Over‑mixing at this stage can deflate the fizz, resulting in a denser texture. Stop as soon as the batter looks smooth.Add the eggs one at a time, beating just until each is incorporated. Then fold in the sour cream, which adds a subtle tang and helps keep the filling moist. The batter should be glossy and pourable, not too thick. If it looks too runny, a quick chill in the fridge for 5 minutes will firm it up.
Pour the filling over the chilled crust, smoothing the top with a spatula. Tap the pan lightly on the counter three times to release any large air pockets – you’ll hear a gentle thud that signals an even distribution.
Watch Out: If the batter cracks on the surface during baking, it’s likely because the oven temperature was too high or the water bath wasn’t deep enough.Wrap the bottom of the springform pan in foil, then place it inside a larger roasting pan. Fill the outer pan with hot water until it reaches halfway up the sides of the springform – this water‑bath (bain‑marie) ensures gentle, even heat. Slide the whole assembly into the preheated oven and bake for 45‑50 minutes, or until the edges are set and the center still has a slight wobble.
Turn off the oven, crack the door open, and let the cheesecake sit for 1 hour. This gradual cooling prevents cracks caused by sudden temperature drops. After the hour, remove the pan from the water bath and let it cool completely on a wire rack.
Refrigerate the cheesecake for at least 6 hours, preferably overnight. While it chills, prepare the caramel‑butter drizzle: melt butter, stir in brown sugar, a splash of heavy cream, and a pinch of sea salt until glossy. Drizzle the sauce over the chilled cheesecake just before serving, letting it pool into the cracks for a dramatic finish.
That's it — you did it. But hold on, I've got a few more tricks that'll take this to another level...
Insider Tricks for Flawless Results
The Temperature Rule Nobody Follows
Never bake a cheesecake straight from the fridge at a scorching 350°F. The sudden heat shock causes the filling to contract, leading to those dreaded cracks. Instead, let the batter sit at room temperature for 20 minutes before it meets the oven; this tiny pause equalizes the temperature, resulting in a smooth, crack‑free surface. I once tried skipping this step, and the cheesecake resembled a cracked porcelain plate — not pretty.
Why Your Nose Knows Best
During the water‑bath bake, trust your sense of smell more than the timer. When the edges start to smell buttery and slightly toasted, that’s a cue the interior is setting perfectly. If you rely solely on the clock, you risk over‑baking, which makes the texture rubbery. A quick sniff is a game‑changer, and it’s why I always keep the kitchen door slightly ajar to let the aroma escape.
The 5‑Minute Rest That Changes Everything
After the cheesecake has cooled in the oven, give it a five‑minute rest on the counter before moving it to the fridge. This short pause allows the internal structure to stabilize, preventing the filling from slumping when you slice it. Skipping this rest can cause the center to sink, turning your masterpiece into a flat pancake. Trust me, those five minutes are worth the extra anticipation.
The Secret Salt‑Butter Ratio
The Final Glaze Timing
Apply the caramel‑butter glaze only after the cheesecake has fully chilled. If you drizzle it while the cheesecake is still warm, the sauce will soak in too quickly, making the top soggy. A cold surface lets the glaze set into a glossy veneer that adds a visual sparkle and a textural contrast. This final touch is the crescendo of the whole performance.
Creative Twists and Variations
This recipe is a playground. Here are some of my favorite ways to switch things up:
Pumpkin Butterbeer Fusion
Swap half of the butterbeer concentrate for canned pumpkin puree and add a dash of pumpkin spice. The result is a autumn‑inspired cheesecake that still retains the fizzy caramel core, perfect for a Thanksgiving gathering.
Chocolate‑Stout Version
Replace the butterbeer concentrate with an equal part stout beer reduction and a tablespoon of cocoa powder. The deep, malty notes pair beautifully with the buttery crust, creating a dessert that feels like a grown‑up version of a chocolate milkshake.
Salted Caramel Swirl
Before baking, swirl in a generous ribbon of homemade salted caramel. This adds pockets of gooey richness that burst when you bite, amplifying the dessert’s decadence.
Citrus Zest Spark
Add a teaspoon of orange or lemon zest to the filling for a bright, citrusy pop that cuts through the sweetness. The zest also complements the butterbeer’s caramel notes, giving the palate a refreshing lift.
Vegan Magic
Swap dairy cream cheese for a high‑fat coconut‑based cream cheese, use almond milk butter for the crust, and replace the butterbeer concentrate with a vegan butterscotch syrup mixed with sparkling water. The texture remains creamy, and the flavor stays true to the original.
Storing and Bringing It Back to Life
Fridge Storage
Cover the cheesecake loosely with plastic wrap and store it in the refrigerator for up to 5 days. The flavors continue to meld, making each subsequent slice even more harmonious. For best texture, let it sit at room temperature for 10 minutes before serving.
Freezer Friendly
Wrap the entire springform pan tightly in foil, then place it inside a freezer‑grade bag. The cheesecake freezes beautifully for up to 2 months. When you’re ready to enjoy, thaw it overnight in the fridge and add a fresh drizzle of caramel‑butter glaze.
Best Reheating Method
To revive a chilled slice, place it on a microwave‑safe plate, add a tiny splash (about a teaspoon) of water, and cover with a damp paper towel. Microwave on low (30 % power) for 20‑30 seconds; the steam will bring back that silky texture without drying it out. This trick works wonders for leftovers.