Picture this: it’s a crisp Saturday afternoon, the air carries that familiar scent of cinnamon and butter, and you’re standing in your kitchen feeling a little guilty because you’ve just burned a batch of brownies. That moment of culinary catastrophe sparked a revelation. I realized that what I really needed was a recipe that could turn a kitchen mishap into a triumph, a single skillet creation that would bring the whole house together in seconds. And that’s where the Caramel Apple Skillet Cookie D found its purpose.
I started with a simple craving—apple, caramel, and cookie all rolled into one. The idea was to fuse the chewy, buttery texture of a cookie with the warm, comforting feel of a skillet apple crumble, then to top it with glossy caramel pockets that melt in your mouth. The result is a dessert that feels like a hug from the inside out, a single-pan wonder that turns any ordinary evening into a mini celebration. Every bite offers a sweet, slightly tart apple burst, a buttery crumb that feels like a hug, and a caramel drizzle that coats the dough like a silky blanket.
What makes this version stand out is the way it balances simplicity with depth. You only need one skillet, one bowl, and a handful of ingredients that are usually on hand. The cookies are soft in the center and crisp on the edges, the caramel is glossy and velvety, and the apples are perfectly sautéed—juicy yet firm. The best part? It’s hands down the best version you’ll ever make at home because it turns a simple skillet into a stage for flavor fireworks. I dare you to taste this and not go back for seconds.
And if you think you’ve seen everything in the world of skillet desserts, think again. There’s a twist that most recipes overlook: a splash of espresso or a dash of sea salt that elevates the caramel’s sweetness and deepens the apple’s natural tang. That little tweak is what separates this from the ordinary. Stay with me here, because by the end of this guide, you’ll wonder how you ever made it any other way.
What Makes This Version Stand Out
- Flavor: The caramel sauce is not just a topping; it’s a flavor carrier that infuses every bite with a glossy, buttery sweetness that lingers on the tongue.
- Texture: The cookie dough is buttery and slightly chewy, while the edges caramelize to a crisp finish that snaps like thin ice.
- Speed: From prep to plate, the entire process takes less than an hour—perfect for spontaneous dessert cravings.
- One‑Pan Simplicity: No need for ovens or multiple bowls; a single skillet is all you need, making cleanup a breeze.
- Versatility: The base recipe can be customized with nuts, spices, or even a splash of espresso for a coffee‑infused version.
- Make‑Ahead Potential: The cookies hold up wonderfully for 24 hours when stored in an airtight container, making them ideal for parties or a quick dessert on a busy day.
- Kid‑Friendly: The buttery, sweet dough is a hit with kids, and the apple slices add a wholesome touch that parents love.
- Visual Appeal: The caramel glaze glistens like liquid gold, and the apple slices create a rustic, autumnal aesthetic that’s Instagram‑worthy.
Alright, let's break down exactly what goes into this masterpiece…
Inside the Ingredient List
The Flavor Base
All-purpose flour is the backbone of this cookie, providing structure and a chewy bite that holds the caramel and apple together. Skipping it would leave you with a sticky, unstructured mess. If you’re gluten‑free, a blend of rice flour and potato starch will work, but the texture will shift slightly to a lighter crumb.
Brown sugar is the secret to moisture and depth. It caramelizes during the cooking process, adding a subtle molasses note that elevates the sweetness without overpowering the apples. A pinch of sea salt balances the sugar’s richness and brings out the caramel’s depth. If you prefer a cleaner sweet, white sugar works, but the cookie will be a bit less complex.
The Texture Crew
Butter is the lifeblood of the cookie. It creates a tender crumb and a rich flavor profile that melts in your mouth. Use room‑temperature butter for easier mixing, and consider adding a teaspoon of milk to keep the dough from drying out during cooking.
Egg is the binder that holds everything together. It adds moisture and helps the cookie rise slightly, giving it a soft center. If you’re vegan, a flax egg (1 tablespoon ground flaxseed mixed with 3 tablespoons water) will mimic the binding properties.
The Unexpected Star
Caramel sauce or bits are the star of this dish, delivering pockets of sticky sweetness that coat the dough like velvet. The caramel also adds a glossy sheen that makes the finished cookie look as good as it tastes. If you’re feeling adventurous, try a homemade caramel made from butter, brown sugar, and a splash of cream for a richer flavor.
Optional nuts add a delightful crunch and a toasty flavor contrast. Walnuts or pecans pair beautifully with the caramel and apples, while almonds give a subtle nuttiness that doesn’t overpower the sweet. If you’re allergic or simply want a lighter version, omit them entirely.
The Final Flourish
Cinnamon is the quintessential fall spice that marries perfectly with apples. It adds warmth, depth, and a hint of spice that keeps the cookie from feeling too sweet. A teaspoon is enough for four servings, but feel free to increase if you love a spicier bite.
Apples bring juiciness and a slight tart balance that cuts through the caramel’s sweetness. Choose firm varieties like Honeycrisp or Granny Smith for the best texture. Thinly sliced, they’ll cook quickly and release their natural sugars, creating a caramelized glaze on the skillet.
Everything's prepped? Good. Let's get into the real action…
The Method — Step by Step
- Heat a large, heavy‑bottom skillet over medium heat and add 2 tablespoons of butter. Let it melt until it begins to foam, indicating that the butter has reached the right temperature. This step is crucial because it creates a non‑stick base that prevents the cookie dough from sticking. The buttery aroma should fill the kitchen, signaling that the skillet is ready.
- While the butter is melting, combine 2 cups of all‑purpose flour, 1 cup of brown sugar, 1 tsp baking soda, and 2 tsp cinnamon in a medium bowl. Whisk them together until the dry ingredients are evenly distributed. The flour’s protein content will help the cookie rise slightly, giving it that perfect chewy center.
- In a separate bowl, whisk 1 cup of softened butter with 1 egg and 1 tsp vanilla extract until the mixture is light and fluffy. This creates a smooth batter that will coat the apples and caramel. Add a splash of milk if you notice the mixture is too thick; it should pour like a thick cream.
- Fold the dry ingredients into the wet mixture, stirring until just combined. Be careful not to overmix; a few streaks of flour are acceptable. Overmixing can develop gluten, resulting in a tough cookie. The dough should be thick but pliable.
- Slice 2 medium apples into thin rounds, about 1/8 inch thick. The thinner the slices, the quicker they’ll caramelize and release their sugars. Arrange the apple slices in a single layer at the bottom of the skillet, overlapping slightly. This creates a base that will toast and caramelize as the cookie cooks.
- Pour the cookie dough over the apples, spreading it evenly with a spatula. The dough will rise slightly as it cooks, creating a fluffy, golden surface. Sprinkle 1/2 cup of caramel sauce or bits over the top, letting the caramel seep into the dough and apples.
- Reduce the heat to low and cover the skillet with a lid. Cook for 12–15 minutes, checking occasionally. The edges should start pulling away from the skillet and the center should look set but still slightly soft. This slow cooking allows the flavors to meld together without burning.
- After 12 minutes, remove the lid and stir gently to distribute the caramel and apples evenly. Then, return the lid and continue cooking for another 5 minutes. The cookies should now be golden brown on top and the caramel should be glossy.
- Remove the skillet from heat and let the cookie sit for 5 minutes before serving. This resting period allows the caramel to thicken slightly and the cookie to set, preventing it from breaking apart when sliced.
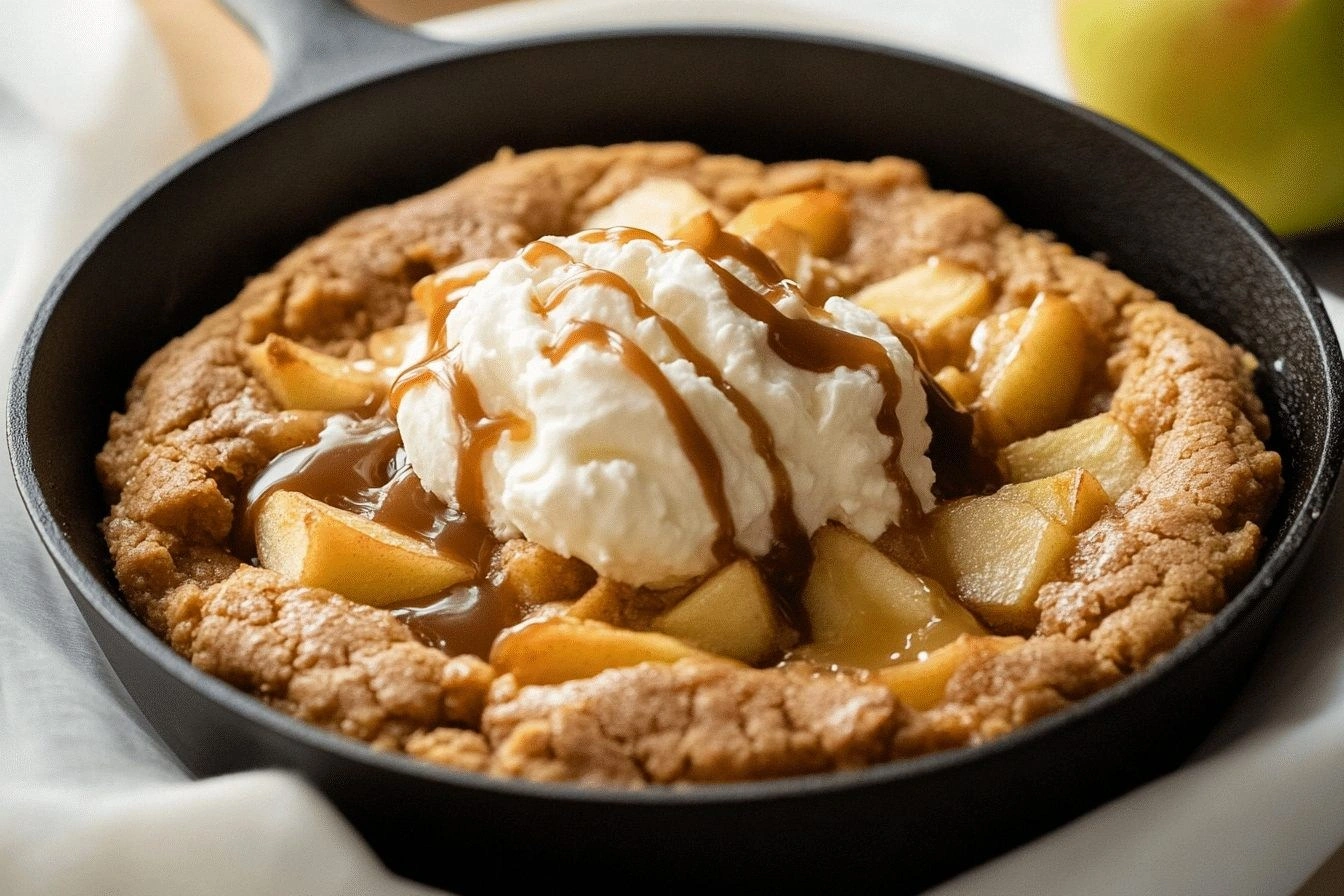
- Serve warm, optionally dusted with powdered sugar or drizzled with extra caramel sauce. Pair it with a scoop of vanilla ice cream for an indulgent treat. Enjoy the symphony of textures and flavors that unfold in each bite.
That's it — you did it. But hold on, I've got a few more tricks that'll take this to another level. These insider tips will help you perfect the cookie every time and even turn it into a show‑stopping dessert for guests.
Insider Tricks for Flawless Results
The Temperature Rule Nobody Follows
Many bakers believe that a higher heat will cook cookies faster, but that’s a myth. The key is low, steady heat that allows the caramel to melt slowly and the dough to set without burning the butter. Keep the skillet on low heat, and if you notice the edges browning too fast, reduce the heat further or remove the lid for a short burst.
Why Your Nose Knows Best
Your sense of smell can tell you when the cookie is perfectly cooked. When the caramel begins to bubble and the dough emits a warm, buttery scent, it’s time to remove the lid. Trust your nose, and you’ll never overcook a cookie again.
The 5-Minute Rest That Changes Everything
Letting the cookie rest for exactly five minutes before cutting allows the caramel to thicken and the cookie to firm up. Cutting too soon will cause the caramel to run and the cookie to crumble. The five‑minute rest also lets the flavors meld, creating a richer taste.
Add a Dash of Espresso for Depth
A teaspoon of espresso powder or a splash of strong coffee can deepen the caramel’s flavor and add a subtle bitterness that balances the sweetness. This trick turns the cookie into a coffee‑infused dessert that’s perfect for coffee lovers.
Use a Silicone Baking Mat for Easy Cleanup
If you’re worried about sticking or burning, line the skillet with a silicone baking mat before pouring the dough. It creates a non‑stick surface, making cleanup a breeze and ensuring the cookie lifts out of the pan effortlessly.
Creative Twists and Variations
This recipe is a playground. Here are some of my favorite ways to switch things up:
Nutty Crunch
Add 1/2 cup chopped walnuts or pecans to the dough before cooking. The nuts add a crunchy texture and a buttery flavor that complements the caramel.
Maple Infusion
Replace the brown sugar with an equal amount of pure maple syrup and add a splash of maple extract. The result is a sweet, aromatic cookie that tastes like a maple‑syrup drizzle.
Spiced Apple
Boost the cinnamon to 3 tsp and add a pinch of nutmeg or allspice. This version feels like a warm, spiced apple pie in cookie form.
Chocolate‑Caramel Fusion
Swirl in 1/4 cup of dark chocolate chips into the dough before cooking. The chocolate melts into pockets of gooey chocolate, creating a decadent flavor profile.
Vegan Version
Use coconut oil instead of butter, replace the egg with a flax egg, and choose a plant‑based caramel sauce. The texture remains tender, and the flavor stays just as indulgent.
Cold‑Brew Twist
Stir in a tablespoon of cold‑brew coffee into the dough for a subtle coffee undertone. The coffee pairs beautifully with the caramel, creating a sophisticated dessert.
Storing and Bringing It Back to Life
Fridge Storage
Cool the cookie completely, then store it in an airtight container at room temperature for up to 3 days. The cookie will stay soft, and the caramel will remain glossy.
Freezer Friendly
Wrap the cookie tightly in plastic wrap and place it in a freezer bag. Freeze for up to 2 months. Thaw at room temperature for 30 minutes before serving.
Best Reheating Method
Reheat in a pre‑heated oven at 300°F (150°C) for 8–10 minutes. Add a splash of water before reheating to steam the cookie and restore its moistness. This trick keeps the caramel from drying out.