Picture this: I was standing in a cramped kitchen, the air thick with the smell of frying oil, when a friend dared me to turn a simple pork chop into something unforgettable. The challenge was simple—make the most crispy, juicy pork you could imagine. I stared at the four boneless loin chops, thinking about how many times I'd ruined the texture in the past. That night, I decided to dive into the buttermilk bath and a secret spice blend that would change everything. I swear, the moment the first chop hit the pan, the sizzle sounded like applause.
The buttermilk didn't just tenderize; it created a tender, almost silky interior that clung to the meat like a second skin. The coating, a blend of flour, garlic powder, paprika, and onion powder, turned into a golden shell that cracked with each bite, delivering a crunch that shatters like thin ice. I could almost taste the applause in the air, a chorus of savory notes that made my mouth water. Most recipes get this completely wrong, but this version sticks to a simple yet powerful technique that guarantees a crispy edge that stays crisp. The result? A dish that feels like a hug in every bite.
What sets this apart is not just the crunch; it's the depth of flavor that comes from the buttery gravy that follows. The gravy, thickened with a touch of flour and enriched with butter, coats the pork like velvet, turning a humble cut into a showstopper. I dare you to taste this and not go back for seconds, because the savory, slightly smoky undertones will keep you coming back. Picture yourself pulling this out of the pan, the whole kitchen smelling incredible, and the table already buzzing with anticipation. This is hands down the best version you'll ever make at home.
I know the stakes: a dish that could either be a flop or a feast. I’ve tried countless fried pork recipes that left me with soggy middles or burnt exteriors. This one, however, balances heat and tenderness perfectly. And now, ready for the game‑changer? Let me walk you through every single step—by the end, you'll wonder how you ever made it any other way.
What Makes This Version Stand Out
- Crisp Perfection: The coating is a thin, golden lattice that turns into a satisfying crunch with every bite. It’s achieved by letting the pork rest in buttermilk before coating, which seals the surface and locks in moisture. The result is a crackling edge that shatters like thin ice, while the inside stays juicy.
- Tender Inside: The buttermilk bath works as a tenderizer, breaking down proteins and infusing subtle tang. It keeps the chops moist even after a long frying session. The meat remains tender enough to fall apart in your mouth.
- Flavor Depth: The spice blend—garlic, paprika, onion—creates a savory backbone that pairs perfectly with the buttery gravy. The gravy itself is thickened with flour and enriched with butter, giving it a silky texture. Together, they form a flavor profile that feels both comforting and sophisticated.
- Simplicity of Prep: No fancy equipment or obscure ingredients are required. A single bowl for marination, a shallow dish for coating, and a skillet are all you need. This means you can whip up this masterpiece in a flash.
- Crowd‑Pleaser Factor: Whether it’s a family dinner or a casual get‑together, people love the crispy exterior and the rich gravy. The dish looks impressive on a plate, and the aroma alone can win over skeptics. It’s the kind of dish that turns a regular night into a memorable event.
- Make‑Ahead Friendly: The pork can be marinated overnight, and the gravy can be reheated without losing its silky texture. This makes it perfect for busy weeknights or for hosting a last‑minute dinner. The leftovers taste almost as good as the freshly cooked version.
Alright, let's break down exactly what goes into this masterpiece. From the first splash of buttermilk to the final drizzle of butter, each step is engineered for maximum flavor. Understanding why each component matters will help you avoid the common pitfalls that plague many fried pork recipes. I’ve spent hours tweaking the proportions until everything fell into place. Trust me, the secret is in the details, and I’m about to spill them all.
Inside the Ingredient List
The Flavor Base
At the heart of this dish are the pork chops, which provide a lean yet juicy foundation. The 4 pieces boneless pork loin chops are seasoned with a generous 2 teaspoons of salt and 2 teaspoons of pepper, ensuring every bite carries a balanced savory profile. The buttermilk bath, infused with these seasonings, tenderizes the meat while adding a subtle tang that contrasts the crisp coating. Skipping the buttermilk means the pork will stay dry and the coating will cling poorly; the result is a less satisfying crunch. If you’re on the hunt for a dairy-free alternative, try a yogurt and lemon mixture, but be prepared for a slightly different flavor.
The Texture Crew
The coating is where the magic happens. A cup of all-purpose flour, combined with 1 teaspoon garlic powder, 1 teaspoon paprika, and 1 teaspoon onion powder, creates a golden lattice that turns into a crackling shell. The flour acts as a binder, while the spices lay down a savory backbone that pairs perfectly with the buttery gravy. If you prefer a gluten-free version, substitute the flour with a blend of rice flour and cornstarch; the texture will remain crisp, but the flavor will shift slightly. The vegetable oil, measured at one cup, provides the high heat needed to fry the pork to perfection; using a lighter oil can help keep the dish lower in calories.
The Unexpected Star
The gravy is the unsung hero that elevates this dish from good to unforgettable. After frying, 4 tablespoons of butter melt into a silky base, and a quarter cup of all-purpose flour is added to create a roux that thickens the sauce. Two cups of chicken broth then flow in, creating a rich, savory liquid that clings to the pork like velvet. The combination of butter and broth yields a depth of flavor that would be impossible with broth alone. If you’re craving a heartier sauce, add a splash of cream or a spoonful of Dijon mustard for a subtle kick.
The Final Flourish
Once the gravy reaches a silky consistency, a final pinch of salt and pepper are added to balance the flavors. The salt intensifies the savory notes, while the pepper adds a gentle heat that lingers on the palate. Skipping this final seasoning step can leave the sauce flat and unremarkable. If you prefer a low-sodium version, reduce the salt to 1 teaspoon and increase the pepper for a sharper finish. This small tweak can transform the dish into a gourmet experience without compromising its comfort‑food roots.
Everything's prepped? Good. Let's get into the real action.
The Method — Step by Step
In a medium bowl, whisk together 1 cup of buttermilk, 1 teaspoon salt, and 1 teaspoon pepper. Gently fold in the pork chops, ensuring each piece is fully submerged. Allow the chops to marinate for at least 30 minutes, or refrigerate overnight for deeper flavor. This step is essential; it not only tenderizes the meat but also infuses the coating with a subtle seasoning that will permeate the crust. When you’re ready to cook, remove the pork from the fridge and let it come to room temperature for even cooking.
In a shallow dish, combine 1 cup all-purpose flour with 1 teaspoon garlic powder, 1 teaspoon paprika, and 1 teaspoon onion powder. Stir until the spices are evenly distributed, creating a fragrant, golden mixture. Lightly dust each pork chop with flour before dipping it into the buttermilk. This double-dipping technique ensures a robust coating that will stay intact during frying. The result is a crisp shell that’s both flavorful and visually stunning.
Heat 1 cup of vegetable oil in a large skillet over medium-high heat. A good test is to drop a pinch of flour into the oil; if it sizzles immediately, the oil is ready. Once hot, carefully place the coated pork chops in the skillet, making sure they don’t touch. Let them cook for 3-4 minutes on each side, or until a deep golden crust forms. The oil should shimmer, and the pork should emit a satisfying crackle as it cooks.
Remove the pork from the skillet and place them on a paper towel-lined plate to drain excess oil. Let them rest for a few minutes; this step allows the juices to redistribute, ensuring each bite stays moist. While the pork rests, use the same skillet to begin the gravy, preserving the flavorful browned bits that cling to the pan. These bits, known as fond, are the foundation of a rich sauce.
Watch Out: When adding the flour to the hot pan, there’s a risk of splattering. To mitigate this, sprinkle the flour in a thin, even layer and stir gently. If any flour clumps, whisk vigorously to break them up. This ensures a smooth roux that won’t develop lumps, which can ruin the silky texture of the gravy.
Stir in 4 tablespoons of butter until melted, then whisk in 1/4 cup of all-purpose flour to create a roux. Cook for 1-2 minutes, allowing the flour to toast slightly; this eliminates the raw flour taste. The roux should look creamy and slightly golden, a sign that it’s ready to absorb the broth.
Gradually pour in 2 cups of chicken broth while whisking continuously. The sauce will begin to thicken as the flour absorbs the liquid. Let it simmer for 3-4 minutes, or until the gravy reaches a silky consistency. Taste and adjust seasoning with 1 teaspoon salt and 1 teaspoon pepper if needed.
Finish the sauce by whisking in the remaining 4 tablespoons of butter, which adds a glossy sheen and rich flavor. Return the pork chops to the skillet, spooning the gravy over them so each piece is coated. Let everything simmer together for an additional 2 minutes, allowing the flavors to meld.
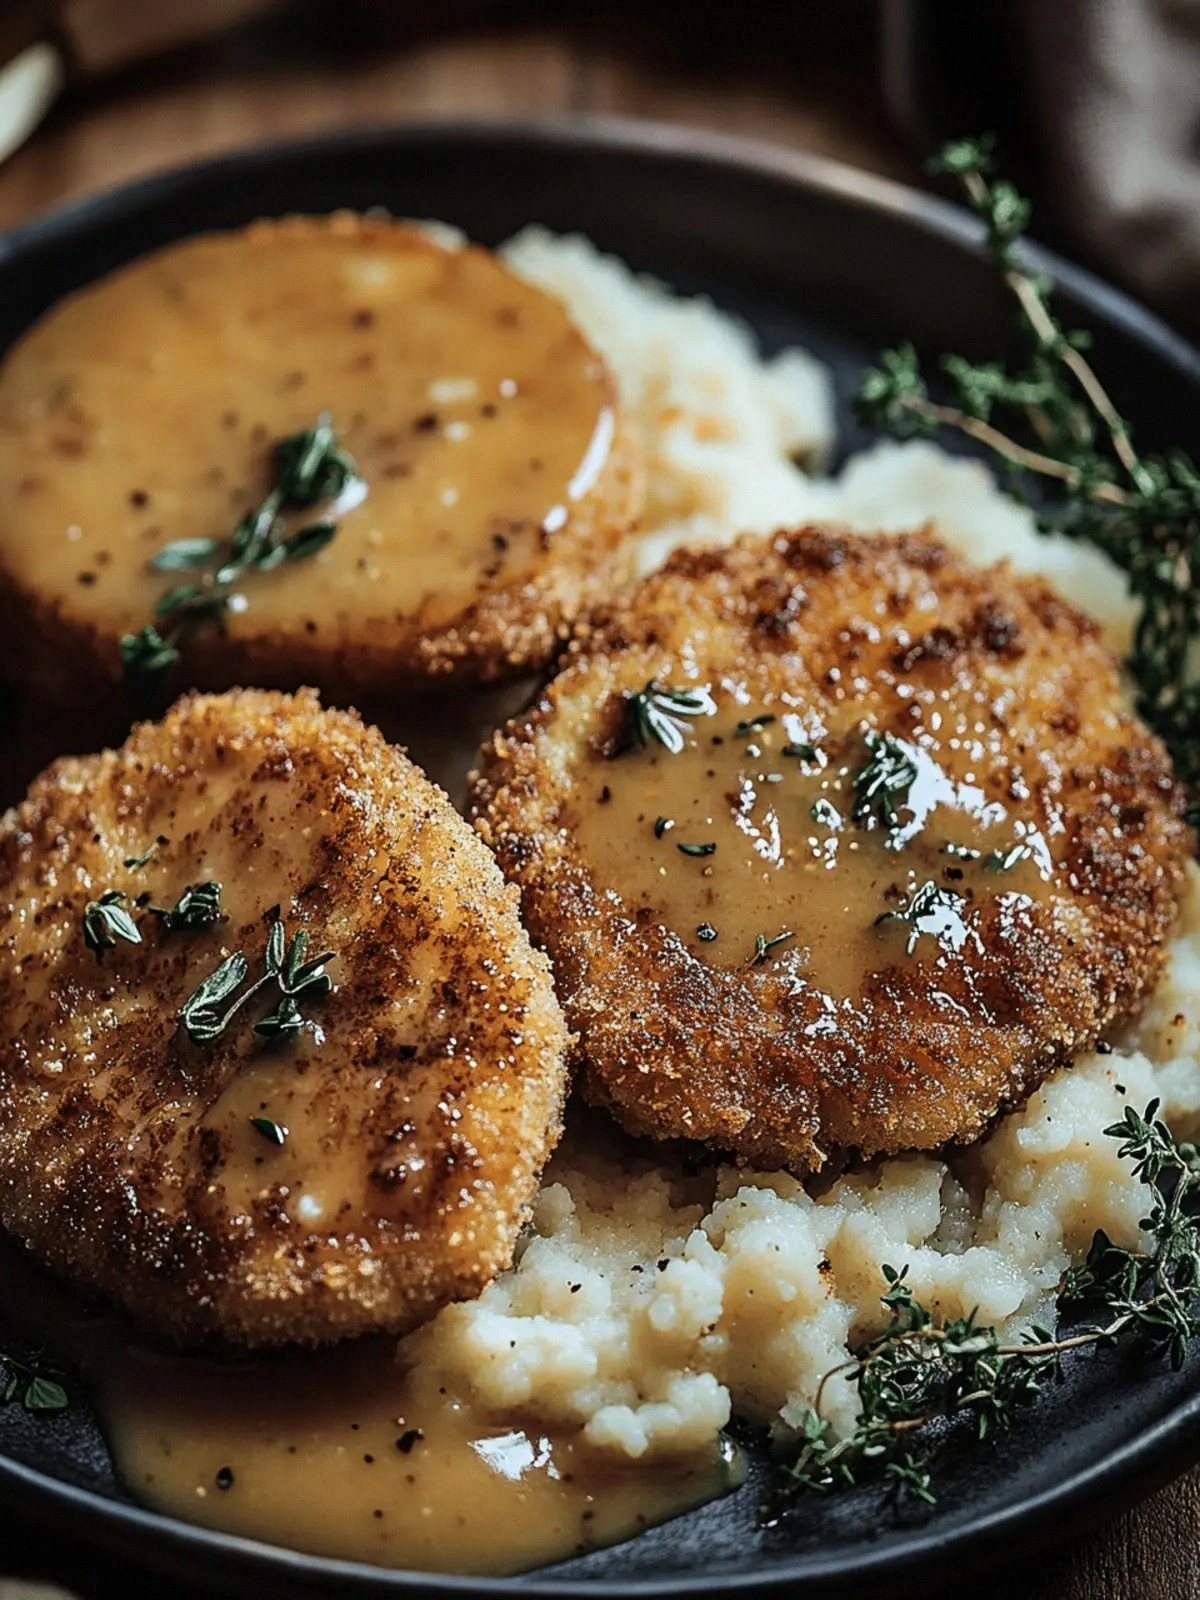
Serve immediately, spooning extra gravy over the pork. Pair it with mashed potatoes, steamed rice, or a crisp green salad to balance the richness. The aroma alone should tempt your guests to dive in without hesitation. This dish is best enjoyed hot, as the crispness of the coating will start to soften if left to sit.
And now the fun part: garnish with fresh herbs like parsley or chives for a burst of color and freshness. A squeeze of lemon juice over the top can cut through the richness, providing a bright counterpoint. Finally, plate the pork on a warm platter, drizzle any remaining gravy, and watch your guests marvel at the golden crust and velvety sauce. That sizzle when it hits the pan? Absolute perfection.
That's it — you did it. But hold on, I've got a few more tricks that'll take this to another level.
Insider Tricks for Flawless Results
The Temperature Rule Nobody Follows
Maintaining the correct oil temperature is crucial for a crispy exterior. Use a thermometer and keep the oil between 350°F and 375°F; if it’s too low, the pork will absorb oil, and if it’s too high, the coating will burn before the inside cooks. I once fried a chop at 400°F, and it came out charred and dry. By keeping the heat steady, you’ll achieve that perfect crunch every time. This hack saves you from soggy, undercooked pork.
Why Your Nose Knows Best
When the pork starts to brown, a subtle nutty aroma will fill the kitchen. This scent is a reliable indicator that the crust is forming correctly. If you notice a metallic smell, the oil may be too hot and is burning the coating. Trust your nose; it’s a seasoned chef’s secret weapon. A good aroma means you’re on the right track.
The 5-Minute Rest That Changes Everything
After frying, let the pork rest for exactly five minutes on a wire rack. This rest period allows the juices to redistribute, preventing them from spilling out when you cut into the meat. I’ve seen people skip this step and end up with dry, unevenly cooked chops. The rest also lets the coating set, keeping it crisp for longer. A simple timer can remind you to take this crucial pause.
Keep the Oil at the Right Heat
Oil temperature can fluctuate quickly, especially when adding thick pieces like pork chops. To keep the heat steady, avoid overcrowding the pan. If you need to cook multiple batches, let the oil cool slightly between batches. Overcrowding leads to a drop in temperature, which results in greasy, soggy pork.
Use a Thermometer for Precision
Internal pork temperature should reach 145°F for safe consumption. A quick glance at the thermometer can save you from undercooking or overcooking. I’ve used a probe thermometer before, and it’s the fastest way to ensure perfect doneness. This step guarantees that every bite is juicy and safe.
Add a Splash of Acid to Brighten
Just before serving, squeeze a few drops of fresh lemon or lime juice over the pork. The acid cuts through the richness of the butter gravy, adding a bright counterpoint. If you’re serving a crowd, you can offer a small bowl of citrus wedges on the side. This simple tweak elevates the dish from comforting to celebratory.
Creative Twists and Variations
This recipe is a playground. Here are some of my favorite ways to switch things up:
Spicy Chipotle Twist
Swap the paprika for chipotle powder and add a dash of hot sauce to the coating. The smoky heat pairs beautifully with the buttery gravy, creating a fiery yet balanced dish. This variation is perfect for those who love a kick without overpowering the pork.
Herb‑Infused Delight
Incorporate fresh thyme and rosemary into the flour mixture. The earthy herbs lend a fragrant depth that complements the pork’s natural flavor. Serve with a side of roasted root vegetables for a rustic, comforting meal.
Coconut Curry Variation
Replace the chicken broth with coconut milk and add curry powder to the roux. The creamy, mildly spiced sauce turns the dish into a tropical delight. Pair it with jasmine rice for an exotic twist.
Sweet & Smoky BBQ
Finish the gravy with a splash of barbecue sauce and a pinch of brown sugar. The sweet, smoky undertones will transform the dish into a crowd‑pleasing barbecue classic. Serve with coleslaw to cut through the richness.
Miso Glaze
Stir in a tablespoon of white miso into the gravy for an umami boost. The miso adds depth and a subtle saltiness that pairs well with the pork’s natural flavor. This variation is especially good for a Japanese‑inspired dinner.
Lemon‑Garlic Crunch
Add minced garlic to the coating and finish the gravy with a squeeze of lemon juice. The bright citrus and aromatic garlic create a lively, fresh flavor profile. This version is ideal for a light summer dinner.
Storing and Bringing It Back to Life
Fridge Storage
Cool the pork and gravy completely before refrigerating. Store in an airtight container for up to 3 days. The coating will stay crisp, and the gravy will thicken slightly, making it even richer.
Freezer Friendly
Wrap the pork tightly in plastic wrap and place it in a freezer bag. Freeze for up to 3 months. Thaw overnight in the fridge before reheating to maintain texture.
Best Reheating Method
Reheat in a skillet over medium heat, adding a splash of water to steam the pork back to juiciness. The gravy will need a quick stir to restore its silky consistency. Avoid microwaving, which can make the coating soggy.