I remember the night I almost turned a simple dinner into a culinary catastrophe. The skillet was smoking, the chicken had turned into a rubbery slab, and my kitchen smelled like burnt ambition. I stared at the charred mess, feeling the sting of disappointment, and whispered, “I’ll never let this happen again.” That moment sparked a relentless pursuit of the perfect honey‑soy chicken thigh stir‑fry, a dish that would rescue me from future kitchen disasters.
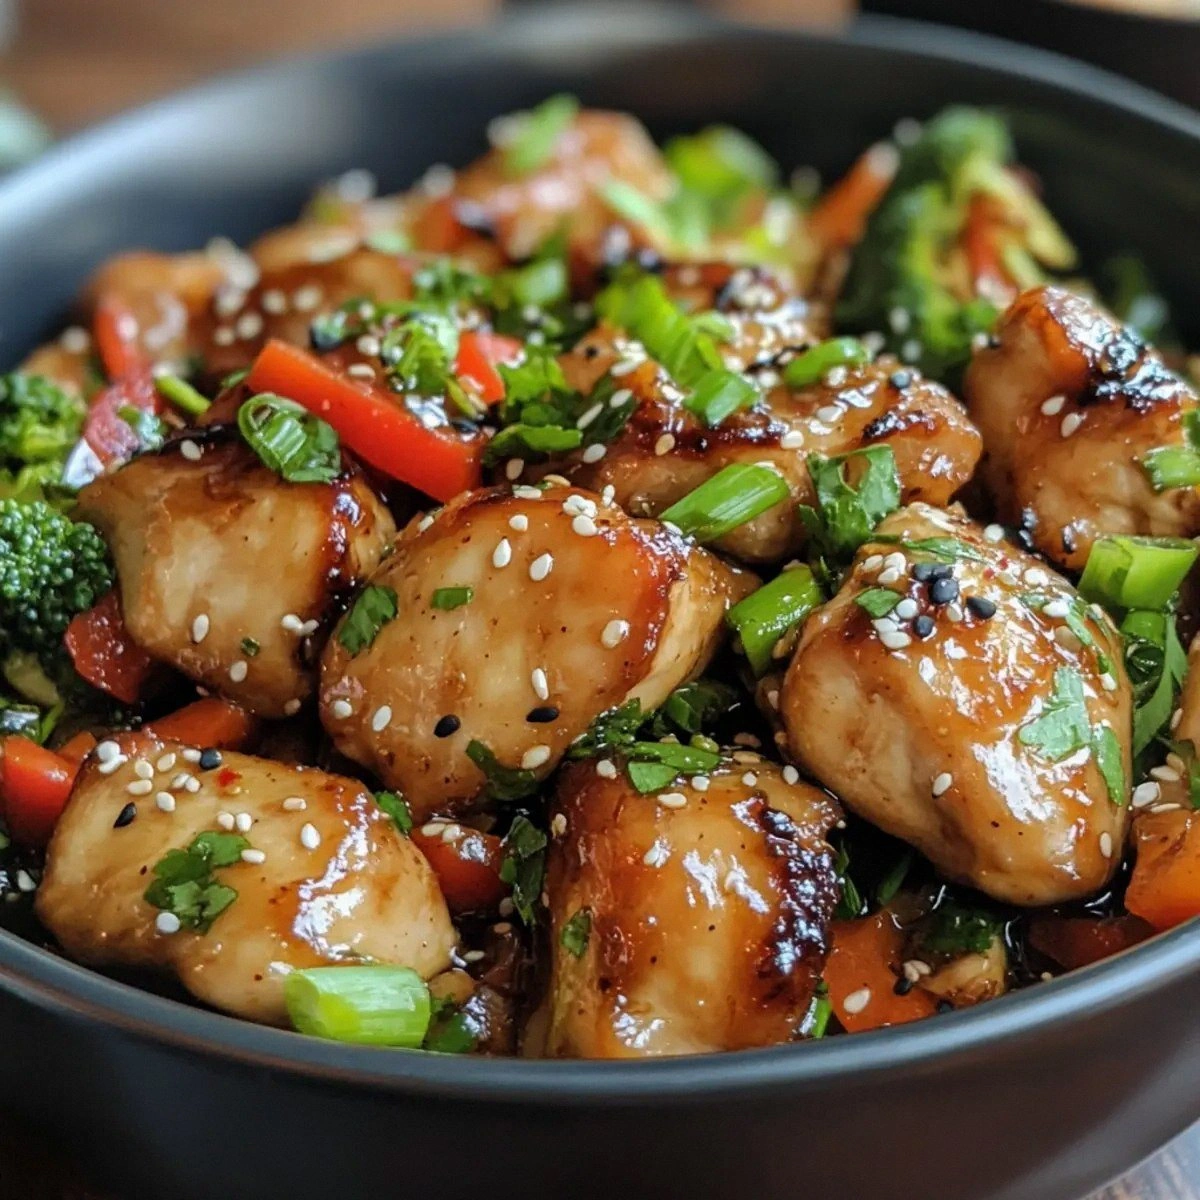
Imagine a plate where the chicken is tender enough to melt in your mouth, the sauce glistens like a glossy lacquer, and every bite bursts with a harmonious blend of sweet, savory, and a hint of heat. The aroma rises like a fragrant cloud, mingling the sharpness of garlic, the warmth of ginger, and the umami richness of soy. When you take your first bite, the crunch of fresh vegetables snaps against the silky sauce, creating a delightful contrast that keeps you coming back for more. I dare you to taste this and not go back for seconds, because the flavor profile is so complete it feels like a culinary hug.
What sets this version apart isn’t just the ingredients; it’s the way they’re orchestrated. The sauce is a velvety coating that clings to every morsel, the chicken thighs remain juicy thanks to a precise searing technique, and the vegetables maintain a crisp bite that balances the softness of the meat. Most recipes get this completely wrong, often overcooking the veggies or under‑seasoning the sauce. Here, I’ve found the sweet spot where everything sings together, and I promise you this is hands down the best version you’ll ever make at home.
Picture yourself pulling this out of the pan, the kitchen filling with an intoxicating scent that makes your stomach growl with anticipation. The sizzling sound as the sauce thickens is like a drumbeat that signals the final act of the show. I’ll be honest—before I perfected this recipe, I ate half the batch before anyone else got a taste. The moment you see those glossy, caramelized edges, you’ll know you’re in the presence of a masterpiece.
Now, let’s dive into the details. I’ll walk you through every single step, revealing the tricks that elevate this dish from ordinary to extraordinary. By the end, you’ll wonder how you ever made it any other way. So grab your apron, preheat that skillet, and let’s get cooking.
What Makes This Version Stand Out
- Flavor: The sauce balances the sweetness of honey with the deep umami of soy, creating a complex taste that lingers on the palate. Each bite is a layered experience, from the initial sweetness to the subtle heat of chili flakes.
- Texture: The chicken thighs remain succulent, thanks to a quick sear that locks in juices, while the vegetables stay crisp yet tender. The sesame seeds add a delightful crunch that breaks the uniformity.
- Ease: With a single pan and minimal prep time, this recipe fits perfectly into a busy weeknight routine. No need for advanced techniques—just simple sautéing and simmering.
- Uniqueness: The addition of fresh ginger and a splash of sesame oil gives it a distinctive aroma that sets it apart from typical stir‑fry dishes.
- Crowd‑pleaser: The vibrant colors and balanced flavors make it a hit at dinner parties or family meals. It’s the kind of dish that gets everyone talking.
- Quality Focus: Using boneless, skinless chicken thighs ensures a rich flavor while keeping the dish lean. The fresh veggies bring natural sweetness and crunch.
- Cooking Method: The technique of caramelizing the sauce in the same pan that sears the chicken eliminates the need for extra utensils and reduces cleanup.
- Make‑Ahead: The dish can be prepared a few hours ahead; the flavors deepen, and reheating is quick and effortless.
Alright, let's break down exactly what goes into this masterpiece.
Inside the Ingredient List
The Flavor Base
The sauce is the heart of this dish, combining soy sauce, honey, and a splash of sesame oil to create a glossy, savory glaze. Soy sauce provides the essential umami foundation, while honey adds a natural sweetness that balances the saltiness. Sesame oil contributes a nutty aroma that elevates the overall profile. If you omit the honey, the sauce becomes too salty and loses its caramelized sheen.
A quick tip: Use a low‑sodium soy sauce if you’re watching salt intake; the honey compensates for the reduced saltiness. The ratio of honey to soy is critical—too much honey can overpower the savory notes, while too little may leave the sauce thin. For an extra layer of flavor, add a splash of rice vinegar at the end of cooking; it brightens the sauce without adding acidity.
The Texture Crew
Chicken thighs bring a juicy, tender texture that contrasts beautifully with the crisp vegetables. The bell peppers, broccoli florets, and carrots each contribute distinct mouthfeel—sweet crunch, earthy bite, and firm snap, respectively. The green onions add a subtle oniony finish that rounds out the dish. Sesame seeds finish with a satisfying crunch and a nutty finish.
If you prefer a softer bite, blanch the broccoli and carrots for 1‑2 minutes before adding them to the pan. This will help them stay tender and reduce the time they spend in the hot sauce. Conversely, if you love a crunchier texture, keep them raw; they’ll crisp up slightly in the pan but retain their bite.
The Unexpected Star
Fresh ginger isn’t just a garnish; it infuses the entire dish with a warm, peppery kick that complements the sweetness of honey. The ginger’s aromatic oils release during cooking, creating a fragrant steam that permeates the sauce. Skipping ginger will make the dish feel flat and less complex.
If you’re allergic or simply don’t have ginger on hand, a pinch of ground ginger or a teaspoon of ginger paste can serve as a decent substitute. However, the fresh zest provides a brighter, cleaner flavor that’s hard to replace.
The Final Flourish
Red chili flakes add a subtle heat that lingers without overwhelming the dish. The amount can be adjusted based on your spice tolerance—double it for a more fiery version or omit for a milder taste. The green onions and sesame seeds are added at the end to preserve their bright color and crunchy texture.
When plating, drizzle a little extra sauce over the top and scatter a few sesame seeds for visual appeal. A squeeze of fresh lime can also brighten the dish, but keep it optional to avoid altering the core flavor profile.
Everything's prepped? Good. Let's get into the real action.
The Method — Step by Step
- Prep the Chicken: Pat the chicken thighs dry with paper towels. Slice them into bite‑sized pieces, then season lightly with salt and pepper. This simple step ensures even cooking and a quick sear.
- Heat the Pan: Place a large wok or skillet over medium‑high heat and add the tablespoon of vegetable oil. Let the oil shimmer; when it starts to lightly smoke, the pan is ready.
- Sear the Chicken: Add the chicken to the pan in a single layer. Do not crowd the pan; if necessary, cook in batches. Sear for 3‑4 minutes on each side until a golden crust forms and the interior is no longer pink.
- Set Aside: Transfer the seared chicken to a plate and cover loosely with foil to keep warm. This step frees the pan for the aromatics.
- Sauté Aromatics: Reduce heat to medium and add the minced garlic and grated ginger. Cook until fragrant, about 30 seconds, stirring constantly to avoid burning.
- Add Vegetables: Toss in the bell peppers, broccoli, and carrots. Stir‑fry for 3‑4 minutes until the vegetables are bright green and just tender. The vegetables should still have a slight crunch.
- Deglaze and Simmer: Pour in the soy sauce and honey, stirring to lift any browned bits from the pan. Bring to a gentle simmer and let the sauce thicken slightly, about 2 minutes.
- Reintroduce Chicken: Return the chicken to the pan and stir to coat with the sauce. Add the red chili flakes and a splash of sesame oil. Cook for an additional 2 minutes, allowing the flavors to meld.
- Finish with Garnish: Sprinkle the green onions and sesame seeds over the top. Give one final stir, then remove from heat.
- Serve: Plate the stir‑fry over steamed rice or noodles, drizzle any remaining sauce, and enjoy the glossy, savory masterpiece.
That’s it—you did it. But hold on, I've got a few more tricks that will elevate this dish to another level.
Insider Tricks for Flawless Results
The Temperature Rule Nobody Follows
Cooking at the right temperature is crucial. If the heat is too low, the chicken will steam rather than sear, losing that coveted crust. If it’s too high, the sauce will burn before the vegetables cook through. The sweet spot is medium‑high for searing and medium for simmering the sauce.
Why Your Nose Knows Best
Before adding the sauce, pause and sniff the pan. A faint, nutty aroma indicates the oil has reached the ideal temperature. This sensory cue ensures your chicken will brown evenly without burning.
The 5‑Minute Rest That Changes Everything
After searing the chicken, let it rest for 5 minutes. This allows the juices to redistribute, keeping the meat moist. A quick rest also prevents the pan from becoming overcrowded when you reintroduce the chicken.
The Quick Toss Technique
When adding vegetables, use a quick toss rather than a slow stir. This technique ensures the vegetables retain their color and firmness, preventing them from becoming mushy.
The Final Sauce Splash
Right before serving, drizzle a splash of sesame oil. This adds a glossy sheen and a subtle nutty flavor that rounds out the dish. The aroma of sesame oil is a subtle reminder of the dish’s Asian roots.
Creative Twists and Variations
This recipe is a playground. Here are some of my favorite ways to switch things up:
Coconut Curry Twist
Replace the soy sauce with coconut aminos and add a splash of coconut milk. The result is a creamy, tropical version that pairs wonderfully with jasmine rice.
Spicy Pineapple Kick
Add diced pineapple and a dash of sriracha for a sweet‑spicy explosion. The pineapple’s acidity cuts through the richness of the sauce, creating a balanced flavor.
Mediterranean Flair
Swap the sesame oil for olive oil, use Kalamata olives, and finish with a squeeze of lemon. This version leans into Mediterranean flavors while maintaining the core honey‑soy base.
Vegetarian Version
Replace the chicken with tofu or tempeh. Marinate the protein in the sauce for 15 minutes before cooking to infuse maximum flavor.
Gluten‑Free Option
Use tamari instead of soy sauce and ensure the honey is gluten‑free. This keeps the dish safe for those with celiac disease or gluten sensitivity.
Low‑Carb Takeaway
Omit the honey and reduce the sauce to a simple soy‑ginger mixture. Pair with cauliflower rice for a low‑carb, high‑protein meal.
Storing and Bringing It Back to Life
Fridge Storage
Store leftovers in an airtight container for up to 3 days. The sauce will thicken slightly, but you can reheat it gently to restore its glossy consistency. Keep the vegetables separate if you prefer them crisper.
Freezer Friendly
Freeze the dish in portions for up to 2 months. Thaw overnight in the fridge, then reheat on the stove or in a microwave until steaming hot. Add a splash of water or broth to prevent dryness.
Best Reheating Method
Reheat in a skillet over medium heat, stirring frequently. A teaspoon of water or broth helps to loosen the sauce, making it silky again. Finish with a quick drizzle of sesame oil for that fresh aroma.