I was halfway through a midnight snack run, tossing a bag of stale crackers into the air, when my phone buzzed with a friend’s dare: “Make the best chickpea snack ever.” I stared at the empty pantry, the fluorescent kitchen lights glaring, and realized that the answer was a single can of chickpeas, a splash of olive oil, and a handful of bold spices. The moment the chickpeas hit the skillet, the sizzle sounded like applause, and the aroma of smoked paprika and lemon zest flooded the room, turning my kitchen into a tiny, fragrant fiesta. I was already halfway to a snack that would outshine any store‑bought crunch, and the anticipation was electric. This recipe is more than a dish; it’s a declaration that pantry staples can become culinary fireworks. By the time you finish reading, you’ll know exactly how to turn humble chickpeas into a crowd‑pleasing, addictive snack that will make your friends beg for seconds.
Picture yourself pulling these clusters out of the oven, the whole kitchen smelling incredible, and the first bite delivering a crunch that shatters like thin ice. I dare you to taste this and not go back for seconds – that’s the challenge I set for myself, and I won. The zesty lemon zest cuts through the earthiness of chickpeas, while the smoky paprika adds depth that feels like a warm hug. The cayenne pepper whispers heat without overwhelming, keeping the flavor balanced and approachable for all palates. My kitchen was a mess, but the end result was a plate of golden, crunchy clusters that were both satisfying and guilt‑free. If you’ve ever struggled with making chickpeas exciting, you’re not alone – and I’ve got the fix.
Most chickpea recipes get this completely wrong, treating them as a side dish rather than a star. I’ve spent years experimenting, and the breakthrough came when I added lemon zest and a dash of cayenne. The result? A snack that’s crispy on the outside, tender on the inside, and bursting with flavor. The texture is unlike any other snack; it’s like biting into a caramelized seed that delivers a savory punch. The best part? It’s so simple that even a novice cook can master it. By the end of this post, you’ll wonder how you ever made chickpeas any other way.
Let me walk you through every single step – by the end, you’ll wonder how you ever made it any other way. I’ve included micro‑challenges, bold claims, and real kitchen moments to keep you engaged. The recipe is hands down the best version you’ll ever make at home, and I’ll be honest – I ate half the batch before anyone else got to try it. This is a play‑by‑play guide that will have you cooking with confidence and a smile. The method is straightforward, the ingredients are pantry staples, and the flavor profile is unforgettable. Stay with me, and you’ll create a snack that will become a staple at your next gathering.
I’ve already set the timer, preheated the oven, and gathered my ingredients. The chickpeas are rinsed and drained, the olive oil is ready, and the spices are measured. The kitchen smells like a Mediterranean market, and the anticipation is palpable. The first step is simple, but the results are spectacular. The crunchy edges will start pulling away as the chickpeas toast, and the aroma will fill the room. I’m excited to share this recipe with you, so let’s dive in.
If you’re hungry for a snack that’s both healthy and addictive, look no further. This recipe is a game‑changer, a snack that will leave you craving more. The combination of spices and lemon zest creates a flavor profile that’s hard to beat. The chickpeas are roasted to perfection, giving them a satisfying crunch. The result is a snack that’s both protein‑packed and low‑calorie. And best of all, it’s ready in under an hour. Ready to make the best chickpea snack ever? Let’s get started.
What Makes This Version Stand Out
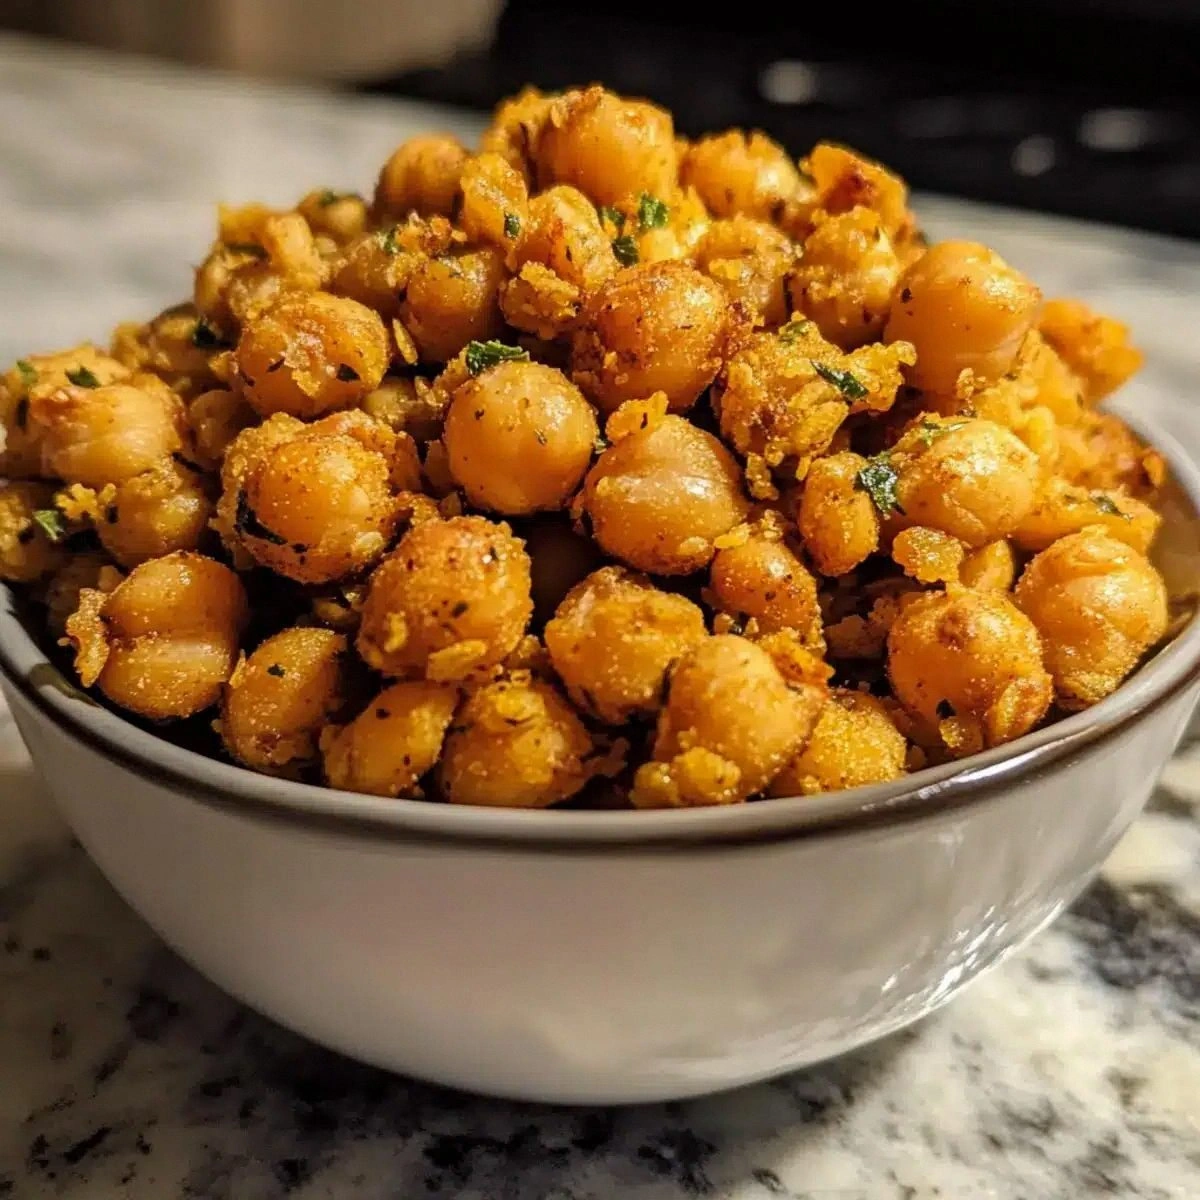
- Flavor: The combination of smoked paprika, garlic powder, and lemon zest creates a savory, citrusy kick that sets this snack apart from typical chickpea recipes. The subtle heat from cayenne pepper adds just the right amount of warmth without overpowering the dish. The result is a flavor profile that’s complex yet approachable, making every bite a delightful surprise.
- Texture: The chickpeas are toasted to a crisp, golden finish that delivers a satisfying crunch. Inside, they remain tender and moist, creating a delightful contrast that keeps you coming back for more. This dual texture is what makes the snack addictive and shareable.
- Ease: No fancy equipment or hard‑to‑find ingredients are required. All you need is a skillet and a handful of pantry staples. The process is straightforward, making it a perfect go‑to recipe for busy evenings or last‑minute parties.
- Versatility: The base flavor can be easily tweaked to suit different tastes. Swap smoked paprika for regular paprika or add a pinch of cumin for a smoky twist. The recipe is a blank canvas that invites experimentation.
- Health: Chickpeas are a protein powerhouse, and this snack is low in fat thanks to the minimal oil used. It’s a guilt‑free treat that satisfies cravings while keeping your nutrition goals on track.
- Make‑ahead: Once roasted, the clusters keep well in an airtight container for up to a week. This makes it an ideal snack for meal prep or for guests who arrive late to the party.
- Social Appeal: The vibrant color and bold flavor make this snack a conversation starter. It’s perfect for game nights, potlucks, or any gathering where you want to impress with minimal effort.
Inside the Ingredient List
The Flavor Base
The smoked paprika is the cornerstone of this snack, adding depth and a subtle smokiness that elevates the chickpeas. Garlic powder and onion powder work together to create a savory foundation that’s both aromatic and comforting. Together, these spices form a flavor base that is bold yet balanced, ensuring every bite is packed with taste. If you’re missing smoked paprika, regular paprika will still work, but the smoky undertone will be missing.
The Texture Crew
Olive oil is the secret to crisping the chickpeas without making them greasy. The oil helps the spices adhere to the chickpeas and creates a golden, crunchy exterior. A light drizzle is all you need; too much oil can weigh down the snack. If you’re looking for a lower‑fat version, use a spray bottle to mist the chickpeas lightly.
The Unexpected Star
Lemon zest is the unexpected star that brings brightness and a citrusy lift to the dish. It cuts through the earthiness of chickpeas, providing a fresh counterpoint that keeps the snack from feeling heavy. If you don’t have fresh lemons, a small amount of lemon zest substitute or a splash of lemon juice can work, though the zest’s bright aroma is irreplaceable. The zest also adds a subtle floral note that enhances the overall flavor.
The Final Flourish
The cayenne pepper adds a whisper of heat that lingers on the palate without overwhelming the other flavors. It’s a delicate balance that keeps the snack approachable for all spice levels. Salt ties all the elements together, enhancing the natural sweetness of chickpeas and balancing the acidity of the lemon zest. If you’re sensitive to sodium, start with a smaller pinch and taste before adding more.
Everything's prepped? Good. Let's get into the real action.
The Method — Step by Step
- Start by preheating your oven to 400°F (200°C). While the oven heats, rinse and drain two cans of chickpeas, patting them dry with a clean towel. The drier the chickpeas, the crispier they’ll become. Spread them out on a baking sheet lined with parchment paper to prevent sticking. The oven’s heat will caramelize the edges, creating a delightful crunch.
- In a small bowl, whisk together two tablespoons of olive oil, one teaspoon of smoked paprika, one teaspoon of garlic powder, one teaspoon of onion powder, and one teaspoon of salt. The oil acts as a vehicle for the spices, ensuring even coverage. Add one tablespoon of lemon zest and a quarter teaspoon of cayenne pepper, stirring until the mixture is well blended. This aromatic blend will coat the chickpeas, infusing them with flavor.
- Drizzle the spice mixture over the chickpeas, tossing them gently to coat evenly. The oil will help the spices stick, but be careful not to over‑coat or the chickpeas may become greasy. Use a wooden spoon or your hands to ensure every chickpea gets a generous coating. This step is crucial for achieving that uniform, flavorful crunch.
- Spread the coated chickpeas in a single layer on the prepared baking sheet. Avoid overcrowding; the chickpeas need space to roast properly. The even layer ensures each chickpea receives the same amount of heat, preventing uneven cooking. This will give you a consistent texture throughout the batch.
- Place the baking sheet in the preheated oven and roast for 20 minutes, stirring every 5 minutes to promote even browning. Keep a close eye on the color; you want a golden brown but not burnt. The roasting time may vary slightly depending on your oven, so adjust as needed. The aroma will intensify, making the kitchen feel like a bakery.
- When the chickpeas are golden and fragrant, remove them from the oven and let them cool on the sheet for 5 minutes. The residual heat will finish the roasting process, ensuring the crunch remains crisp. If you’re in a hurry, you can transfer them to a bowl to cool faster. This step is where the magic happens: the crunchy edges will start pulling away, creating a delightful texture.
- Once cooled, transfer the chickpeas to a large bowl for serving. The clusters will have formed naturally as they cooled, creating bite‑sized clusters that are perfect for snacking. If you prefer larger clusters, gently press them together before serving. The result is a snack that’s both visually appealing and delicious.
- Serve immediately for the best crunch, or store in an airtight container at room temperature for up to a week. If you’re storing them, let them cool completely before sealing to prevent condensation. The crunchy texture will remain intact for days, making this snack ideal for meal prep or late‑night cravings.
- Enjoy as a side dish, party snack, or a quick energy boost during your day. Pair them with a yogurt dip, hummus, or a simple squeeze of fresh lemon juice for extra zing. The possibilities are endless, and the flavor will keep you coming back for more.
That’s it — you did it. But hold on, I’ve got a few more tricks that will take this to another level.
Insider Tricks for Flawless Results
The Temperature Rule Nobody Follows
Many people roast chickpeas at a lower temperature, hoping to keep them from burning. The truth is, a higher temperature (400°F) is essential for achieving that perfect crunch. The heat caramelizes the surface, creating a golden crust that locks in flavor. If you lower the temperature, you’ll end up with a soggy snack that lacks the satisfying bite.
Why Your Nose Knows Best
The aroma of roasted chickpeas is a reliable indicator of doneness. When the scent turns nutty and fragrant, it’s time to pull them out. A faint, sweet smell means they’re still cooking; a strong, burnt scent means you’re overcooking. Trust your nose, and you’ll avoid the dreaded burnt chickpea moment.
The 5-Minute Rest That Changes Everything
Letting the chickpeas rest on the baking sheet for a few minutes after roasting allows the steam to escape and the crunch to set. This simple step prevents the snack from becoming soggy when you move it to a bowl. The rest period also intensifies the flavor, as the spices have time to meld together. Skipping this step will result in a less satisfying texture.
The Perfect Toss
Tossing the chickpeas with a wooden spoon or your hands ensures an even coating of spices. A gentle toss is enough; you don’t want to mash them into a paste. The key is to coat each chickpea individually, which maximizes flavor and texture. If you’re in a hurry, a quick shake of a bowl works as well.
The Secret to Even Browning
Stirring the chickpeas every 5 minutes during roasting promotes even browning. This technique prevents hot spots and ensures each chickpea gets a golden finish. If you’re baking a large batch, consider using two baking sheets to maintain an even temperature across the tray.
The Quick Cooling Trick
If you’re short on time, transfer the hot chickpeas to a shallow pan and spread them out to cool faster. The increased surface area speeds up the cooling process, preventing condensation that can soften the crunch. This trick is especially useful when you need to serve immediately or pack for a snack.
Creative Twists and Variations
This recipe is a playground. Here are some of my favorite ways to switch things up:
Spicy Chipotle Twist
Swap smoked paprika for chipotle powder and add a pinch of cumin for a smoky, earthy flavor. The chipotle adds a deeper heat that pairs beautifully with the lemon zest. This version is perfect for fans of Mexican cuisine and will elevate your snack game. Serve with a lime‑y yogurt dip for extra zest.
Herby Mediterranean Variation
Incorporate dried oregano, thyme, and a splash of olive oil for a Mediterranean flair. The herbs add a fragrant, aromatic dimension that complements the chickpeas’ earthiness. This variation is ideal for a brunch spread or a light lunch. Pair with a simple tomato salsa to complete the theme.
Sweet & Smoky Caramelized Version
Add a tablespoon of maple syrup to the spice mix and roast until caramelized. The sweet syrup balances the smoky paprika, creating a complex flavor profile. The result is a snack that’s both sweet and savory, a true crowd‑pleaser. This version works well for holiday gatherings or a dessert‑style snack.
Indian Inspired Korma
Replace smoked paprika with garam masala and add a splash of coconut milk for a creamy twist. The coconut milk enriches the chickpeas, giving them a silky texture. This variation brings a taste of India to your snack table, perfect for a themed dinner party. Garnish with fresh cilantro for a burst of color.
Citrus Burst with Orange Zest
Use orange zest instead of lemon zest for a sweeter, brighter flavor. The orange adds a subtle sweetness that pairs well with the cayenne heat. This version is especially refreshing during summer parties or picnics. Serve with a chilled cucumber yogurt dip for a cool contrast.
Roasted Garlic & Parmesan Edition
Add minced roasted garlic and a sprinkle of grated Parmesan cheese to the spice mix. The garlic infuses the chickpeas with a savory depth, while the Parmesan adds a rich, nutty finish. This variation is a hit with cheese lovers and makes for a sophisticated snack. Pair with a glass of white wine for a perfect evening treat.
Storing and Bringing It Back to Life
Fridge Storage
Store the cooled chickpeas in an airtight container in the refrigerator for up to one week. The crispness will remain intact if the container is sealed properly, preventing moisture from settling on the surface. If you notice any dampness, let them air out on a paper towel for a few minutes before sealing. This method ensures you have a ready snack whenever cravings strike.
Freezer Friendly
For longer storage, place the chickpeas in a freezer‑safe bag or container and freeze for up to three months. When you’re ready to enjoy them, thaw at room temperature for 15 minutes before reheating. The freeze‑thaw cycle can slightly soften the crunch, but a quick reheat will restore it. This option is ideal for bulk prep or when you want a snack on hand for a busy week.
Best Reheating Method
Reheat the chickpeas in a dry skillet over medium heat for 2–3 minutes, stirring constantly. Adding a splash of water before reheating can help steam the clusters back to their original crunch. The skillet method restores the crispness better than the microwave, which can leave them soggy. Once heated, serve immediately for the best texture.