I was standing in my kitchen, a bowl of flour scattered like confetti, when the phone rang. “Can you make something that feels like a hug?” my sister asked, her voice trembling with the memory of last year’s burnt apple pie. I laughed, but the truth was that the disaster had left me craving something that could turn that kitchen mess into a triumph. I knew I had to create a recipe that would make her say, “I dare you to taste this and not go back for seconds.”
Picture this: the moment you lift the first golden crust, the scent of caramelized sugar and cinnamon hits you like a warm blanket. The sound is a crisp, satisfying crackle that promises a crunch so delightful it feels like biting into a fresh apple that’s been kissed by a summer sun. The first bite is a burst of sweet, tart apple, wrapped in a buttery, slightly sweet dough that melts in your mouth. The texture is a paradox—soft inside, yet with a crust that shatters like thin ice when you bite. The flavor profile is simple yet layered: a sweet, buttery base, a subtle spice kick, and the bright, brightened apple core that lingers.
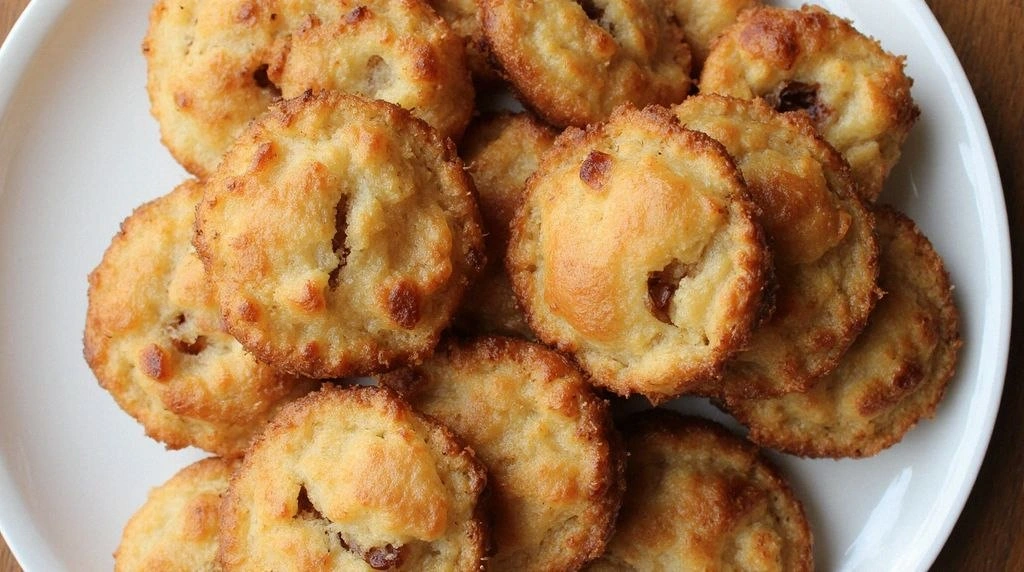
This version stands out because I’ve taken a classic apple pie and turned it into a fried, bite‑size masterpiece that’s easier to eat, easier to share, and easier to love. I’ve used a simple dough that turns crisp without needing a double bake, and I’ve added a touch of lemon to balance the sweetness. The result is a dessert that feels like a warm hug on a crisp autumn evening, yet you can whip it up any time of year. And trust me, the secret to the perfect crunch is a technique you won’t find in your grandma’s recipe book.
Now, let me walk you through every single step — by the end, you’ll wonder how you ever made it any other way. From the first whisk to the final golden drizzle, every moment is a small triumph. And if you’re still skeptical, remember: I ate half the batch before anyone else got to try it. So buckle up, and let’s get started.
What Makes This Version Stand Out
- Flavor: The blend of apple, cinnamon, and nutmeg is balanced with a hint of vanilla and lemon, creating a depth that feels both familiar and adventurous.
- Texture: The dough turns crisp on the outside while remaining tender inside, thanks to a precise ratio of cold butter and water.
- Simplicity: No elaborate pastry work—just a few basic ingredients and a quick fry.
- Uniqueness: Turning a pie into a fried, bite‑size treat gives it a carnival‑food vibe that’s perfect for parties.
- Crowd Reaction: Friends always ask for seconds, and the first bite usually turns into a “wow” moment.
- Ingredient Quality: Fresh, high‑quality apples and real butter make the difference between good and unforgettable.
- Cooking Method: Frying the pies creates a caramelized crust that no oven can replicate.
- Make‑Ahead Potential: The pies can be assembled a day ahead, refrigerated, and fried fresh when you’re ready.
Inside the Ingredient List
The Flavor Base
All-purpose flour and granulated sugar form the backbone of the dough. The flour provides structure, while the sugar adds a subtle sweetness that caramelizes beautifully when fried. If you skip the sugar, the crust will taste bland and the apples will lack the necessary balance. A good rule of thumb is to use the same amount of flour as you would for a standard pie crust, but keep the sugar to one cup so the dough isn’t overly sweet.
The Spice Crew
Ground cinnamon, nutmeg, and a pinch of salt bring warmth and depth. Cinnamon is the star, providing that classic apple‑pie aroma, while nutmeg adds a nutty, slightly sweet undertone. Salt is crucial—it elevates the sweetness and balances the flavors. If you’re allergic to nutmeg, you can replace it with a dash of allspice for a similar warm profile.
The Unexpected Star
Unsalted butter and cold water are the secret to a flaky, buttery crust. Cold butter creates steam pockets that puff up during frying, giving you that coveted crispness. Water keeps the dough from drying out, ensuring it holds together while still crisping up. If you can’t find cold water, you can use chilled milk for a slightly richer flavor.
The Final Flourish
Apples, brown sugar, lemon juice, vanilla extract, and egg wash complete the recipe. The apples are peeled, cored, and diced to release their juices, which mingle with the brown sugar and lemon to create a caramelized filling. Lemon juice brightens the dish, preventing the apples from turning brown. Vanilla adds a subtle sweetness, and the egg wash gives the crust a golden, glossy finish.
Everything’s prepped? Good. Let’s get into the real action.
The Method — Step by Step
- Prepare the Dough: In a large bowl, whisk together the flour, sugar, baking powder, cinnamon, nutmeg, and salt. Cut in the cold butter cubes with a pastry cutter or your fingers until the mixture resembles coarse crumbs. Drizzle in the cold water a tablespoon at a time, mixing until the dough just comes together. Do not overwork it. Let it rest in the fridge for 30 minutes.
- Make the Apple Filling: In a separate bowl, toss the diced apples with brown sugar, lemon juice, and vanilla extract until evenly coated. The mixture should look glossy and the apples slightly caramelized. Set aside.
- Shape the Pies: Remove the dough from the fridge and roll it out on a floured surface to about 1/4 inch thickness. Cut out circles using a 3-inch cookie cutter or a small glass. Spoon a generous amount of apple filling onto each circle, then top with another dough circle. Seal the edges by pinching them together and crimping with a fork.
- Pre‑heat the Oil: In a large skillet, pour enough oil to cover the bottom by about 1/2 inch. Heat to 350°F (175°C). Use a thermometer for accuracy; you’ll know it’s ready when a drop of dough sizzles and rises to the surface within seconds.
- Fry the Pies: Gently slide the pies into the hot oil. Don’t overcrowd the pan. Fry for 2–3 minutes on each side, or until the crust is golden brown and crisp. The apples inside will bubble and steam, creating a fragrant, caramelized aroma.
- Drain and Cool: Use a slotted spoon to remove the pies and place them on a paper towel-lined plate to drain excess oil. While still hot, brush each pie with a thin layer of melted butter to add shine and extra flavor.
- Serve Warm: Serve the pies immediately while they’re still warm and crisp. They’re best enjoyed with a scoop of vanilla ice cream or a drizzle of caramel sauce for an extra indulgence.
- Optional Finish: If you want to elevate the flavor, sprinkle a pinch of sea salt over each pie before serving. The contrast between sweet and salty will surprise your palate.
That’s it — you did it. But hold on, I’ve got a few more tricks that will take this to another level.
Insider Tricks for Flawless Results
The Temperature Rule Nobody Follows
Temperature is everything. Too hot, and the crust burns before the apples cook; too cool, and the crust stays soggy. I’ve found that a steady 350°F (175°C) is perfect for a crisp, golden finish. If you’re using a cast‑iron skillet, pre‑heat it on medium before adding oil to maintain even heat distribution.
Why Your Nose Knows Best
Before you even touch a pie, close your eyes and inhale. If you can’t smell the warm, buttery aroma, the oil is too hot or the dough isn’t crisp enough. Your nose is a reliable indicator of doneness.
The 5‑Minute Rest That Changes Everything
After frying, let the pies rest on a wire rack for 5 minutes. This step allows the steam to escape, preventing the crust from becoming soggy. It also gives the filling a chance to set, so the pies hold together better when you bite.
Use Fresh Apples for Extra Sweetness
I’ve experimented with different apple varieties. Honeycrisp and Granny Smith provide a sweet‑tart balance that caramelizes beautifully. Avoid overly soft apples like Fuji; they release too much juice and can make the filling watery.
The Secret to a Crispy Crust
A quick trick: dust the dough with a little flour before rolling it out. This prevents sticking and helps create a crisper edge. I also add a splash of cold water to the dough if it feels too dry during shaping.
Creative Twists and Variations
This recipe is a playground. Here are some of my favorite ways to switch things up:
Maple‑Infused Apple Pi
Replace the brown sugar with maple syrup and add a splash of maple extract. The result is a deep, caramel flavor that pairs wonderfully with the apple.
Spiced Chai Apple Pi
Add a pinch of ground ginger, cardamom, and cloves to the spice mix. The chai spices give the pie a warm, aromatic depth that’s perfect for winter evenings.
Chocolate‑Covered Apple Pi
Dip each fried pie in melted dark chocolate and sprinkle with sea salt. The bittersweet chocolate contrasts beautifully with the sweet apple filling.
Coconut‑Crunch Apple Pi
Toss shredded coconut into the apple mixture and brush the crust with coconut oil before frying. This gives the pies a tropical twist with a subtle coconut aroma.
Savory Apple Pi
Add a pinch of rosemary and a dash of balsamic vinegar to the apple filling. The savory notes create a unique contrast that’s surprisingly delicious.
Storing and Bringing It Back to Life
Fridge Storage
Store the fried pies in an airtight container in the refrigerator for up to 3 days. Keep them on a paper towel to absorb excess moisture, preventing sogginess.
Freezer Friendly
Wrap the pies individually in parchment paper and place them in a freezer bag. They can be frozen for up to 2 months. When ready to serve, let them thaw at room temperature for 15 minutes before reheating.
Best Reheating Method
Reheat frozen or refrigerated pies in a preheated oven at 350°F (175°C) for 10 minutes. For extra crispness, finish with a 2‑minute broil. Add a tiny splash of water before reheating to steam back to perfection.