Picture this: a late‑night kitchen, the fridge humming, and the sweet, buttery scent of freshly baked cookies drifting through the air. I was halfway through a batch of vanilla cupcakes, the batter thick as molasses, when I realized I had run out of frosting. The panic was real—what could I do to salvage the moment? That’s when the idea hit me like a jolt of electric sugar: what if I turned those leftover Red Velvet Oreos into something that would make even Santa’s sleigh jealous?
I was craving a bite that would combine the nostalgic crunch of a cookie with the indulgent smoothness of a cream cheese filling, all wrapped up in a mischievous green hue. The kitchen lights flickered, the timer buzzed, and my senses were in overdrive. The aroma of crushed cookies mingled with the faint tang of melted cream cheese, while the faint hum of the mixer became the soundtrack to my culinary rebellion. The texture promised a satisfying bite—crisp on the outside, velvety on the inside, and that green candy coating would give it a playful edge. I couldn't help but laugh at the absurdity of the idea, but the moment was too electric to ignore.
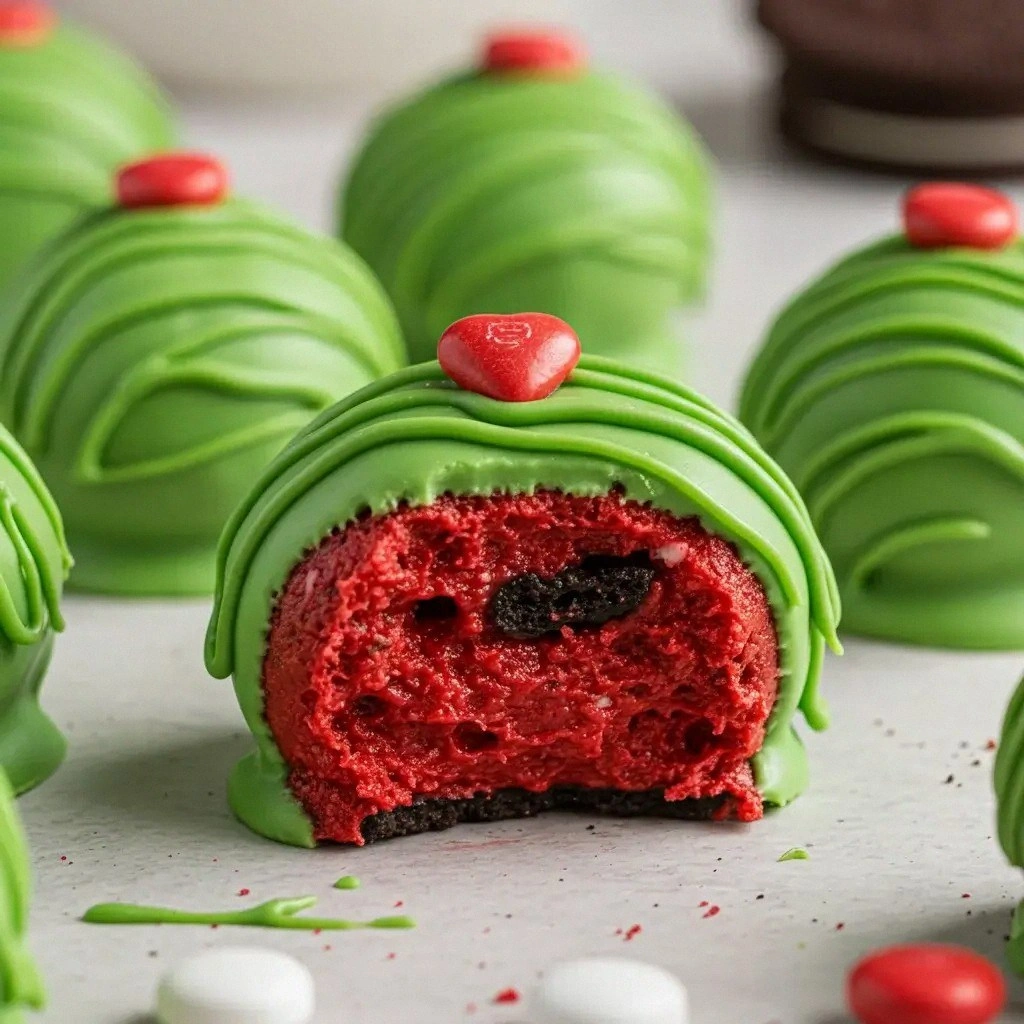
What makes this version of Grinch Oreo Balls stand out is that it’s not just a recipe; it’s a culinary dare. I dare you to taste this and not go back for seconds, because the first bite is a whirlwind of flavor and texture that will leave you craving more. The secret lies in the precise balance of ingredients, the technique of melting, and the final flourish of candy hearts that add a burst of color and crunch. It’s hands down the best version you'll ever make at home, and it’s so simple that even a novice can master it with a few easy tweaks. Let me walk you through every single step—by the end, you'll wonder how you ever made it any other way.
If you've ever struggled with creating that perfect sweet bite that feels both indulgent and playful, you're not alone—and I've got the fix. Most recipes get this completely wrong, either by over‑melted candy melts that become sticky or by under‑mixed dough that crumbles apart. Here’s what actually works: keep the Oreo crumbs moist but not soggy, temper the candy melts so they set just right, and finish with a quick chill to lock in that glossy finish. Picture yourself pulling this out of the fridge, the whole kitchen smelling incredible, and watching the green glaze reflect like a tiny emerald lake. The anticipation is half the fun, but the taste is the real payoff.
What Makes This Version Stand Out
- Flavor Fusion: The red velvet cookie base provides a subtle cocoa undertone that pairs perfectly with the sweet, buttery cream cheese. This combination creates a depth of flavor that feels both familiar and adventurous.
- Texture Triumph: The crushed Oreos give a satisfying crunch that contrasts beautifully with the smooth, creamy filling. The final candy coating adds a snap that echoes the joy of a holiday treat.
- Color Magic: The light green candy melts aren’t just for looks; they bring a fresh, minty brightness that lifts the richness of the chocolatey base.
- Simple Assembly: No baking, no frosting, just mix, roll, and chill. It’s the ultimate quick‑fix dessert for last‑minute parties or spontaneous cravings.
- Make‑Ahead Friendly: Once formed, the balls can be stored in the fridge for up to a week, making them a perfect grab‑and‑go snack.
- Kid‑Approved: The bright green glaze and candy hearts make it a visual hit, and the taste is universally loved, from toddlers to adults.
- Low‑Waste: By using leftover Oreo crumbs, you reduce kitchen waste and get more flavor out of what you already have.
- Party Perfection: The bite‑sized shape is ideal for gift baskets, holiday parties, or a whimsical dessert table.
Alright, let's break down exactly what goes into this masterpiece. We’ll dive into each ingredient, why it matters, and how you can tweak it if you’re feeling adventurous.
Inside the Ingredient List
The Flavor Base
Red Velvet Oreos are the heart of this recipe. Their signature red velvet flavor, combined with the chocolate cookie, creates a rich backdrop that feels both indulgent and comforting. If you were to skip them, the entire flavor profile would collapse into a bland, white chocolate treat. For a twist, try using a dark chocolate Oreo variant; it will deepen the cocoa notes and give the balls a more sophisticated edge.
The Texture Crew
Cream cheese is the binder that turns crunchy crumbs into a silky, cohesive filling. Its tangy profile cuts through the sweetness of the Oreos and adds a creamy mouthfeel that feels luxurious. If you’re vegan or lactose intolerant, a plant‑based cream cheese will work—just make sure it’s softened to the same consistency. The key is to avoid over‑mixing; a few lumps are fine and actually help maintain a pleasant texture.
The Unexpected Star
Light green candy melts are the star that gives these balls their signature look. They add a sweet, slightly minty flavor that balances the richness of the cookie and cream cheese. If you prefer a different color, try pink or blue candy melts for a whimsical twist. The melting point is critical—too hot and they’ll become sticky; too cold and they’ll crack. Keep them at a gentle 115°F (46°C) for the perfect glaze.
The Final Flourish
Red candy hearts are more than just decoration—they add a chewy contrast that pops when you bite. They’re also a nod to holiday traditions, making these balls perfect for Christmas or any festive occasion. If you’re looking for a different finish, try chocolate-dipped nuts or sprinkles for a crunchy or colorful twist. Just remember to coat them lightly in the melted candy so they adhere without becoming too heavy.
Everything's prepped? Good. Let's get into the real action.
The Method — Step by Step
- Step 1: Crush the Oreos. Place the 24 Red Velvet Oreos in a food processor and pulse until they resemble fine crumbs. The goal is a texture that’s fluffy yet clings together when pressed. If you don’t have a processor, wrap them in a plastic bag and crush with a rolling pin—just be patient. This step sets the foundation for the rest of the recipe.
- Step 2: Soften the cream cheese. Let the 8 oz cream cheese sit at room temperature for about 20 minutes. Softened cream cheese blends smoothly with the crumbs and prevents lumps. If you’re short on time, microwave in 10‑second bursts, stirring between each burst until it’s pliable. A silky mixture will make rolling the balls effortless.
- Step 3: Combine crumbs and cream cheese. In a large bowl, mix the Oreo crumbs with the softened cream cheese until fully incorporated. The mixture should feel like a dough that holds together when pressed. If it feels too dry, add a splash of milk or a tablespoon of heavy cream to moisten. This is the heart of the ball—get it right, and the rest follows.
- Step 4: Form the balls. Using a tablespoon or small cookie scoop, portion the mixture into 1‑inch spheres. Place them on a parchment‑lined tray and press gently to flatten. The size should be uniform for even coating. This is the moment of truth—your hands are shaping the future of this dessert.
- Step 5: Chill the spheres. Refrigerate the formed balls for 20 minutes. Chilling firms the mixture, making it easier to coat and preventing the candy melt from sagging. While they’re cooling, you can start melting the candy.
- Step 6: Melt the candy. In a microwave‑safe bowl, melt 15 oz of light green candy melts at 50% power for 30 seconds. Stir, then continue heating in 15‑second increments, stirring each time, until the mixture is smooth and glossy. Avoid overheating, or the candy will seize and become unusable.
- Step 7: Coat the balls. Dip each chilled sphere into the melted candy, ensuring it’s fully covered. Let any excess drip off before placing the ball back on parchment. While the candy is still tacky, press a red candy heart onto the top for a festive touch. The coating should set in a minute or two.
- Step 8: Final chill. Return the coated balls to the refrigerator for 10 minutes to allow the candy to harden completely. This final set gives the balls a crisp, satisfying bite. Once set, they’re ready to serve or store.
That's it — you did it. But hold on, I've got a few more tricks that'll take this to another level.
Insider Tricks for Flawless Results
The Temperature Rule Nobody Follows
The key to a glossy, crack‑free coating is maintaining the candy melt at a precise temperature. Use a candy thermometer and aim for 115°F (46°C). If the temperature dips too low, the glaze will harden before it sets on the balls; too high, and it will become sticky. I once melted candy at 140°F and the coating was tacky and uneven—lesson learned.
Why Your Nose Knows Best
Trust your senses. As you melt the candy, a sweet, buttery aroma indicates the right stage. If you notice a faint burnt scent, pull the bowl immediately and give it a quick stir. Your nose is a reliable guide, far more accurate than a timer.
The 5‑Minute Rest That Changes Everything
After coating each ball, let it rest for a full five minutes before moving it. This brief pause allows the candy to set enough to hold the heart in place, preventing it from sliding off. It’s a small step that saves you from a sticky mess.
The Crumb‑Control Trick
If you find your mixture too crumbly, add a tablespoon of milk or heavy cream. This small addition smooths the texture without making it overly wet. I’ve experimented with oat milk, and the result was a slightly lighter bite, great for dairy‑free versions.
The Chill‑Chill Method
Refrigerate the balls for 10 minutes before coating, then again for 10 minutes after. This double chill locks the shape and ensures the candy sets firmly. It also keeps the balls from melting in a hot kitchen.
Creative Twists and Variations
This recipe is a playground. Here are some of my favorite ways to switch things up:
Minty Madness
Swap the light green candy melts for mint chocolate chips. Melt them with a splash of coconut milk for a tropical twist. The result is a refreshing bite that feels like a beach vacation in your mouth.
Nutty Crunch
Add chopped pecans or walnuts into the Oreo mixture before rolling. The added crunch provides a contrasting texture, and the nuts pair well with the creamy filling. This version is great for those who love a bit of savory in their sweets.
Chocolate‑Covered Delight
After coating with green candy, dip the balls in melted dark chocolate. Let the chocolate set, then sprinkle with sea salt. The salty finish elevates the sweetness and creates a sophisticated flavor profile.
Vegan Vibes
Use a plant‑based cream cheese and vegan candy melts. The texture remains silky, and the flavor stays just as indulgent. This version is perfect for guests with dietary restrictions.
Holiday Sparkle
Replace the candy hearts with edible gold leaf or silver dust. Add a pinch of edible glitter for a sparkling effect. This gives the balls a festive, party‑ready look that will impress any guest.
Citrus Burst
Add a teaspoon of orange zest to the Oreo mixture. The citrus brightens the flavor, and the zest pairs wonderfully with the green candy coating. It’s a bright, fresh take on a classic.
Storing and Bringing It Back to Life
Fridge Storage
Store the balls in an airtight container at room temperature for up to 5 days. If you’re in a humid environment, keep them in the fridge to maintain the crisp coating. The balls will stay fresh, and the flavor will only deepen over time.
Freezer Friendly
Place the balls on a parchment‑lined tray and freeze for 2 hours, then transfer to a freezer bag. They’ll keep for up to 3 months. When ready to serve, let them thaw at room temperature for 10 minutes before enjoying.
Best Reheating Method
If the balls have become soft, give them a quick warm‑up in a 200°F (93°C) oven for 5 minutes. Add a tiny splash of water before reheating to steam back to perfection. The candy will regain its shine, and the filling will feel silky again.