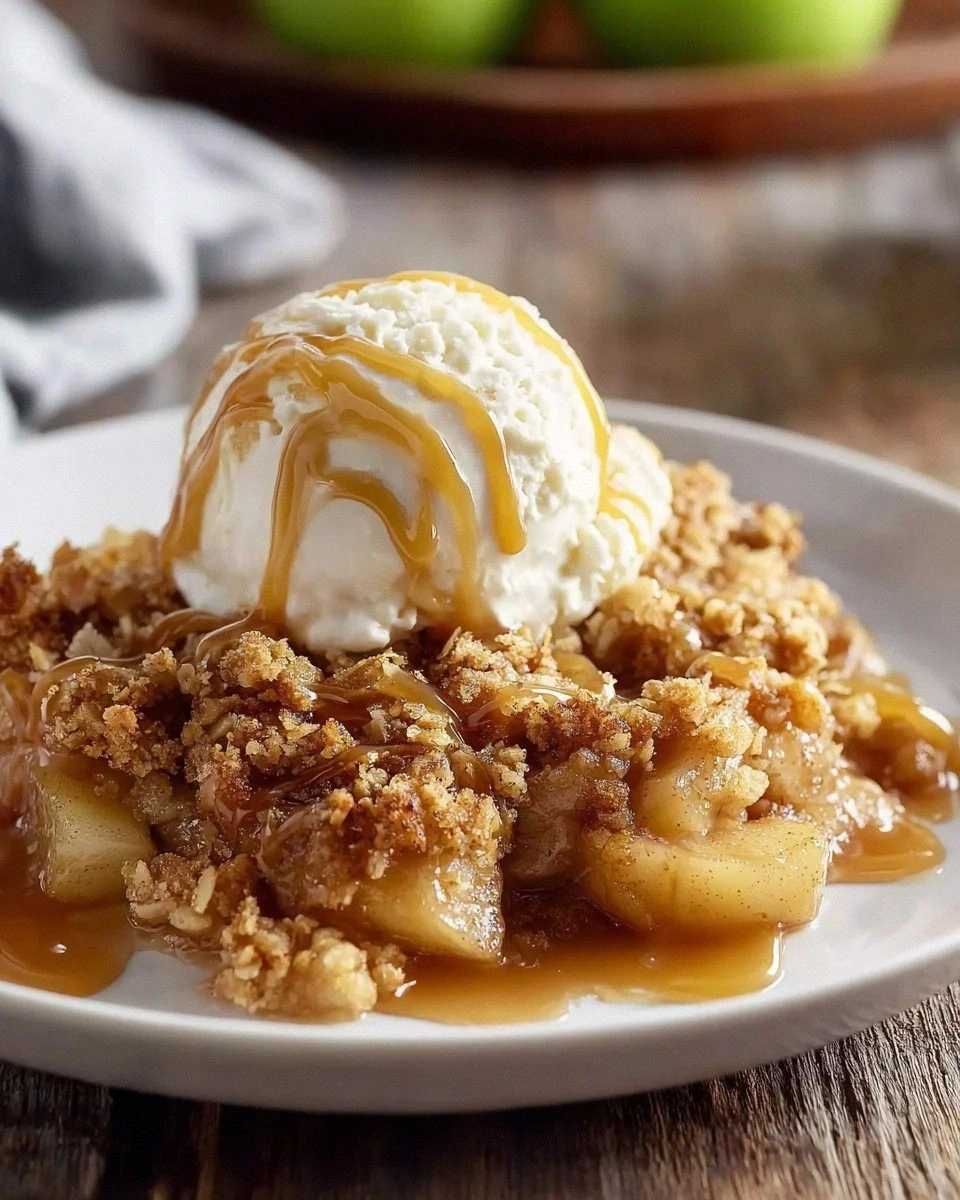
Okay, picture this: I was halfway through a marathon Netflix binge, the clock struck midnight, and a sudden craving for something that could simultaneously hug my heart and slap my taste buds awake hit me like a rogue espresso shot. I raided the pantry, found a lonely bag of cocoa, a jar of caramel sauce that was practically screaming for attention, and a handful of toffee bits that looked like edible confetti. I tossed everything into a bowl, slapped it into the oven, and the result was a cake that made the smoke alarm cheer in approval. I dare you to taste this and not go back for seconds because, honestly, it’s hands down the best version you’ll ever make at home.
The moment the batter hit the pan, the kitchen filled with a perfume that could convince even the most stoic neighbor to peek through the door – deep chocolate mingling with buttery caramel, a whisper of toasted toffee that crackled like tiny fireworks. The sound? A soft, rhythmic sigh as the batter settled, followed by that glorious “ding!” that signals the birth of something extraordinary. My fingertips tingled as the heat radiated from the oven, and the first bite? Imagine velvet hugging a crunchy caramel shell, a texture duet that sings “you’ve never lived.” If you’ve ever struggled with a soggy center or a flat flavor profile, you’re not alone — and I’ve got the fix.
What makes this cake a show‑stopper isn’t just the ingredients; it’s the method that coaxed each component into a perfect partnership. Most recipes get this completely wrong, either drowning the chocolate in too much sugar or forgetting that the toffee should stay crunchy, not turn into a mushy mess. I’ve added a secret step – a quick caramel infusion into the hot water – that locks in glossy sheen and depth, something you won’t find in any generic blog. And the best part? The recipe is simple enough for a rookie, yet sophisticated enough to impress a room full of dessert connoisseurs.
Okay, ready for the game‑changer? I’m about to walk you through every single step — by the end, you’ll wonder how you ever made it any other way. Stay with me here — this is worth it.
⚡ What Makes This Version Stand Out
- Taste: The marriage of bittersweet cocoa and buttery caramel creates a flavor depth that feels like a midnight rendezvous between two old friends.
- Texture: Every forkful delivers a crunchy toffee surprise that shatters like thin ice, followed by a moist, fudgy crumb that melts on the tongue.
- Simplicity: Only eight pantry staples and two specialty items (caramel sauce and toffee bits) are needed, making it a weekend‑ready wonder.
- Uniqueness: The hot‑water caramel infusion is a technique most home bakers overlook, giving the cake a glossy, almost glossy finish.
- Crowd Reaction: Expect gasps, “Can I have the recipe?” chants, and a line forming at the dessert table – it’s that good.
- Ingredient Quality: Using high‑quality unsweetened cocoa and real butter elevates the whole experience from “good” to “legendary.”
- Cooking Method: A single‑bowl, one‑pan approach saves you from a mountain of dishes while still delivering a bakery‑level crumb.
- Make‑Ahead Potential: This cake keeps its texture for up to three days, and you can freeze slices for a quick indulgence later.
Alright, let's break down exactly what goes into this masterpiece…
🍋 Inside the Ingredient List
The Flavor Base
All‑Purpose Flour (1 cup): This is the structural backbone, giving the cake its tender crumb while still allowing the chocolate to shine. If you skip it, you’ll end up with a dense, brownie‑like slab that’s hard to slice. For a gluten‑free twist, swap with a 1:1 blend of rice flour and tapioca starch, but expect a slightly different texture.
Unsweetened Cocoa Powder (3/4 cup): The dark, velvety soul of the cake. Choose a Dutch‑process cocoa for a richer, smoother taste; a natural cocoa will add a subtle acidity that brightens the caramel. If you accidentally grab sweetened cocoa, cut the granulated sugar by half to keep sweetness in check.
The Texture Crew
Baking Powder (1 tsp) & Salt (1/2 tsp): These tiny powerhouses control rise and flavor balance. Too much baking powder makes the cake rise like a balloon and then deflate; too little leaves it dense. Always sift them together with the flour to avoid pockets of bitterness.
Unsalted Butter (1/2 cup): The butter is the buttery whisper that makes every bite melt in your mouth. Use real European‑style butter for a richer mouthfeel. If you’re low on butter, substitute with an equal amount of coconut oil, but expect a faint coconut note.
The Unexpected Star
Caramel Sauce (1 cup): This is the liquid gold that infuses the cake with a buttery sweetness and a glossy sheen. I use a thick, sea‑salted caramel for a hint of savory contrast. If you’re feeling adventurous, swirl in a spoonful of espresso‑infused caramel for a mocha twist.
Toffee Bits (1 cup): The crunchy surprise that shatters like thin ice with each bite. They stay crisp because they’re folded in after the batter has cooled slightly, preventing them from melting into the batter.
The Final Flourish
Large Eggs (2): Eggs act as the binder, giving the cake structure and lift. Use room‑temperature eggs; cold eggs will cause the batter to seize and create lumps.
Buttermilk (1 cup): The acidity in buttermilk reacts with baking powder, creating a tender crumb and a subtle tang that cuts through the sweetness. If you don’t have buttermilk, mix 1 cup of milk with 1 tbsp lemon juice and let it sit for 5 minutes.
Granulated Sugar (1 cup): Provides the sweet backbone and helps with caramelization. For a deeper flavor, swap half the sugar with brown sugar, but keep the total volume the same.
Hot Water (1 cup): The secret weapon! When combined with caramel, it creates a glossy, fluid caramel‑water mixture that keeps the cake moist. Be careful not to use boiling water; a gentle simmer is perfect.
Everything's prepped? Good. Let's get into the real action…

🔥 The Method — Step by Step
Preheat your oven to 350°F (175°C) and grease a 9‑inch round cake pan with butter, then dust lightly with flour. This ensures the cake releases cleanly, and the edges get that golden‑brown kiss that screams “finished.” I like to line the bottom with parchment for extra confidence. Power transition: Okay, ready for the game‑changer?
In a large mixing bowl, whisk together the flour, cocoa powder, baking powder, and salt until the mixture looks like a deep, chocolatey snowstorm. Sifting eliminates lumps and aerates the dry ingredients, which is crucial for a light crumb. Tip: Give the bowl a quick tap on the counter to settle the powders evenly.
In a separate saucepan, melt the butter over medium heat, then stir in the caramel sauce until it forms a glossy pool. Once smooth, pour in the hot water (not boiling) and whisk vigorously – this is the secret caramel‑water infusion that locks in moisture. Watch Out: If the water is too hot, the caramel can separate; keep it just below a gentle simmer.
🪄 Kitchen Hack: Use a hand‑held immersion blender for this step; it emulsifies the butter and caramel instantly, giving you a silk‑smooth mixture.Add the granulated sugar to the caramel‑water mixture, whisking until the sugar dissolves completely and the mixture looks slightly thickened. This is where the aroma really starts to sing – a sweet, buttery perfume that makes you want to lick the spoon.
Crack the eggs into a small bowl, beat lightly, then whisk them into the caramel‑sugar blend. The batter should become glossy and a shade lighter. Power transition: This next part? Pure magic.
Stir in the buttermilk slowly, allowing the batter to loosen into a pourable consistency. The acidity of the buttermilk will react with the baking powder, creating tiny bubbles that promise a tender crumb. At this point, the batter should look like a deep, velvety river.
Gently fold the dry ingredient mixture into the wet batter using a rubber spatula. Use a “fold” motion, turning the bowl over itself, to keep the air bubbles intact. The batter will become thick but still glossy – that’s exactly what we want.
Now, the toffee bits! Sprinkle them over the surface of the batter and give a very gentle fold so they stay mostly on top. This ensures the toffee stays crunchy and doesn’t melt into the batter. Watch Out: Over‑mixing here will turn those crunchy gems into a soggy mess.
Pour the batter into the prepared pan, smoothing the top with a spatula. Slide the pan into the oven and bake for 30‑35 minutes, or until a toothpick inserted into the center comes out with a few moist crumbs but no wet batter. The edges should pull away slightly, and the top will have a glossy, caramel‑kissed sheen. Chef’s note: If you love a crackly top, turn the oven to broil for the last 2 minutes – just watch it like a hawk.
That's it — you did it. But hold on, I've got a few more tricks that'll take this to another level…
🏆 Insider Tricks for Flawless Results
The Temperature Rule Nobody Follows
Never bake a cake straight from the fridge. Let the batter sit at room temperature for 10‑15 minutes before you slide it into the oven. This small pause equalizes the temperature, ensuring the cake rises evenly and the caramel doesn’t seize. A friend once tried to pour cold batter straight into the oven and ended up with a sunken center that looked like a pancake disaster.
Why Your Nose Knows Best
When the cake is about 20 minutes into baking, start sniffing the kitchen. If you catch a buttery, caramel aroma with a hint of toasted cocoa, you’re on the right track. If the scent leans toward raw flour, give it a couple more minutes. Trusting your nose often saves you from over‑baking, which can dry out the crumb.
The 5‑Minute Rest That Changes Everything
Once the cake is out, let it rest in the pan for exactly five minutes before turning it onto a wire rack. This brief pause lets the steam finish the cooking process and prevents the cake from breaking apart when you invert it. I’ve seen novices flip a hot cake too early, and it collapses like a sad soufflé.
Caramel Glaze Boost
While the cake cools, melt an extra quarter cup of caramel sauce with a splash of heavy cream. Drizzle this glossy glaze over the top for an extra glossy finish that looks like a runway model’s hair. The extra caramel adds a buttery sheen and a punch of flavor that makes the cake unforgettable.
Toffee Placement Precision
Instead of mixing all the toffee bits into the batter, sprinkle half on the surface before baking and fold the other half in at the very end. This technique gives you a double‑layer crunch: one that stays on top, crackling under the fork, and another that’s hidden inside, waiting to surprise.
🎨 Creative Twists & Variations
This recipe is a playground. Here are some of my favorite ways to switch things up:
Espresso Explosion
Swap 2 tablespoons of the hot water for freshly brewed espresso. The coffee deepens the chocolate’s bitterness, creating a mocha‑like experience that’s perfect for brunch.
Sea‑Salt Caramel Dream
Add a teaspoon of flaky sea‑salt to the caramel‑water mixture before folding it in. The salt amplifies the caramel’s sweetness and adds a sophisticated crunch that balances the chocolate.
Nutty Crunch
Replace half of the toffee bits with toasted pecans or hazelnuts. The nuts bring an earthy richness and a buttery aroma that pairs beautifully with the caramel.
Fruit Fusion
Fold in a half‑cup of dried cherries or cranberries for a tart contrast. The dried fruit’s chewiness adds texture variety and a pop of color.
Gluten‑Free Glory
Use a 1:1 gluten‑free flour blend (rice flour, potato starch, tapioca) and add a tablespoon of xanthan gum to mimic gluten’s elasticity. The cake stays tender and crumbly without sacrificing structure.
❄️ Storing & Bringing It Back to Life
Fridge Storage
Wrap a whole slice tightly in plastic wrap, then place it in an airtight container. It stays fresh for up to three days, and the caramel surface stays glossy. If the cake looks a little dry, a quick brush of warmed caramel revives it.
Freezer Friendly
Slice the cake, place each piece on a parchment sheet, freeze until solid, then transfer to a zip‑top bag. It’ll keep for up to two months. When you’re ready, let it thaw at room temperature for 30 minutes, then warm in a 300°F oven for 10 minutes.
Best Reheating Method
Add a tiny splash (about a tablespoon) of water to the slice, cover loosely with foil, and heat in a 325°F oven for 8‑10 minutes. The steam created by the water brings the crumb back to its original moistness, while the caramel re‑glosses itself. Chef’s secret: A microwave works in a pinch, but the oven keeps the texture intact.