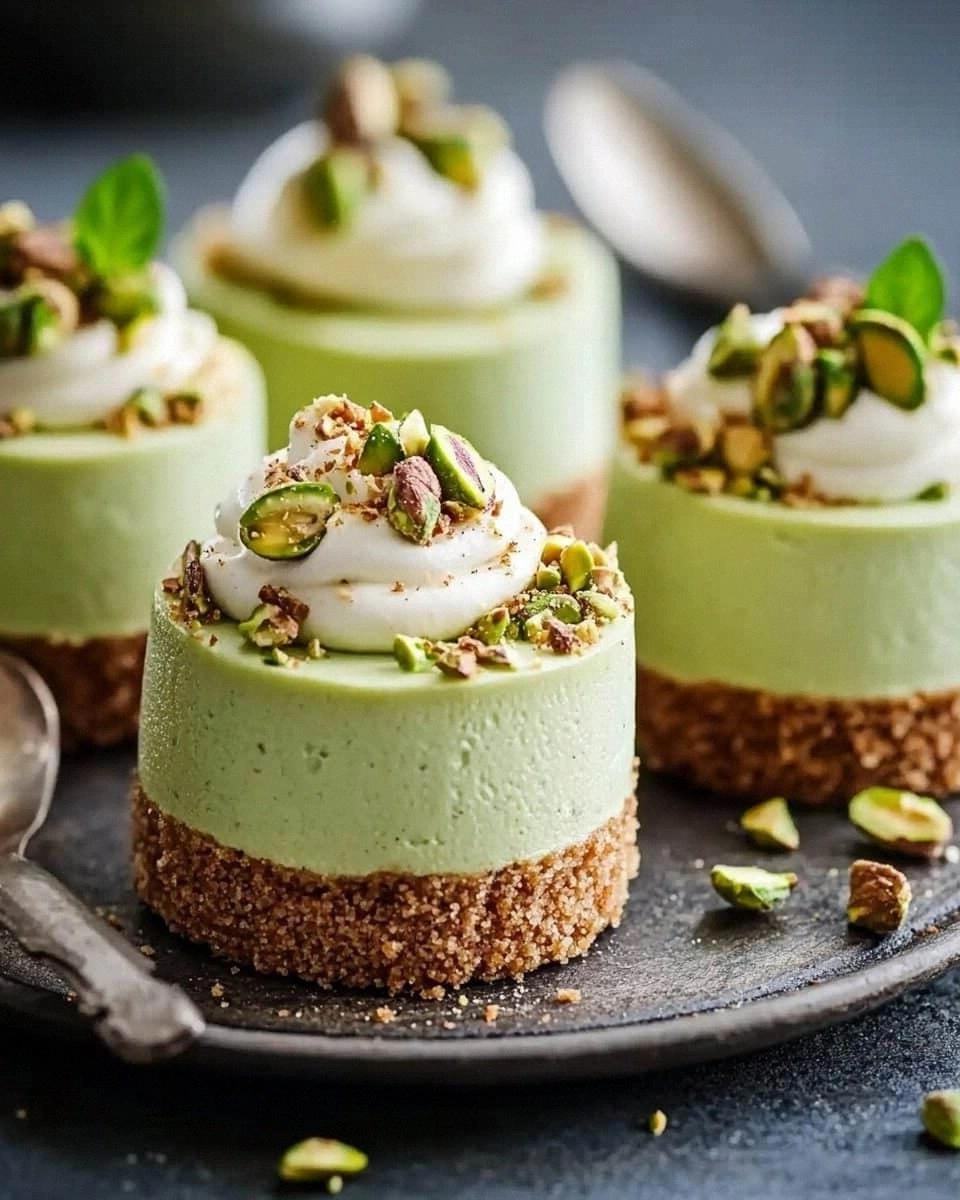
Picture this: I’m standing in my kitchen, the scent of fresh espresso curling around the room, and a sudden craving for something that feels like a dessert and a coffee shop specialty all at once. The last time I tried a pistachio cheesecake, I ended up with a dense, heavy mess that tasted more like a nut loaf than a creamy treat. I was determined to rewrite that story, and what I discovered is a recipe that turns every bite into a silky, nutty whisper of roasted pistachios balanced by the boldness of a dark roast. I dare you to taste this and not go back for seconds.
I’ll be honest—when I first mixed the crust, the butter melted so fast it felt like a secret handshake with the pan. The pistachios released their oils, turning the crumbs into a golden, fragrant base that smelled like a summer garden after rain. The filling, on the other hand, was a cloud of cream cheese, espresso, and pistachios that sang together like a well-rehearsed jazz trio. The texture is a paradox: the crust is crisp enough to crack like a brittle shell, while the interior melts on your tongue like a velvety river of chocolate. If you’ve ever struggled to balance richness with a light finish, you’re not alone—and I’ve got the fix.
What makes this version stand out is the meticulous layering of flavors and the clever use of espresso as both an ingredient and a flavor enhancer. The pistachios aren’t just nuts; they’re a source of subtle nuttiness that pairs perfectly with the deep, roasted notes of coffee. The crust is a pistachio‑infused crumble that offers a satisfying crunch, while the filling’s silky texture is achieved by folding in heavy cream and a touch of powdered sugar for that silky finish. The result? A cheesecake that feels like a decadent dessert and a sophisticated coffee shop creation rolled into one. Picture yourself pulling this out of the oven, the whole kitchen smelling incredible, and knowing that you’ve just crafted something that will wow anyone who takes a bite.
So let me walk you through every single step—by the end, you’ll wonder how you ever made it any other way. From the first whisk to the final garnish, each moment is a chance to elevate this cheesecake from good to unforgettable. And trust me, the secret lies in the small details: the timing of the espresso, the balance of sweet and nutty, and the way the crust crisps just enough to hold that luscious filling. Ready? Let’s dive in.
What Makes This Version Stand Out
- Bold Flavor: The espresso isn’t just a background note; it’s the star that cuts through the creaminess and adds depth, making the cheesecake feel like a dessert you’d order at a high‑end café.
- Texture Contrast: The pistachio crust offers a satisfying crunch while the filling melts like a cloud, creating a dynamic mouthfeel that keeps you coming back.
- Ingredient Quality: Fresh, high‑grade pistachios and heavy cream make the difference between a good cheesecake and an unforgettable experience.
- Make‑Ahead Friendly: This cheesecake can be assembled up to 24 hours before serving, allowing flavors to meld and the crust to firm up for an even better bite.
- Visual Appeal: The dark espresso swirl on top gives it a dramatic look that’s as Instagram‑worthy as it is delicious.
- Versatile: Swap the espresso for cold brew or add a splash of bourbon for an adult twist without losing the core integrity.
Alright, let’s break down exactly what goes into this masterpiece…
Inside the Ingredient List
The Flavor Base
The espresso is the heart of this cheesecake. A strong, freshly brewed espresso brings a bitter, caramelized sweetness that balances the cream cheese’s richness. If you skip it, the cheesecake will taste flat and lack that signature coffee kick. For a lighter version, replace espresso with cold brew concentrate, but keep the ratio the same to maintain intensity.
The Texture Crew
Cream cheese is the backbone of any cheesecake, but choosing a high‑fat, low‑acid variety ensures a silky mouthfeel. Heavy cream adds a subtle thickness that keeps the filling from becoming too dense. If you’re dairy‑free, substitute with coconut cream and a splash of almond milk, though the flavor profile will shift slightly.
The Unexpected Star
Pistachios are more than just a garnish—they’re a flavor pillar. Toasted pistachios release oils that give the cheesecake a nutty aroma and a slight crunch. Skipping them turns the dessert into a plain, coffee‑filled cheesecake. If you’re allergic, replace with roasted hazelnuts or almonds for a different nutty profile.
The Final Flourish
Powdered sugar is used sparingly to finish the filling, giving it a glossy sheen and a touch of sweetness without overpowering the coffee. A pinch of salt lifts the flavors and balances the sweetness. Without salt, the cheesecake can taste cloying. For an extra twist, sprinkle toasted pistachios on top before serving for an edible garnish that adds crunch and visual appeal.
Everything’s prepped? Good. Let’s get into the real action…
The Method — Step by Step
-
Begin by preheating your oven to 325°F (160°C). While the oven warms, toast the pistachio crumbs in a dry skillet over medium heat until they’re golden and fragrant. This step releases the nuts’ oils and deepens their flavor. Let them cool before mixing with melted butter and sugar to form the crust.
-
Press the crust mixture into the bottom of a 9‑inch springform pan, ensuring even coverage. The crust should be firm enough to hold the filling but not so dense that it becomes a stone. A quick tap on the counter will help it settle into place.
-
In a large bowl, beat the cream cheese until smooth and free of lumps. This is the moment of truth—any clumps will ruin the silky texture. Add the granulated sugar and continue beating until the mixture is fluffy and pale.
-
Introduce the eggs one at a time, whisking vigorously after each addition. The key is to incorporate each egg fully before adding the next to avoid curdling. The batter should be thick but pourable.
-
Fold in the vanilla extract, espresso, heavy cream, and chopped pistachios. The espresso should be at room temperature to prevent the mixture from curdling. The pistachios add a delightful crunch that contrasts with the smooth filling.
-
Pour the batter over the crust, smoothing the top with a spatula. Tap the pan gently on the counter to release any air pockets. This ensures a uniform rise and prevents cracks during baking.
-
Bake for 45 minutes, or until the edges are set and the center still has a slight wobble. The cheesecake should have a golden‑brown top and a faint coffee aroma filling the kitchen. If you’re worried about overbaking, cover the top with foil after 30 minutes.
-
Once done, remove the cheesecake from the oven and let it cool in the pan on a wire rack for 1 hour. This cooling period allows the flavors to settle and the cheesecake to firm up.
-
After cooling, run a knife around the edges, release the springform, and transfer the cheesecake to a serving plate. Chill in the refrigerator for at least 4 hours, preferably overnight, before serving. The chill intensifies the coffee flavor and makes the cheesecake easier to slice.
-
Before serving, dust the top with powdered sugar and sprinkle a handful of toasted pistachios for an extra crunch and visual pop. A drizzle of espresso reduction or a splash of amaretto can elevate the dessert to a cocktail‑style experience.
That's it — you did it. But hold on, I've got a few more tricks that'll take this to another level.
Insider Tricks for Flawless Results
The Temperature Rule Nobody Follows
Many bakers bake cheesecakes at 350°F, but that higher heat causes the edges to overcook before the center sets. Baking at 325°F allows the filling to rise evenly and develop a smooth finish. If you’re using a different oven, keep an eye on the center; a slight wobble means it’s ready.
Why Your Nose Knows Best
A well‑baked cheesecake will emit a subtle, nutty aroma that hints at espresso. If you smell a faint burnt scent, the oven is too hot. Trust your nose; it’s a reliable indicator of doneness.
The 5-Minute Rest That Changes Everything
After removing the cheesecake from the oven, let it sit uncovered for 5 minutes. This pause allows the residual heat to finish the bake without overcooking. It also prevents a sudden temperature drop that can cause cracks.
The Chill Trick
Refrigerate the cheesecake for at least 4 hours, but overnight is best. The cold sets the filling’s structure and enhances the coffee flavor, making each slice a silky, aromatic experience.
The Dusting Secret
Use powdered sugar sparingly; a light dusting brightens the surface and adds a touch of sweetness without overpowering the espresso. A pinch of cinnamon can add a warm, spicy note if you’re feeling adventurous.
Creative Twists and Variations
This recipe is a playground. Here are some of my favorite ways to switch things up:
Chocolate Espresso Swirl
Fold a tablespoon of cocoa powder into the batter for a chocolate‑coffee fusion. The chocolate complements the espresso’s bitterness, creating a richer dessert.
Almond Crunch Variation
Replace pistachios with toasted almond slivers. The nutty flavor is milder, making the cheesecake lighter and more approachable for those who prefer almonds.
Caramelized Banana Layer
Add a thin layer of caramelized banana slices on top of the batter before baking. The banana’s sweetness balances the coffee’s bitterness and adds a tropical twist.
Bourbon Infusion
Stir in a tablespoon of bourbon into the filling. The warm, vanilla‑oaked flavor pairs beautifully with the espresso, creating a sophisticated adult dessert.
Vegan Version
Use coconut cream, dairy‑free chocolate, and a plant‑based cream cheese substitute. The texture remains creamy, though the flavor profile shifts slightly toward coconut.
Mini Cheesecake Cups
Divide the batter into silicone muffin cups for individual servings. Bake at 300°F for 25 minutes. These mini cakes are perfect for parties or dessert bars.
Storing and Bringing It Back to Life
Fridge Storage
Store the cheesecake in an airtight container in the refrigerator for up to 5 days. The flavors deepen, and the texture remains silky. Keep it wrapped in parchment or plastic wrap to prevent it from absorbing fridge odors.
Freezer Friendly
Wrap the cheesecake tightly in plastic wrap and then in foil before freezing. It can be kept for up to 3 months. Thaw in the refrigerator overnight before serving.
Best Reheating Method
To revive a frozen or refrigerated cheesecake, let it sit at room temperature for 30 minutes. If you prefer a warm slice, briefly warm in a microwave at 30% power for 10 seconds; this prevents the cheesecake from becoming too firm.