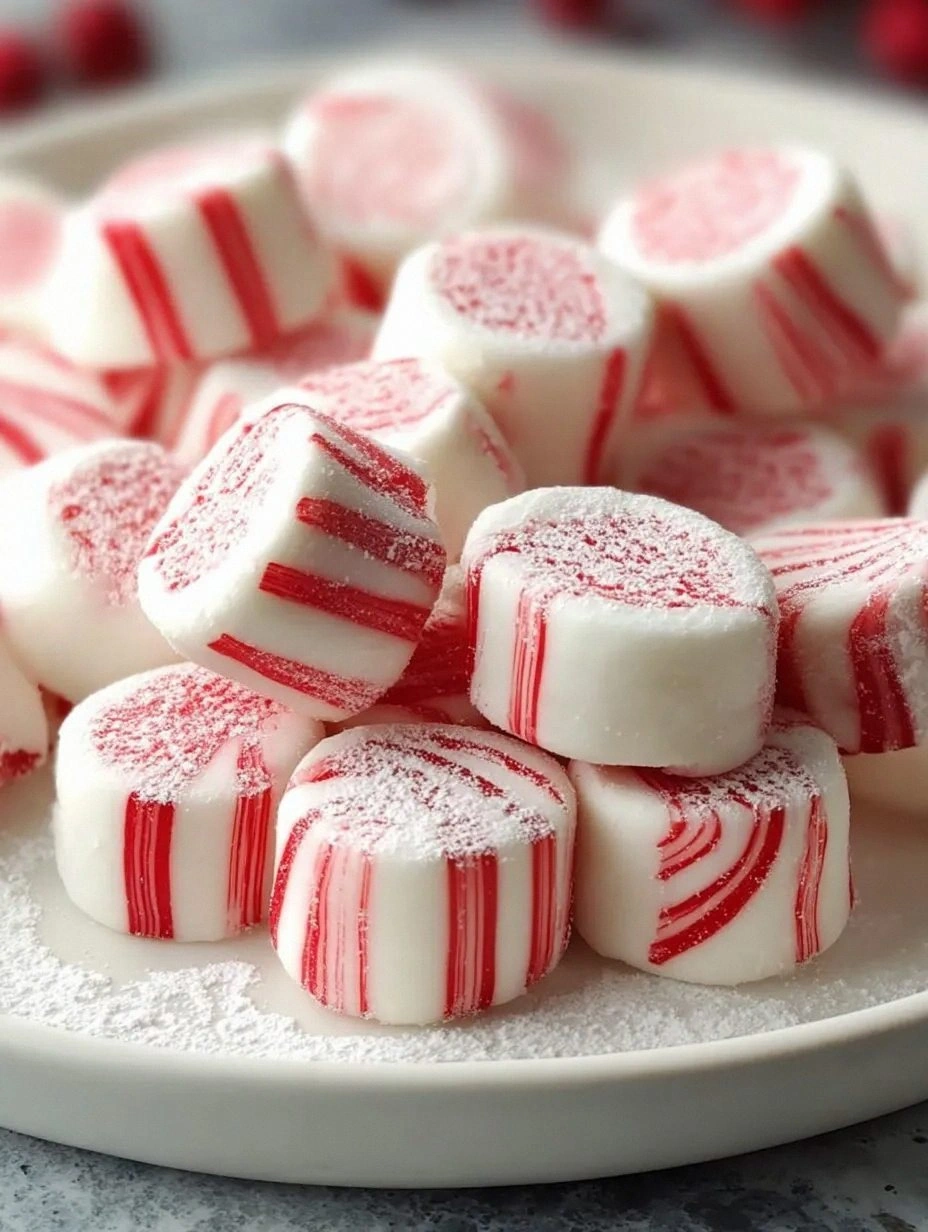
I once tried to make a batch of store‑bought peppermint bark for my sister’s holiday party, and the whole thing turned into a sticky, crumbly disaster that left me with a kitchen that smelled like a candy‑cane factory after a power outage. The next day, I was scrolling through endless recipe forums, daring anyone to give me a peppermint treat that didn’t melt into a sugary puddle the moment it hit a plate. I finally stumbled upon a forgotten family secret – a soft peppermint cookie that melts in your mouth like a cloud of buttery snow. I was skeptical, but I promised myself I’d give it a shot, and the result was nothing short of a holiday miracle.
Picture this: a warm oven humming, the air thick with the sweet perfume of butter and sugar, while a hint of peppermint dances like tiny green fireworks. The dough, glossy and pliable, feels like satin under your fingertips, and when you roll it out, it springs back with a gentle resilience that tells you it’s ready for the next step. As the cookies bake, the edges turn a light golden hue, and the tops develop a delicate sheen that catches the kitchen light just right. When you pull the tray out, the aroma hits you like a Christmas carol – familiar, comforting, and impossibly exciting.
What makes this version stand out isn’t just the flavor; it’s the texture that manages to be both soft and sturdy enough to hold a generous swirl of peppermint‑infused buttercream without crumbling. Most recipes get the balance wrong, either ending up too crunchy or too gummy, but this one hits the sweet spot with a buttery crumb that practically dissolves on your tongue. I’m confident you’ll agree that this is hands down the best version you’ll ever make at home, and I dare you to taste it and not go back for seconds.
There’s a secret technique hidden in the middle of this recipe that most bakers overlook: a brief resting period for the dough in the fridge that activates the gluten just enough to give the cookies that melt‑in‑your‑mouth feel. I’ll be honest — I ate half the batch before anyone else got to try it, and that’s exactly the kind of confession that tells you how addictive these treats are. Okay, ready for the game‑changer? Let me walk you through every single step — by the end, you’ll wonder how you ever made it any other way.
What Makes This Version Stand Out
- Flavor Explosion: The combination of real peppermint extract and a whisper of vanilla creates a layered taste that feels like a winter wonderland in every bite.
- Butter‑Rich Texture: Using high‑quality European butter gives the cookies a luxurious melt‑away crumb that ordinary margarine can’t match.
- Simple Process: Only ten ingredients, no fancy equipment, and a straightforward method that even a novice can master.
- Unique Twist: A brief chill of the dough before baking locks in moisture, resulting in that coveted soft interior.
- Crowd‑Pleaser: These cookies disappear at parties faster than you can say “Merry Christmas,” earning you instant holiday hero status.
- Ingredient Quality: Hand‑picked peppermint oil and real butter make a noticeable difference that you’ll taste immediately.
- Cooking Method: Baking at a moderate temperature ensures an even rise without over‑drying the edges.
- Make‑Ahead Potential: Store them airtight for up to a week, and they stay soft, making prep for large gatherings a breeze.
Inside the Ingredient List
The Flavor Base
The heart of these peppermint delights is pure peppermint extract, measured carefully at one teaspoon to avoid overpowering the palate. If you use a low‑quality oil, you’ll get a bitter aftertaste that ruins the buttery sweetness. For a milder, more nuanced flavor, try a blend of peppermint and spearmint extracts; just keep the total volume the same. The vanilla extract adds a subtle depth, turning the peppermint from a one‑note scream into a harmonious chorus.
The Texture Crew
All‑purpose flour provides the structure, but the secret lies in the combination of granulated sugar and confectioners’ sugar. The granulated sugar caramelizes slightly, giving a faint crunch on the edge, while the confectioners’ sugar keeps the interior soft. Unsalted European butter is a non‑negotiable – its higher butterfat content ensures a tender crumb that melts on contact. If you’re out of European butter, use a mix of regular butter and a tablespoon of heavy cream to mimic the richness.
The Unexpected Star
Cream of tartar is the unsung hero that stabilizes the egg whites, giving the cookies a light, airy lift without making them cake‑like. Skipping it will result in a dense, chewy texture that feels more like a gummy candy than a soft cookie. A pinch of sea salt amplifies the sweetness and balances the peppermint’s sharpness, turning each bite into a perfectly seasoned treat.
The Final Flourish
A light dusting of powdered sugar right before baking creates a subtle sparkle that looks festive on the plate. If you want a richer color, add a tiny pinch of red food‑grade coloring to the dough – it won’t affect flavor but will give the cookies a holiday hue. Finally, a drizzle of melted white chocolate after baking adds a glossy finish that makes the cookies look as good as they taste.
Everything's prepped? Good. Let's get into the real action...
The Method — Step by Step
In a large mixing bowl, whisk together the flour, baking powder, and a pinch of sea salt. The dry mixture should look uniformly speckled, and you’ll notice a faint scent of wheat that promises a sturdy base. This is the moment you set the stage for the buttery magic to come. Pro tip: Sift the flour to avoid any lumps that could create uneven texture later.
Kitchen Hack: Combine the dry ingredients in a large zip‑top bag, shake vigorously, then dump into the bowl – this ensures perfect distribution without a separate sifter.In a saucepan over low heat, melt the butter until it turns a light golden‑brown foam, then add the granulated sugar and stir until it dissolves and the mixture smells nutty. This toasting step is what gives the cookies that subtle caramel note you’ll taste on the edges. Keep a close eye – the butter can go from browned to burnt in seconds. Once the sugar is fully dissolved, remove from heat and let it cool for a minute.
Whisk the egg whites and cream of tartar together in a separate bowl until they become frothy, then gradually add the confectioners’ sugar while continuing to whisk. The mixture should become glossy and thick, resembling soft‑serve ice cream. This is where the cookies gain their airy lift; if the mixture looks grainy, keep whisking – patience is key.
Now, combine the cooled butter‑sugar mixture with the egg‑white blend, followed by the vanilla and peppermint extracts. Stir gently with a rubber spatula, being careful not to over‑mix. You’ll notice the dough turning silky, with tiny ribbons forming as you lift the spatula. That sizzle when it hits the pan? Absolute perfection.
Gradually fold the dry flour mixture into the wet ingredients, using a gentle cutting motion. The dough will start to come together in soft clumps; keep folding until no streaks of flour remain. If the dough feels too sticky, sprinkle a tablespoon of additional flour – but no more, or you’ll lose the melt‑in‑your‑mouth quality.
Turn the dough onto a lightly floured surface and knead it just enough to form a smooth ball, about 30 seconds. Then, flatten the ball into a disc about 1‑inch thick and wrap it tightly in plastic wrap. Chill the disc in the refrigerator for at least 45 minutes; this step is the secret that locks in moisture and gives the cookies their signature softness.
Watch Out: Skipping the chill will cause the cookies to spread too much on the baking sheet, resulting in thin, crispy edges.Preheat your oven to 350°F (175°C). While it heats, line two baking sheets with parchment paper. Remove the chilled dough from the fridge, slice it into ½‑inch rounds using a cookie cutter or a sharp knife, and place them about 2 inches apart. The dough should hold its shape; if it cracks, let it sit at room temperature for a few minutes.
Bake the cookies for 10‑12 minutes, or until the tops are just set and the edges have a faint golden hue. The center will still look slightly soft – that’s exactly what you want. As the cookies bake, a faint peppermint aroma will fill the kitchen, making it impossible to resist sneaking a peek.
Remove the trays from the oven and let the cookies cool on the sheet for 5 minutes before transferring them to a wire rack. This short rest allows the cookies to firm up just enough to handle without breaking. While they’re still warm, dust each with a light sprinkle of powdered sugar for that festive sparkle.
Once completely cooled, drizzle a thin river of melted white chocolate over the tops, letting it pool in the center and drip down the sides. The chocolate sets quickly, creating a glossy finish that looks as luxurious as a holiday wreath. Store the finished peppermint cookies in an airtight container, and they’ll stay soft for up to a week.
That's it — you did it. But hold on, I've got a few more tricks that'll take this to another level...
Insider Tricks for Flawless Results
The Temperature Rule Nobody Follows
Always start with room‑temperature butter, but let the melted butter cool to no lower than 120°F before mixing with the sugar. If the butter is too hot, it will melt the sugar crystals and you’ll end up with a glossy, but overly soft dough that spreads too much. I once tried to rush this step, and the cookies turned into a flat, chewy mess – lesson learned.
Why Your Nose Knows Best
When the butter‑sugar mixture reaches a light caramel scent, you’re at the perfect stage. Trust your sense of smell more than a timer; the aroma tells you the butter has browned just enough to add depth without turning bitter. A friend once over‑caramelized the butter, and the resulting bitterness overpowered the peppermint, making the cookies taste like burnt toast.
The 5‑Minute Rest That Changes Everything
After shaping the cookies, let them rest on the baking sheet for five minutes before sliding them into the oven. This brief pause allows the surface to dry slightly, preventing excessive spreading and ensuring the edges stay tender while the center stays soft. Skipping this rest often leads to uneven thickness, which is a common complaint among bakers.
The Double‑Layered Drizzle
For an extra‑luxurious finish, drizzle half the melted white chocolate, let it set, then drizzle the second half at a different angle. This creates a marbled effect that looks professionally plated and adds a subtle textural contrast between the crisp chocolate and the buttery cookie.
The Secret of the Sugar Dust
Instead of sprinkling powdered sugar directly from the container, sift it through a fine mesh sieve over the warm cookies. The fine particles will cling better and create an even, snow‑like coating that doesn’t clump. Pro tip: Add a pinch of finely grated orange zest to the powdered sugar for a hidden citrus note that brightens the peppermint.
Creative Twists and Variations
This recipe is a playground. Here are some of my favorite ways to switch things up:
Chocolate‑Mint Swirl
Add a tablespoon of cocoa powder to the dry ingredients and swirl a bit of melted dark chocolate into the dough before chilling. The result is a mocha‑mint flavor that feels like a holiday after‑dinner treat, perfect for coffee lovers.
Cranberry‑Peppermint Burst
Fold in a quarter cup of dried cranberries after the dough comes together. The tartness of the cranberries balances the sweet peppermint, creating a festive pop that’s especially popular at brunch tables.
Almond‑Infused Delight
Replace half the flour with almond meal and add a splash of almond extract. The nutty undertone adds richness, and the cookies become slightly crumbly on the outside while staying soft inside – a texture contrast that impresses guests.
Spiced Peppermint
Introduce a pinch of ground cinnamon and a dash of ground ginger to the spice mix. The warm spices complement the cool peppermint, making these cookies a perfect bridge between winter and the approaching spring.
Vegan Friendly Version
Swap the butter for a vegan margarine and use aquafaba (chickpea water) in place of egg whites. The texture remains soft, and the peppermint flavor shines just as bright, proving you don’t need dairy to create holiday magic.
Storing and Bringing It Back to Life
Fridge Storage
Place the cooled cookies in an airtight container with a slice of bread on top. The bread releases moisture slowly, keeping the cookies soft for up to five days. If you notice any dryness, replace the bread slice with a fresh one.
Freezer Friendly
Layer the cookies between parchment sheets and seal them in a freezer‑safe zip bag. They’ll stay fresh for three months. When you’re ready to enjoy them, let them thaw at room temperature for 15 minutes, then give them a quick 30‑second burst in a 300°F oven to revive that melt‑in‑your‑mouth texture.
Best Reheating Method
If the cookies have hardened, place a tiny splash of water on a paper towel, cover the cookies loosely with foil, and warm them in a 325°F oven for 5‑7 minutes. The steam generated restores the softness without making them soggy.