Picture this: a rainy Saturday afternoon, the kind where the clouds look like they’re about to spill the whole sky into your kitchen, and you’re staring at an empty plate that feels more like a betrayal than a dessert. I was mid‑mug of coffee, scrolling through endless recipe blogs, when a friend dared me to make a cake that could turn any gloomy day into a celebration. I laughed, I shrugged, and I said, “Challenge accepted.” Fast forward a few hours, a bowl of butter and sugar dancing together, and the oven humming like a contented cat. The result? A Fluffy French Butter Cake that is hands down the best version you’ll ever make at home, and I’m about to spill every buttery secret.
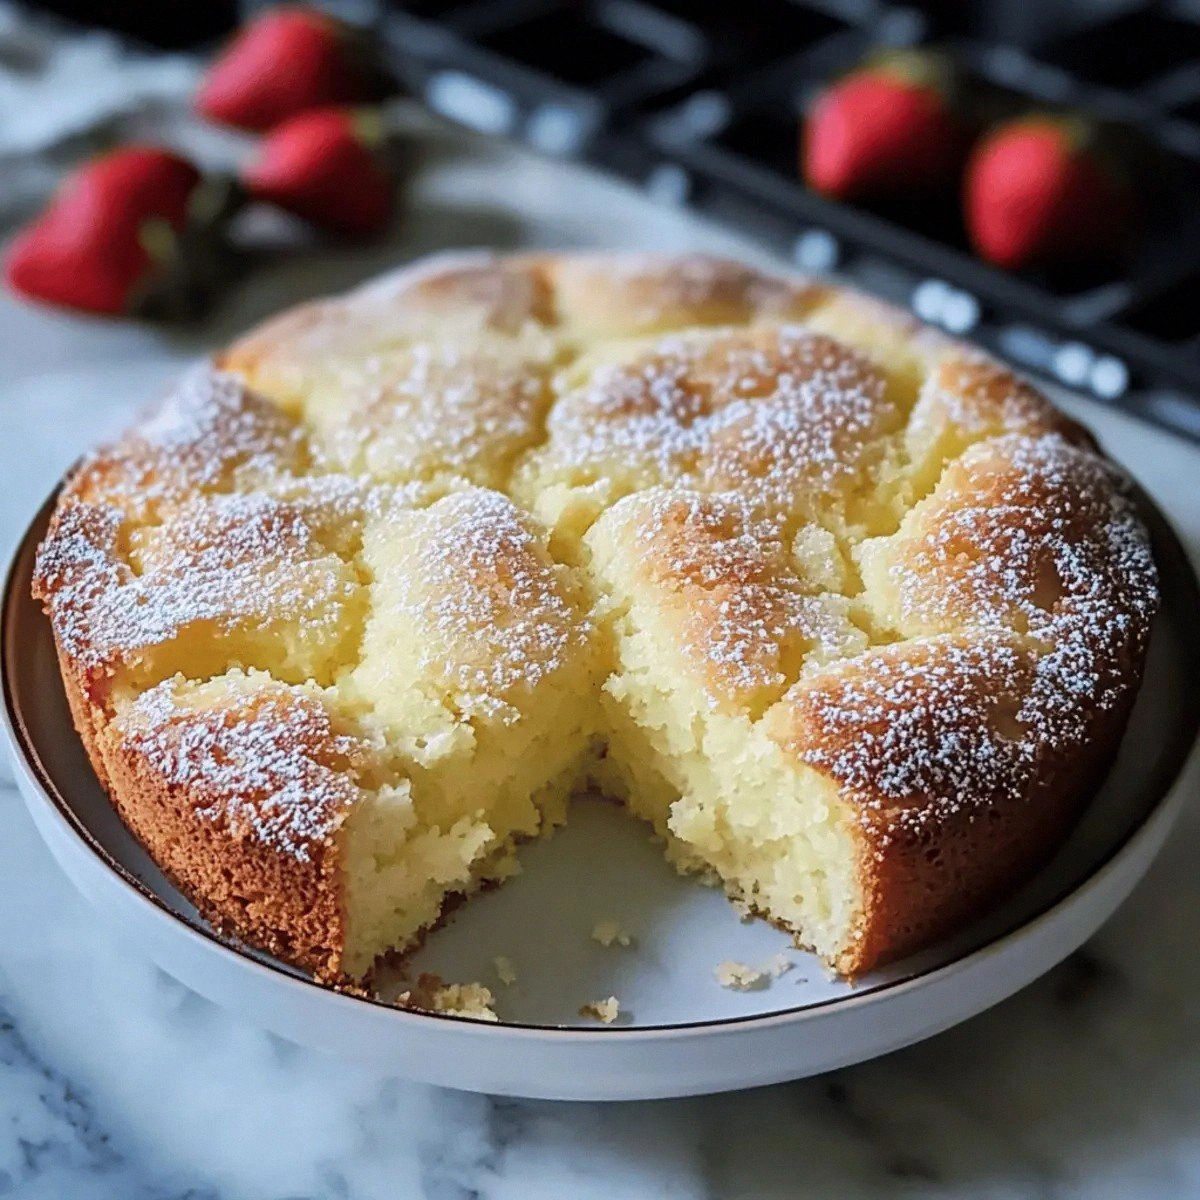
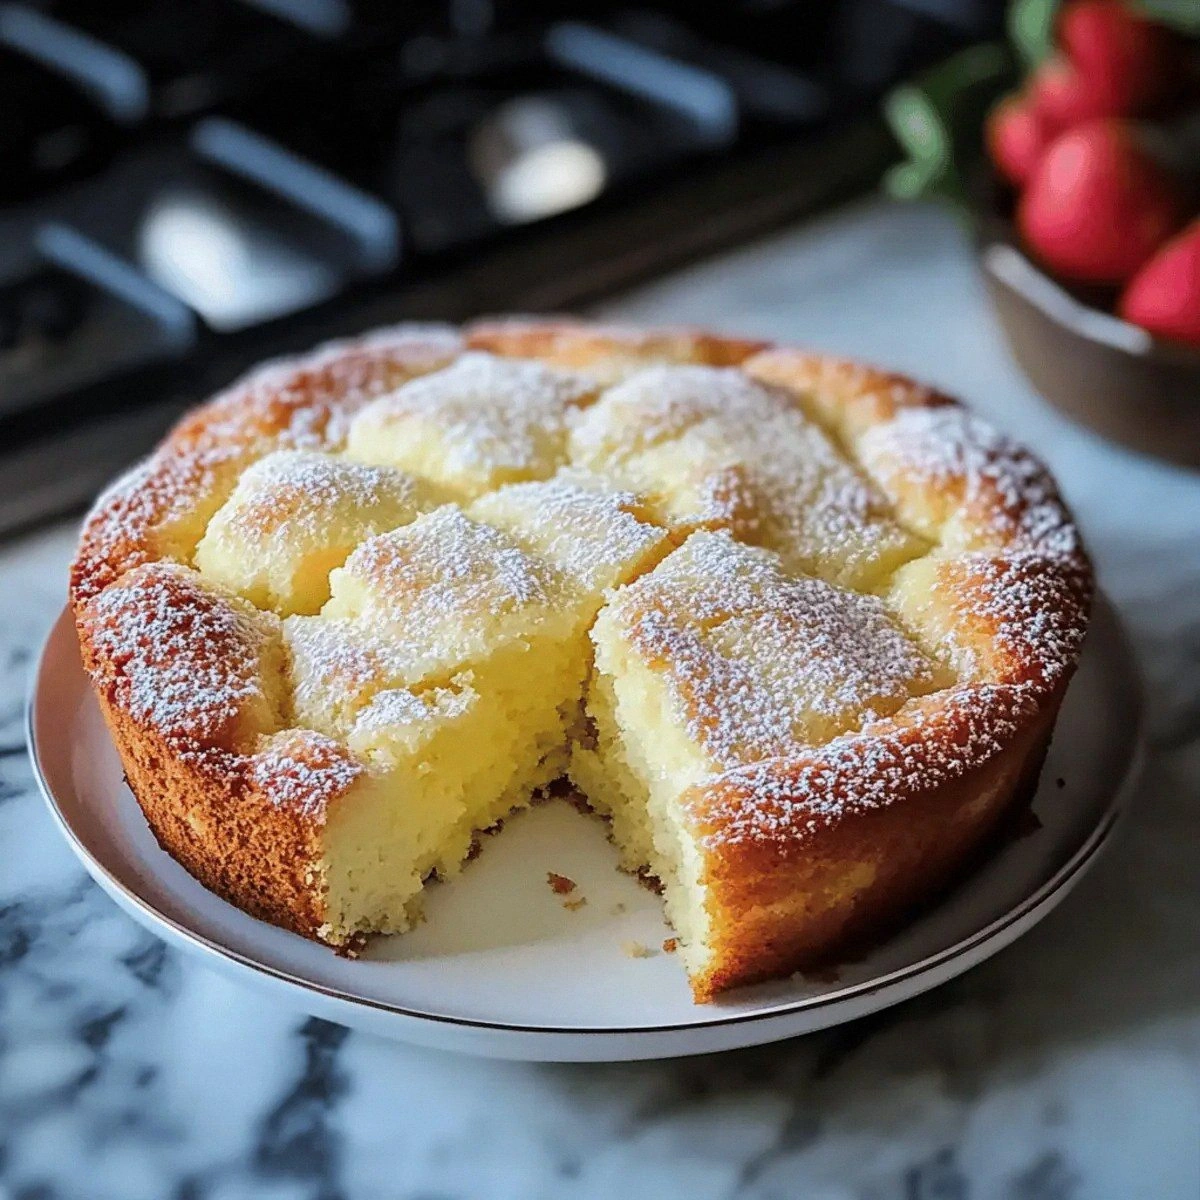
The moment I pulled the cake from the oven, the kitchen was flooded with a perfume that could convince even the most stubborn dieter that calories are just a myth. The top was a golden‑brown crown, speckled with a delicate sugar crunch that crackles like fresh snow underfoot. When I sliced into it, the crumb rose up like a cloud of vanilla‑kissed silk, each forkful melting on my tongue with the kind of buttery richness that makes you want to close your eyes and sigh. I dare you to taste this and not go back for seconds; the texture is so light it practically floats, yet the flavor is anchored deep in that classic French butter base that we all love.
Most recipes get this completely wrong. They either over‑mix, turning the batter into a dense brick, or they skip the crucial sour cream step, leaving the cake dry and sad. Here’s what actually works: a precise balance of melted butter, room‑temperature eggs, and a gentle fold that keeps air trapped inside. I’ll be honest — I ate half the batch before anyone else got to try it, and that was the only crime I could commit without feeling guilty. The secret ingredient that most bakers overlook is the sour cream, which adds a subtle tang and an extra lift, making the crumb airy enough to rival any patisserie in Paris.
And now the fun part: I’m going to walk you through every single step — from selecting the perfect butter to mastering the art of the final sugar topping. Picture yourself pulling this out of the oven, the whole kitchen smelling incredible, the crust glistening, and the crumb inviting you to dive in. Okay, ready for the game‑changer? This next part? Pure magic. Stay with me here — this is worth it.
What Makes This Version Stand Out
- Flavor: The combination of real vanilla extract and a buttery base creates a depth that feels both nostalgic and sophisticated, like a warm hug from a French grandmother.
- Texture: Thanks to the sour cream and careful folding, the crumb is feather‑light, airy, and just moist enough to melt on your palate without being soggy.
- Simplicity: Only nine ingredients, no exotic flours or mystery powders, so you can whip this up with what’s already in your pantry.
- Uniqueness: The topping of granulated sugar adds a subtle crunch that contrasts beautifully with the soft interior, a detail most recipes skip.
- Crowd Reaction: One bite and your guests will be whispering, “Is this store‑bought?” while you grin, knowing you just out‑cooked a bakery.
- Ingredient Quality: Using unsalted butter lets you control the salt level, ensuring the cake isn’t overly salty and the butter flavor shines.
- Cooking Method: The gentle cream‑first technique keeps the batter from deflating, preserving the airy structure.
- Make‑Ahead Potential: This cake freezes beautifully, so you can bake it ahead of a party and reheat with a splash of water for instant freshness.
Inside the Ingredient List
The Flavor Base
Granulated Sugar (1 cup): Sugar is the silent hero that sweetens, tenderizes, and helps create that delicate crust. If you replace it with brown sugar, you’ll get a caramel note but lose the crisp top. For a lower‑calorie option, try a 50/50 split with coconut sugar, though the texture will shift slightly.
Unsalted Butter (½ cup): Real butter provides the rich, creamy backbone of the cake. Using margarine will introduce a greasy mouthfeel and a faint chemical aftertaste. When shopping, look for butter with at least 80% butterfat for the best flavor and structure.
Vanilla Extract (2.5 teaspoons): Pure vanilla extracts bring aromatic depth; imitation vanilla can taste flat. If you have a vanilla bean, split it and scrape the seeds for an even more luxurious flavor.
The Texture Crew
Eggs (3 unit): Eggs act as both leavening agents and emulsifiers, binding the butter and flour together while adding lift. Using room‑temperature eggs is crucial; cold eggs can cause the batter to seize, resulting in a dense crumb.
Cake Flour (2 cups): Cake flour’s low protein content yields a tender crumb. If you only have all‑purpose flour, sift it with a tablespoon of cornstarch per cup to mimic cake flour’s softness.
Baking Powder (2 teaspoons): This double‑acting leavener gives the cake its rise. Over‑baking can cause a bitter aftertaste, so stick to the exact amount and timing.
The Unexpected Star
Sour Cream (⅔ cup): The acidity of sour cream reacts with the baking powder, creating extra bubbles that make the cake airy. Skipping it will lead to a tighter crumb; you can substitute Greek yogurt, but the flavor will be tangier.
The Final Flourish
Salt (1 teaspoon): Salt balances the sweetness and enhances the butter flavor. A pinch less and the cake may taste flat; a pinch more and you’ll overwhelm the delicate sweetness.
Granulated Sugar for Topping (2 tablespoons): Sprinkled on top before baking, it caramelizes into a delicate crust that adds a subtle crunch. For an extra twist, try swapping half with coarse sea salt for a sweet‑salty contrast.
Everything's prepped? Good. Let’s get into the real action…
The Method — Step by Step
First, preheat your oven to 350°F (175°C) and grease a 9‑inch round cake pan with a thin layer of butter, then dust lightly with flour. The pan should feel slick but not greasy; this ensures the cake releases cleanly. While the oven warms, set a large mixing bowl on the counter and let it sit at room temperature — a warm bowl helps the butter melt evenly later on.
In a saucepan, melt the half‑cup of unsalted butter over low heat, then whisk in the cup of granulated sugar until the mixture is smooth and glossy. That sizzle when it hits the pan? Absolute perfection. Once combined, remove from heat and let it cool just enough that it’s warm to the touch but not hot, about 2 minutes. This step is crucial because it dissolves the sugar, preventing a gritty texture later.
Kitchen Hack: If you’re short on time, microwave the butter and sugar together in 15‑second bursts, stirring in between, until fully combined.While the butter‑sugar mixture cools, crack the three eggs into a separate bowl, add the vanilla extract, and whisk until the mixture is pale and slightly frothy. This aerates the eggs, giving the batter a head start on lift. Then, gently fold the eggs into the butter‑sugar mixture, being careful not to over‑mix; you want to keep the air you just introduced.
Now comes the trickiest part: incorporating the dry ingredients. In a separate bowl, whisk together cake flour, baking powder, and salt until fully combined. Watch Out: If you dump the flour straight into the wet batter, you’ll create lumps that sabotage the cake’s fluffiness. Instead, sift the dry mixture over the batter in three additions, folding gently each time.
Watch Out: Over‑mixing after adding flour will develop gluten, turning your airy cake into a dense brick.Stir in the ⅔ cup of sour cream with a rubber spatula, using a folding motion that lifts the batter from the bottom of the bowl. The sour cream adds moisture and a subtle tang that balances the sweetness. When the batter looks smooth and glossy, it’s ready for the pan.
Kitchen Hack: Warm the sour cream slightly (no more than 90°F) before adding; this prevents the batter from cooling too quickly and helps the cake rise evenly.Give the prepared pan a gentle tap on the counter to release any large air bubbles. Then, evenly sprinkle the 2 tablespoons of granulated sugar over the top. This will melt and form a delicate, crackly crust as the cake bakes.
Slide the pan into the pre‑heated oven and bake for 25‑30 minutes, or until a toothpick inserted into the center comes out clean and the edges start pulling away from the pan. Around the 20‑minute mark, you’ll notice the top turning a deep golden hue and a faint buttery aroma filling the kitchen.
Once baked, remove the cake from the oven and let it sit in the pan for 10 minutes. This short rest allows the structure to set, preventing a collapse when you turn it out. After 10 minutes, run a thin knife around the edge, invert onto a cooling rack, and let it cool completely before slicing.
That’s it — you did it. But hold on, I’ve got a few more tricks that’ll take this to another level…
Insider Tricks for Flawless Results
The Temperature Rule Nobody Follows
Never bake a cake with cold ingredients. Let butter, eggs, and sour cream sit at room temperature for at least 30 minutes before you start. A friend once tried to speed things up by using chilled butter straight from the fridge; the result was a dense, uneven crumb that fell apart like stale bread. The temperature rule ensures that the batter stays fluid enough to trap air, giving you that cloud‑like texture.
Why Your Nose Knows Best
Don’t rely solely on timers. The moment the cake’s edges start pulling away from the pan and the top gives a faint, caramelized scent, you know it’s ready. If you wait too long, the sugar topping will burn, leaving a bitter aftertaste. Trust your nose; it’s the most reliable kitchen gauge.
The 5‑Minute Rest That Changes Everything
After removing the cake from the oven, let it rest in the pan for exactly five minutes before turning it out. This short pause lets the steam redistribute, preventing the cake from collapsing. Skipping this step is a common mistake that leads to a saggy center, especially in cakes that rely on air for lift.
Don’t Over‑Mix the Flour
When you add the flour mixture, fold just until you see no streaks. Over‑mixing creates gluten strands that chew rather than melt, ruining the airy texture. I once mixed for a full minute because I was “being thorough”; the cake turned out as tough as a shoe sole.
Finish with a Light Dusting
Before serving, lightly dust the top with powdered sugar or a drizzle of melted butter for an extra glossy finish. This not only adds visual appeal but also adds a subtle sweet crunch that complements the sugar crust. It’s a tiny step that makes the cake feel restaurant‑grade.
Creative Twists and Variations
This recipe is a playground. Here are some of my favorite ways to switch things up:
Lemon Zest Burst
Add the zest of one large lemon to the batter and replace half the vanilla with lemon extract. The citrus brightens the buttery base, making it perfect for spring brunches. Pair with a dollop of whipped cream flavored with a splash of lemon juice.
Chocolate Swirl
Mix ¼ cup of melted dark chocolate into a small portion of the batter and swirl it gently with a skewer before baking. The chocolate ribbons create pockets of richness that contrast the light cake. This version is a hit for chocolate lovers who still crave that fluffy texture.
Almond‑Infused
Replace ¼ cup of the cake flour with almond flour and add ½ teaspoon of almond extract. The nutty undertone adds depth without overpowering the butter flavor. Top with sliced toasted almonds for an added crunch.
Berry‑Layered
Fold in ½ cup of fresh raspberries or blueberries just before the final fold. The berries burst during baking, creating pockets of juicy sweetness. Serve with a side of vanilla ice cream for a summer dessert that feels indulgent.
Spiced Autumn
Stir in ½ teaspoon of ground cinnamon, ¼ teaspoon of nutmeg, and a pinch of clove. The warm spices turn the cake into a cozy autumn treat, especially when paired with caramel sauce. It’s perfect for Thanksgiving leftovers.
Storing and Bringing It Back to Life
Fridge Storage
Once completely cooled, wrap the cake tightly in plastic wrap or store it in an airtight container. It will stay fresh for up to five days in the refrigerator. Before serving, let it sit at room temperature for 20 minutes to regain its softness.
Freezer Friendly
Slice the cake into serving‑size wedges, wrap each piece in parchment paper, then place them in a freezer‑safe zip‑top bag. The cake freezes beautifully for up to three months. To reheat, pop a slice onto a microwave‑safe plate, sprinkle a tiny splash of water, and microwave for 15‑20 seconds; the steam revives the crumb.
Best Reheating Method
For the best texture, reheat whole slices in a pre‑heated 300°F (150°C) oven for 8‑10 minutes, covered loosely with foil. Add a tablespoon of water to the pan before reheating; the moisture creates a gentle steam that restores the cake’s fluffiness without drying it out.