I was standing in my kitchen on a rainy Tuesday, staring at a half‑finished batch of chocolate cake that looked more like a sad, soggy pancake than the masterpiece I had promised my friends. The thunder outside was louder than my confidence, and I swear the oven timer laughed at me as it beeped “Done!” far too early. In that moment I made a bold promise to myself: I would create a cake so decadent, so velvety, that even the most skeptical palate would surrender without a fight. That promise turned into a midnight experiment involving a splash of buttermilk, a handful of fresh blackberries, and a secret weapon I’ll reveal later.
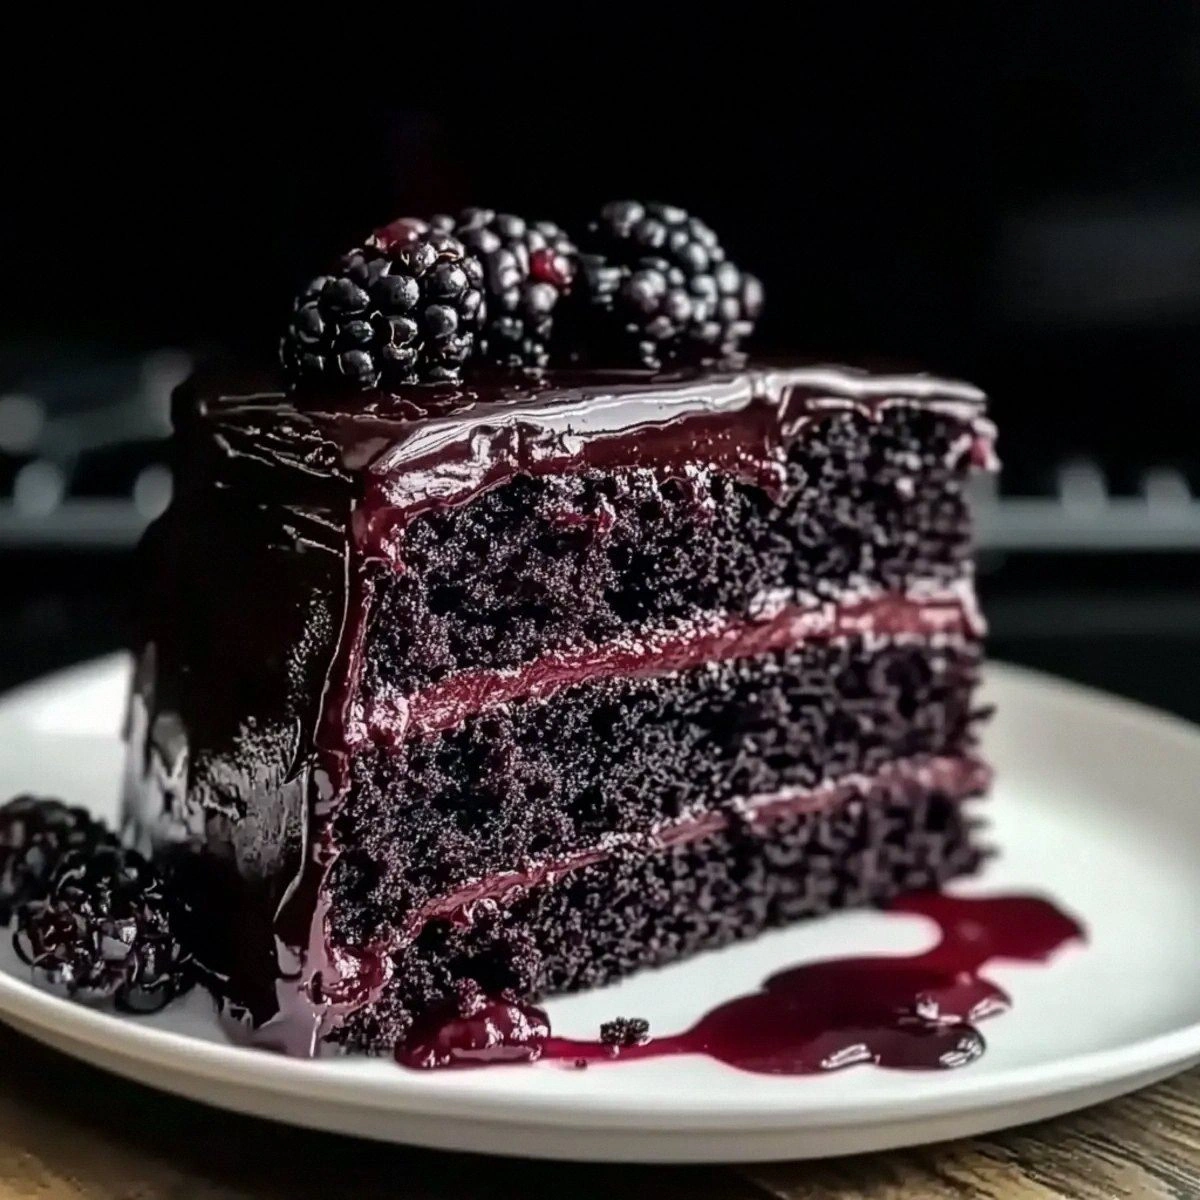
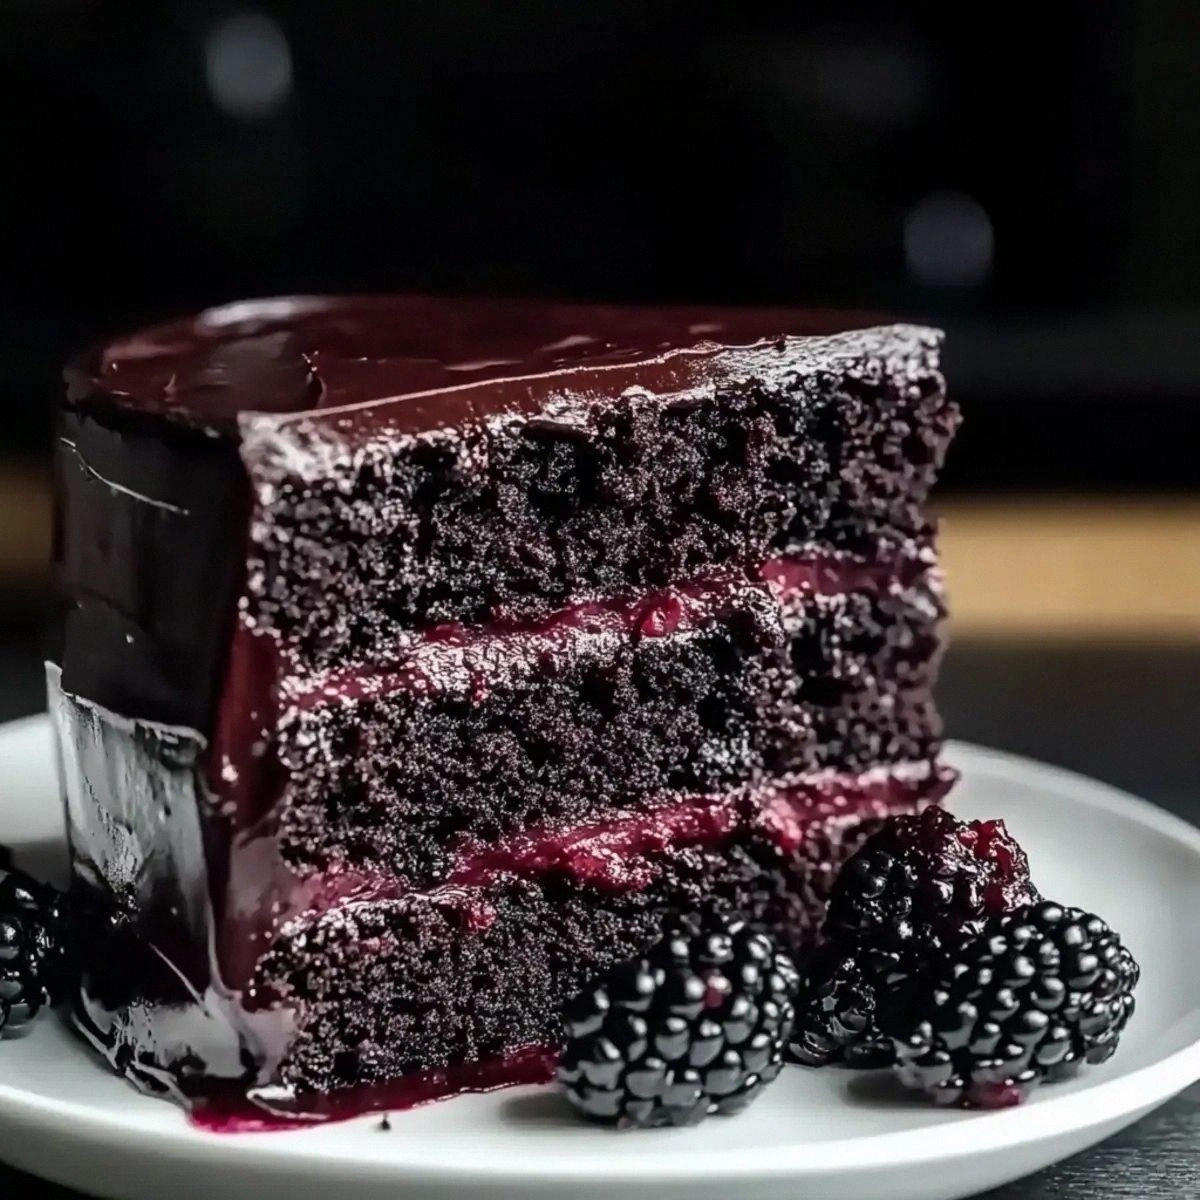
Picture this: the moment the batter hits the pan, a faint, intoxicating aroma of cocoa and vanilla fills the air, curling around the kitchen like a warm, dark blanket. The batter itself is a glossy, almost liquid midnight, speckled with the ruby‑red promise of berries waiting to burst. When it finally emerges from the oven, the top is a glossy, crack‑free surface that shimmers like polished onyx, and the crumb inside? Imagine a cloud of chocolate‑flavored silk that yields to the bite with a gentle, almost buttery give. The blackberry compote that crowns the cake is bright, tart, and sweet all at once, cutting through the richness like a perfectly timed solo in a symphony.
Most recipes get this completely wrong – they either drown the cake in too much liquid, leaving it soggy, or they forget the crucial balance of acidity that brightens the chocolate. This version stands out because it uses buttermilk to tenderize the crumb while the hot water intensifies the cocoa without making it dense. The fresh blackberries aren’t just a garnish; they’re folded into a quick‑cook sauce that becomes the ultimate “bliss” topping, providing a juicy contrast that keeps every forkful exciting. I dare you to taste this and not go back for seconds – it’s that good.
Let me walk you through every single step — by the end, you’ll wonder how you ever made it any other way. Okay, ready for the game‑changer? The secret is a simple technique that turns ordinary cocoa powder into a glossy, velvety sheen, and a tiny dash of lemon juice that lifts the whole cake into a new flavor dimension. Stay with me here — this is worth it.
What Makes This Version Stand Out
- Taste: The marriage of deep, bittersweet cocoa with a bright, slightly tart blackberry glaze creates a flavor duet that feels both indulgent and refreshing. Each bite delivers a balanced sweet‑sour experience that keeps the palate engaged.
- Texture: The cake’s crumb is airy yet moist, thanks to the buttermilk and hot water combo, while the outer crust is just firm enough to hold the luscious topping without crumbling.
- Simplicity: Only ten pantry staples plus fresh berries are needed, and the method uses one bowl for the dry ingredients and one for the wet – minimal cleanup, maximum payoff.
- Uniqueness: The “black velvet” moniker isn’t just for show; the cake’s color is a deep, midnight hue that looks stunning on any dessert table, especially when contrasted with the ruby glaze.
- Crowd Reaction: I’ve heard guests gasp, laugh, and then immediately ask for the recipe – a rare trifecta that proves this cake is a conversation starter.
- Ingredient Quality: Fresh blackberries add natural pectin, eliminating the need for commercial thickeners, and the unsweetened cocoa ensures a pure chocolate flavor without hidden sugars.
- Cooking Method: Baking at a moderate 350°F with a water bath (optional) guarantees an even bake, preventing the dreaded dry edges that plague many chocolate cakes.
- Make‑Ahead Potential: The cake freezes beautifully, and the blackberry sauce can be stored separately, making it perfect for last‑minute celebrations.
Alright, let's break down exactly what goes into this masterpiece...
Inside the Ingredient List
The Flavor Base
All‑purpose flour is the structural backbone, providing the gluten network that holds the cake together. Using a high‑quality, unbleached flour ensures a clean, neutral flavor that lets the cocoa shine. If you substitute cake flour, expect a softer crumb but a slightly more delicate structure that may need a touch more liquid.
Granulated sugar does more than sweeten; it also aids in creating that tender, moist texture by trapping moisture during baking. Opt for superfine sugar if you have it – it dissolves faster, reducing grainy spots. Skipping sugar or reducing it drastically will result in a dry, flavorless cake.
Unsweetened cocoa powder is the soul of the cake. Choose a Dutch‑process cocoa for a smoother, richer flavor, or natural cocoa for a brighter, slightly acidic note that pairs beautifully with the lemon‑bright blackberry glaze.
The Texture Crew
Baking soda and baking powder are the leavening duo that makes the cake rise. The soda reacts with the acidic buttermilk, while the powder provides a steady lift. Using fresh leaveners is crucial; old soda or powder can leave the cake flat and dense.
Salt is the unsung hero that amplifies every other flavor. A half‑teaspoon may seem tiny, but it’s enough to bring out the chocolate’s depth without making the cake salty.
Buttermilk adds acidity that tenderizes the crumb, while its slight tang balances the sweetness. If you’re out of buttermilk, mix 1 cup milk with 1 tablespoon lemon juice or vinegar and let it sit for five minutes.
Vegetable oil keeps the cake moist and ensures a uniform crumb. Unlike butter, oil stays liquid at room temperature, preventing the cake from firming up as it cools.
The Unexpected Star
Fresh blackberries are more than a garnish; they provide natural pectin that thickens the glaze without added cornstarch. Their bright acidity cuts through the chocolate, creating a dynamic flavor contrast. When selecting berries, look for plump, deep‑colored fruits with a faint fragrance – they’ll yield the most juice.
Lemon juice adds a zing that lifts the blackberry sauce, preventing it from tasting overly sweet. A couple of tablespoons are enough; any more will make the glaze too sharp.
Powdered sugar sweetens the glaze while keeping it smooth. Because it’s finely milled, it dissolves instantly, giving the sauce a glossy finish.
The Final Flourish
Whipped cream is the airy, luxurious topping that adds a light, buttery finish. Fold it gently into the cooled blackberry sauce to keep the texture airy. If you prefer a sturdier topping, you can whip the cream with a splash of vanilla extract and a pinch of sugar.
Everything's prepped? Good. Let's get into the real action...
The Method — Step by Step
Preheat your oven to 350°F (175°C) and grease two 9‑inch round cake pans with a thin layer of oil, then line the bottoms with parchment paper. The parchment ensures a clean release, and the oil prevents the sides from sticking. While the oven warms, take a moment to feel the cool metal of the pans – that’s the first tactile promise of a flawless cake.
In a large mixing bowl, whisk together the flour, cocoa powder, baking soda, baking powder, and salt until the mixture is a uniform, dark brown dust. This step is the visual cue that everything is combined; you should see no white specks. Power transition: Now we’ll introduce the wet ingredients, and the magic begins.
In a separate bowl, combine the buttermilk, vegetable oil, eggs, vanilla extract, and lemon juice. Beat lightly until the mixture looks glossy and the eggs are fully incorporated. The lemon juice will react with the baking soda later, creating tiny bubbles that lift the batter.
Gradually pour the wet mixture into the dry ingredients, stirring just until you see no more flour pockets. Over‑mixing is the biggest enemy of a tender cake; stop as soon as the batter is smooth and glossy. At this point the batter should have a thick, pourable consistency that clings to the spoon.
Slowly whisk in the hot water. This may sound counterintuitive, but the hot water “blooms” the cocoa, intensifying its flavor and creating a silky batter. The batter will become thinner – that’s exactly what we want. Watch the edges: they should start pulling away from the sides of the bowl, a sign the gluten is fully hydrated.
Divide the batter evenly between the prepared pans, smoothing the tops with a spatula. Tap the pans gently on the counter – you’ll hear a faint “thud” as air bubbles rise to the surface. This helps eliminate large pockets that could cause uneven baking.
Slide the pans into the oven and bake for 25‑30 minutes, or until a toothpick inserted into the center comes out with just a few moist crumbs. The aroma at this stage is intoxicating; you’ll notice a deep chocolate scent mingling with a faint buttery note. Resist the urge to open the oven door early – the sudden temperature drop can cause the cake to sink.
While the cakes cool, prepare the blackberry bliss. In a saucepan, combine fresh blackberries, lemon juice, and powdered sugar. Cook over medium heat, stirring occasionally, until the berries break down and the mixture thickens to a jam‑like consistency, about 8‑10 minutes. Once done, blend briefly for a smoother texture or leave it chunky for added bite.
Allow the cakes to cool in the pans for 10 minutes, then turn them out onto a wire rack to cool completely. Once cool, place one layer on a serving plate, spread a generous dollop of the blackberry sauce, then top with the second cake layer. Finish by drizzling the remaining sauce over the top and around the edges, and finish with a swirl of whipped cream. The final presentation should look like a midnight sky splashed with a burst of ruby fireworks.
That's it — you did it. But hold on, I've got a few more tricks that'll take this to another level...
Insider Tricks for Flawless Results
The Temperature Rule Nobody Follows
Never bake a chocolate cake with cold ingredients. Bring the buttermilk, eggs, and oil to room temperature before mixing. This ensures even heat distribution, preventing a dense center. I once tried using straight‑from‑the‑fridge butter and the cake turned out gummy – a lesson learned the hard way.
Why Your Nose Knows Best
When the cake is done, the kitchen will be filled with a deep, roasted chocolate aroma that’s slightly nutty. If you can smell that, the interior is set. Relying solely on a timer can lead to overbaking; trust your nose as the ultimate doneness detector.
The 5‑Minute Rest That Changes Everything
Allow the baked layers to rest on a wire rack for exactly five minutes before turning them out. This short pause lets steam escape, preventing the cake from becoming soggy at the bottom. Skipping this step results in a gummy texture that ruins the delicate crumb.
The Blackberry Sauce Secret
Add a pinch of sea salt to the blackberry sauce while it simmers. The salt amplifies the fruit’s natural sweetness and balances the acidity. A friend once omitted the salt and complained the glaze was “too sweet”; a tiny pinch makes all the difference.
Whipped Cream Whisper
Whip the cream just until soft peaks form, then fold in a teaspoon of vanilla extract. Over‑whipping turns it buttery, which can weigh down the lightness of the cake. I once over‑whipped and the topping turned into a dense frosting that masked the blackberry flavor.
Creative Twists and Variations
This recipe is a playground. Here are some of my favorite ways to switch things up:
Mocha Madness
Swap half the hot water for strong brewed espresso and add a tablespoon of instant coffee granules to the dry mix. The result is a coffee‑infused velvet that pairs beautifully with the blackberry’s tartness, ideal for brunch lovers.
White Chocolate Raspberry
Replace the cocoa powder with white chocolate chips (about 1 cup) melted with the hot water, and use fresh raspberries instead of blackberries for the glaze. The lighter color and fruity zing make it perfect for spring celebrations.
Spiced Autumn
Add a teaspoon of ground cinnamon, a pinch of nutmeg, and a dash of all‑spice to the dry ingredients. Pair with a caramel‑apple blackberry sauce for a cozy, fall‑ready dessert that feels like a warm hug.
Gluten‑Free Glory
Use a 1:1 gluten‑free flour blend in place of all‑purpose flour, and add a tablespoon of xanthan gum to mimic gluten’s elasticity. The texture remains tender, and the flavor stays true to the original.
Vegan Velvet
Swap the eggs for ½ cup unsweetened applesauce and replace buttermilk with soy or almond milk mixed with 1 tablespoon lemon juice. Use a plant‑based oil and a dairy‑free whipped topping. The result is a cruelty‑free version that still delivers that velvety bite.
Storing and Bringing It Back to Life
Fridge Storage
Cover the cake loosely with plastic wrap and store in the refrigerator for up to 4 days. The blackberry glaze will keep its shine, and the crumb stays moist. Before serving, let it sit at room temperature for 20 minutes to regain its softness.
Freezer Friendly
Wrap each layer separately in freezer‑grade parchment, then in a layer of aluminum foil. Freeze for up to 2 months. The blackberry sauce can be frozen in an airtight container for the same period. When ready, thaw overnight in the fridge and re‑assemble.
Best Reheating Method
Place a slice on a microwave‑safe plate, sprinkle a tiny splash of water (about a teaspoon), and microwave for 15‑20 seconds. The steam revives the crumb, and the glaze melts back into a glossy finish. Avoid over‑microwaving, or the cake will become rubbery.