I was halfway through a late‑night binge of store‑bought mint chocolate cookies when the dreaded sugar‑crash hit me like a rogue wave. My kitchen was a battlefield of crumbs, half‑melted chocolate, and a lingering minty after‑taste that refused to quit. I stared at the empty cookie tin and thought, “What if I could make something that tastes like a mint‑chip dream but without the guilt, the dairy, and the oven‑time?” That moment sparked a tiny culinary rebellion, and I dove headfirst into the world of no‑bake vegan desserts. The result? A batch of No‑Bake Mint Chip Patties that are as refreshing as a winter breeze and as indulgent as a chocolate‑covered secret.
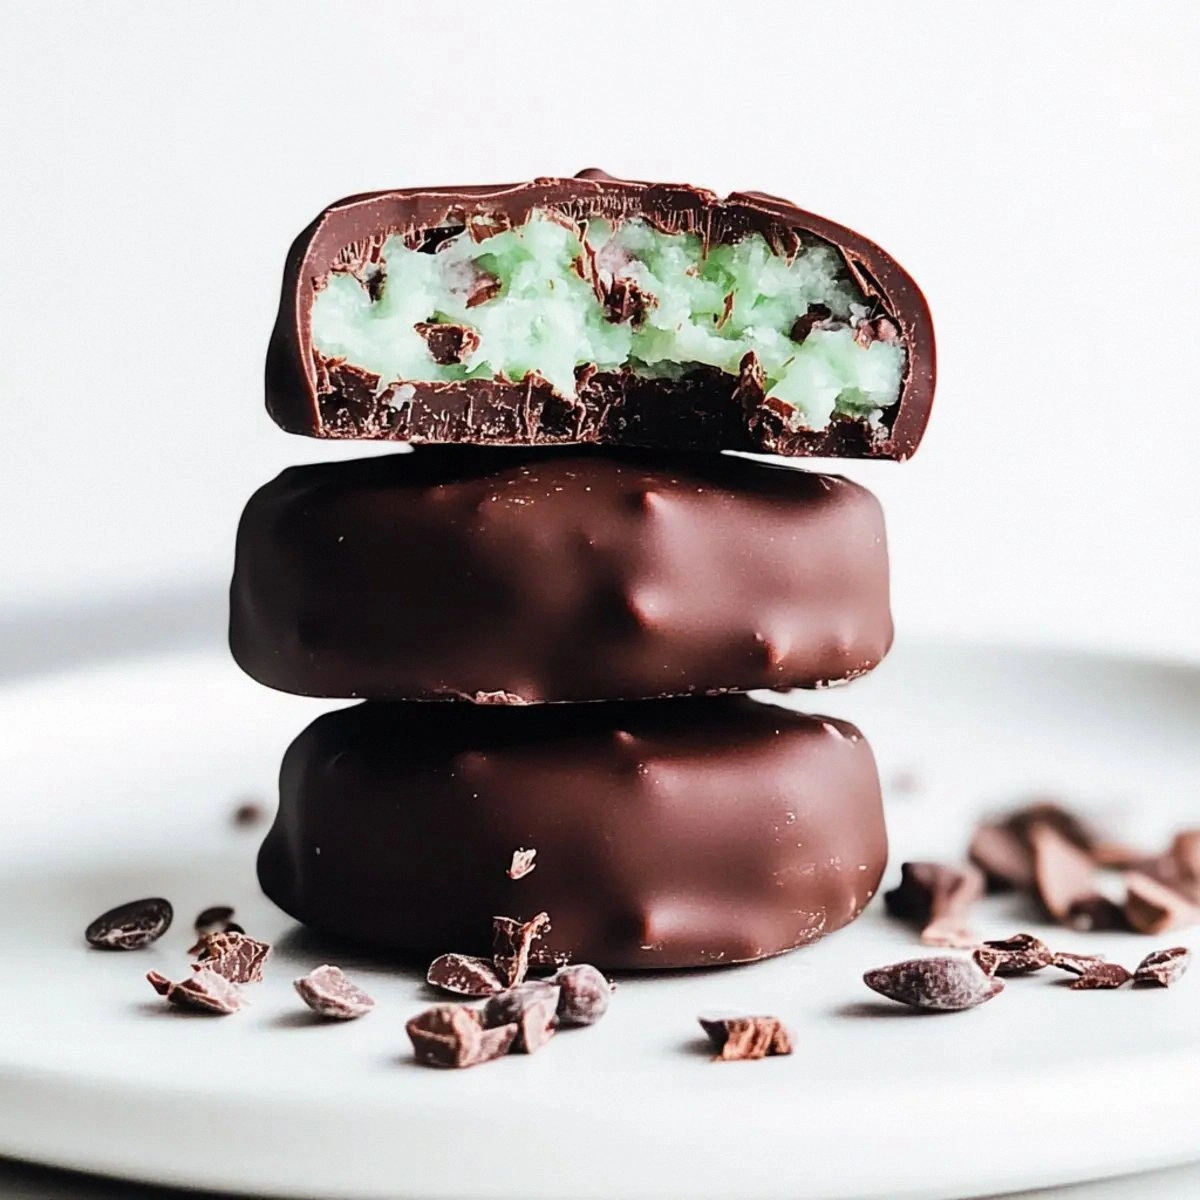
Imagine the scene: the kitchen counter glistening with a glossy sheet of dark chocolate, the air humming with the faint aroma of peppermint that makes your nose tingle, and a bowl of creamy coconut cream that looks like a cloud ready to melt into your mouth. You can hear the gentle crackle of cacao nibs as they hit the warm chocolate, a sound that promises a crunchy surprise. When you finally bite into a patty, the first thing that hits you is a cool mint wave that instantly awakens every sense, followed by a silky, rich chocolate coating that clings to your tongue like velvet. The texture? A perfect marriage of crisp, melt‑in‑your‑mouth chocolate and a soft, coconut‑infused interior that feels like a hug from a dessert‑loving grandma.
What makes this version truly stand out is the simplicity of the technique paired with a few secret ingredients that most recipes overlook. Most mint‑chip desserts rely on heavy dairy creams or require a full oven cycle that leaves you sweating in a hot kitchen. Here, we skip the oven entirely, use coconut cream for that luxurious mouthfeel, and add a splash of liquid stevia for a clean, natural sweetness that never overpowers. The result is a dessert that’s not only vegan but also dairy‑free, refined‑sugar‑free, and unbelievably quick to assemble. I dare you to taste this and not go back for seconds—trust me, you’ll be reaching for more before the plate even empties.
You might be wondering where the magic ingredient hides. Spoiler alert: it’s the peppermint extract, but not just any extract. I’m talking about a high‑quality, food‑grade peppermint oil that delivers a punchy, clean mint flavor without the bitter aftertaste you get from cheap powders. Pair that with a generous handful of dark chocolate, and you’ve got a flavor profile that sings louder than a choir on opening night. The secret? A quick tempering trick that gives the chocolate a glossy finish and a snap that makes each bite feel like a mini celebration.
Let me walk you through every single step — by the end, you’ll wonder how you ever made a mint‑chip dessert any other way. Okay, ready for the game‑changer? This next part? Pure magic. Stay with me here — this is worth it.
What Makes This Version Stand Out
- Taste: The peppermint extract delivers a crisp, clean mint that cuts through the richness of the dark chocolate, creating a balanced flavor that’s never cloying.
- Texture: A crunchy chocolate exterior gives way to a soft, coconut‑cream interior, offering a delightful contrast that keeps you chewing happily.
- Simplicity: No oven, no fancy equipment—just a microwave, a bowl, and a handful of pantry staples.
- Uniqueness: Using coconut flakes adds a subtle tropical note that most mint‑chip desserts completely miss.
- Crowd Reaction: Even the most skeptical non‑vegans rave, often asking for the recipe before the first bite is over.
- Ingredient Quality: High‑grade peppermint oil and dark chocolate ensure a deep, aromatic flavor without artificial aftertastes.
- Method: The no‑bake approach preserves the bright mint aroma that can evaporate in a hot oven.
- Make‑Ahead Potential: These patties keep beautifully in the fridge for up to a week, making them perfect for meal‑prep or impromptu dessert cravings.
Alright, let's break down exactly what goes into this masterpiece...
Inside the Ingredient List
The Flavor Base
Coconut cream is the unsung hero of this recipe. It provides a buttery, rich mouthfeel that mimics traditional dairy cream without the lactose. If you skip it, you’ll end up with a dry patty that lacks that luxurious melt‑in‑your‑mouth quality. For the best results, choose a full‑fat coconut cream straight from the can—don’t settle for the lighter, watery versions. Swap tip: If coconut is off‑limits, a blend of almond milk and silken tofu can mimic the creaminess, though the flavor will shift slightly.
The Texture Crew
Coconut flakes add a subtle crunch and a whisper of tropical aroma that elevates the mint‑chip experience. They also help absorb excess moisture, ensuring your patties hold their shape. Skipping them will make the mixture too slick, causing the patties to slide off the plate. If you’re allergic to coconut, finely chopped toasted oats or puffed quinoa can provide a similar texture without compromising the structure.
The Unexpected Star
Cacao nibs or chocolate chips bring that essential snap and deep cocoa flavor. They’re the crunchy surprise that makes each bite feel like a mini celebration. Using low‑quality chocolate chips can result in a waxy mouthfeel, so opt for at least 70% dark chocolate or raw cacao nibs for a more complex profile. Pro tip: Toast the nibs lightly in a dry pan for 2 minutes to unlock a richer, nuttier flavor before folding them in.
The Sweet Whisper
Liquid stevia or monk fruit drops provide a clean, low‑calorie sweetness that doesn’t interfere with the mint’s brightness. Too much sugar can dull the peppermint’s crispness, so a few drops are all you need. If you prefer a more natural sweetener, a drizzle of maple syrup works, but be prepared for a slight caramel undertone that will shift the flavor balance.
The Minty Punch
Peppermint extract is the heart‑beat of these patties. A teaspoon is enough to flood the mixture with a refreshing, cool note that lingers on the palate. Over‑extracting can make the flavor harsh, so measure carefully. For an even fresher vibe, add a few torn fresh mint leaves during the mixing stage; they’ll infuse a garden‑fresh aroma that’s hard to beat.
The Final Flourish
Dark chocolate or cacao is the glossy, indulgent coating that seals the deal. It’s melted and tempered just enough to set quickly, giving each patty a snap that’s satisfying to the bite. Using a lower cocoa percentage will make the coating softer and sweeter, which can overwhelm the mint. If you’re allergic to chocolate, a caramelized almond butter coating can substitute, though the flavor profile will shift dramatically.
Everything's prepped? Good. Let's get into the real action...

The Method — Step by Step
-
First, gather all your ingredients and give the coconut cream a good stir to break up any separation. Transfer the cream into a chilled stainless steel bowl—yes, chill it for about 10 minutes as the earlier Kitchen Hack suggested. This cold environment helps the cream thicken faster when you whisk it, giving you a sturdy base that won’t melt when you shape the patties. The mixture should look glossy and slightly fluffy, like a cloud waiting to be turned into chocolate heaven.
-
Next, add the peppermint extract and the liquid stevia drops. As soon as the peppermint hits the coconut cream, you’ll notice a refreshing aroma that makes the whole kitchen feel like a winter wonderland. Stir gently but thoroughly; you want the mint to be evenly distributed, not just floating on the surface. This step is crucial—if the mint isn’t fully incorporated, you’ll get pockets of blandness that ruin the overall experience.
-
Now, fold in the coconut flakes and cacao nibs (or chocolate chips). Use a spatula to gently incorporate them, ensuring each flake and nib is coated in the mint‑cream mixture. The flakes will add a subtle chew, while the nibs bring that satisfying crunch. If you’re using chocolate chips, make sure they’re semi‑sweet; too sweet and they’ll compete with the mint. Watch Out: Over‑mixing can cause the coconut flakes to break down, turning them mushy and losing that delightful texture.
-
While the mixture rests, melt the dark chocolate. Place the chocolate in a microwave‑safe bowl and heat in 20‑second bursts, stirring in between, until smooth and glossy. Be careful not to overheat—chocolate can seize and become grainy if it gets too hot. Once melted, let it sit for a minute so it’s just warm enough to coat but not so hot that it melts the coconut cream.
-
Take a tablespoon of the mint‑cream mixture and roll it between your palms to form a smooth ball. Then, gently press the ball onto a parchment‑lined tray, flattening it into a patty about ½‑inch thick. The patty should hold its shape without crumbling. If it’s too soft, chill the tray for a few minutes; this quick chill firms the surface, making the chocolate coating adhere better.
Kitchen Hack: Use a silicone ice‑cube tray to shape perfectly uniform patties; each compartment gives you a consistent size and thickness. -
Dip each patty into the warm dark chocolate, using a fork to lift it out and letting excess chocolate drip back into the bowl. The coating should be thin but glossy, creating a delicate shell that hardens quickly. As you dip, you’ll notice the chocolate hugging the patty like a silky blanket. Place the coated patties back onto the parchment paper, spacing them a few centimeters apart.
-
Now, the waiting game: let the chocolate set. You can speed this up by placing the tray in the refrigerator for about 10‑15 minutes. The chocolate will firm up, turning from a glossy sheen to a firm snap that makes the patties look professionally tempered. Watch Out: If you leave them at room temperature for too long, the chocolate may stay soft and the patties could slide off the tray.
-
Once set, gently lift the patties with a spatula and transfer them to a serving platter. At this point, you’ll see the contrast between the dark, glossy exterior and the pale, coconut‑mint interior—a visual promise of the flavor explosion to come. Take a moment to admire your work; this is the part where you feel like a dessert alchemist who just turned simple pantry staples into edible gold.
-
Serve immediately or store in an airtight container. If you’re serving right away, let each guest take a patty and watch their eyes light up as the mint hits their palate. I’ll be honest — I ate half the batch before anyone else got to try it, and that’s saying something because these are addictive. This is hands down the best version you’ll ever make at home, and you’ll understand why once you taste that perfect mint‑chocolate balance.
That's it — you did it. But hold on, I've got a few more tricks that'll take this to another level...
Insider Tricks for Flawless Results
The Temperature Rule Nobody Follows
Never underestimate the power of temperature control. Keep your chocolate at 88‑90°F (31‑32°C) for a true snap. If the chocolate is too hot, it will be runny and won’t set properly; too cold, and it becomes grainy. I once tried to speed things up by heating the chocolate in a saucepan over medium heat, and the result was a dull, matte coating that looked like it had been left out in the rain. Using a microwave in short bursts, as described earlier, is the safest way to stay within the perfect temperature window.
Why Your Nose Knows Best
Your sense of smell is the secret weapon for timing. When the chocolate is just right, you’ll smell a faint, roasted cocoa aroma that’s sweet but not burnt. If you notice a bitter, burnt scent, you’ve overheated it. Trust that nose—if it smells good, it’s likely ready to coat. This sensory checkpoint saves you from a batch of flat‑tasting patties.
The 5‑Minute Rest That Changes Everything
After coating, let the patties rest for exactly five minutes before moving them to the fridge. This short pause lets the chocolate “settle” and form a stronger crystalline structure, resulting in a shinier finish and a firmer snap. Skipping this rest can lead to a softer coating that melts too quickly on the tongue, losing that satisfying crunch.
The Coconut Cream Whisk Hack
If your coconut cream is stubborn and won’t thicken, add a pinch of agar‑agar powder (about ¼ teaspoon) while whisking. This natural thickener helps the cream hold its shape without altering the flavor. I tried this once when my coconut cream was unusually watery, and the patties turned out perfectly firm without any gelatin or dairy.
The “Double‑Dip” for Extra Crunch
For an extra layer of crunch, dip each patty twice. After the first coating sets, give it a quick dip in the chocolate again, then let it set a second time. This creates a thin, crunchy shell that adds a surprise snap before the creamy interior. Just be careful not to over‑dip, or the outer layer will become too thick and mask the mint flavor.
Creative Twists and Variations
This recipe is a playground. Here are some of my favorite ways to switch things up:
Berry Burst
Swap the peppermint extract for a teaspoon of raspberry puree and fold in freeze‑dried raspberry pieces. The tangy berries complement the dark chocolate, turning the patties into a sweet‑tart treat that’s perfect for summer picnics.
Spiced Chai
Replace the peppermint with a pinch of chai spice blend (cinnamon, cardamom, ginger). Add a drizzle of almond butter on top before the chocolate sets. This creates a warm, comforting flavor that’s ideal for chilly evenings.
Nutty Crunch
Stir in toasted hazelnuts or pistachios alongside the cacao nibs. The nutty oil adds richness, and the visual specks of green or brown make the patties look extra gourmet.
Coconut Lime
Add a teaspoon of lime zest to the coconut cream and swap the peppermint for a dash of lime essential oil. The citrus zing lifts the dessert, giving it a tropical vacation vibe.
Coffee Kick
Mix a tablespoon of finely ground espresso into the chocolate coating. The coffee notes deepen the chocolate flavor and add a subtle bitterness that balances the sweet coconut base.
Storing and Bringing It Back to Life
Fridge Storage
Place the patties in an airtight container lined with parchment paper. They’ll stay fresh for up to 7 days. The cool environment keeps the chocolate firm and prevents the coconut cream from becoming soggy.
Freezer Friendly
If you want to keep them longer, freeze the patties on a tray, then transfer to a zip‑top bag. They’ll last for up to 3 months. Thaw them in the refrigerator for a few hours before serving, and you’ll retain the perfect texture.
Best Reheating Method
When you’re ready to serve, give the patties a quick 10‑second zap in the microwave or let them sit at room temperature for 15 minutes. If the chocolate looks a bit dull, add a tiny splash (about a teaspoon) of water and microwave for 5 seconds; the steam will bring back that glossy shine.