
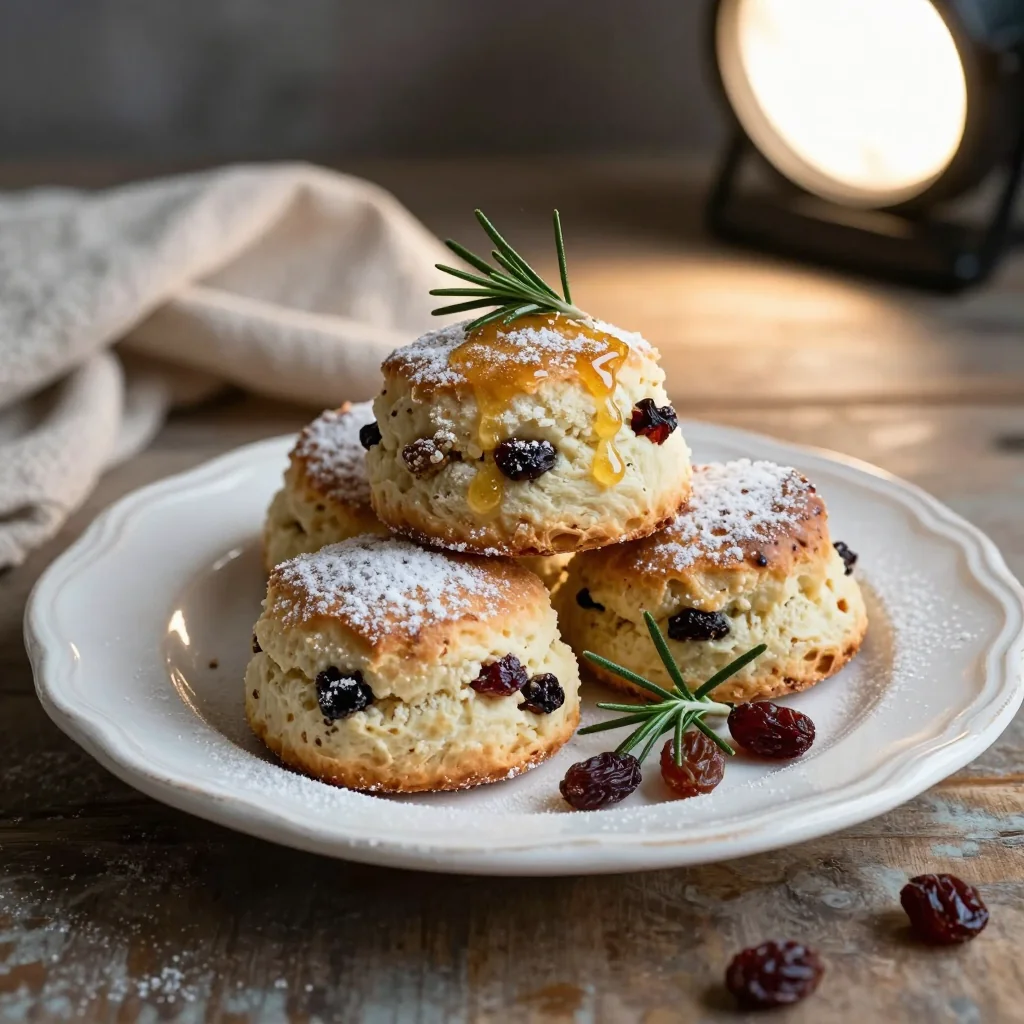
A comforting, buttery treat that brings the rolling green hills of Ireland straight to your kitchen.
When I was a child, the scent of fresh soda bread drifting from my grandmother’s kitchen was as reliable as sunrise. She would pull out a battered tin, sprinkle raisins over the dough, and the whole house would pause, inhaling that sweet, yeasty perfume. Those moments taught me that comfort isn’t just about warmth; it’s about memory, texture, and that fleeting taste of home.
The traditional Irish soda bread scone is a humble staple, born out of necessity when yeast was scarce. Its quick‑rise chemistry, thanks to baking soda and the acidity of buttermilk, yields a tender crumb that’s both crumbly and slightly crisp on the edges. Adding plump raisins introduces bursts of natural sweetness that complement the buttery base.
In this article, you’ll discover why this recipe works every time, how to master the perfect crumb, and tricks to keep the scones moist even after cooling. I’ll walk you through each step, share expert tips, and give you variations that let you tailor the scones to any palate.
So preheat your oven, gather the ingredients, and let’s bring a piece of Irish heritage to your table. Ready? Let’s bake!
🌟 Why This Recipe Will Capture Your Heart
These scones blend tradition with a modern touch, making them perfect for any occasion.
- ✨ Authentic Irish Flavor : The combination of baking soda, buttermilk, and a hint of salt recreates the classic tang that defines true soda bread, while the raisins add a subtle sweetness that balances the palate.
- ✨ Foolproof Quick Rise : No yeast, no long proofing. The chemical reaction happens instantly, giving you a reliable rise every time you bake.
- ✨ Moist Yet Light Texture : The cold butter pockets melt during baking, creating flaky layers that stay moist, preventing the dreaded dry crumb.
- ✨ Versatile Serving Options : Enjoy them warm with butter, drizzle with honey, or serve alongside a hearty Irish stew for a complete meal.
- ✨ Simple Ingredient List : Only pantry staples are required, making it easy to whip up even on a busy weeknight.
- ✨ Perfect for All Seasons : Their comforting warmth is ideal for winter, yet their bright raisin specks make them feel fresh enough for summer tea.
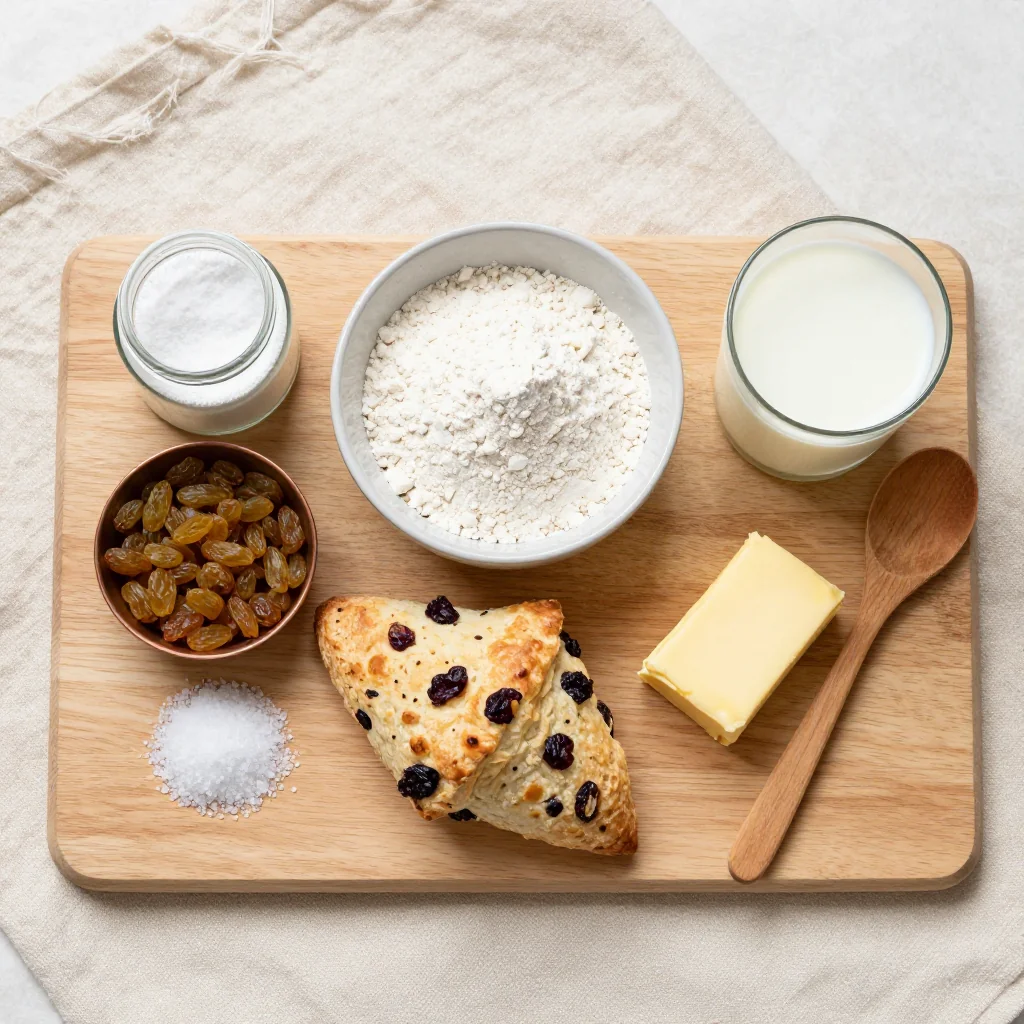
🥗 Ingredients
📝 Complete Ingredient List
For the Dough :
For the Glaze :
🔍 Focus on Key Ingredients
All‑Purpose Flour
The backbone of any baked good, all‑purpose flour provides the structure needed for the scones to rise while remaining tender. For an even lighter crumb, you can sift the flour before measuring, which aerates it and prevents clumps of baking soda.
Buttermilk
Buttermilk’s acidity reacts with baking soda to produce carbon dioxide, giving the scones their characteristic rise without yeast. It also adds a subtle tang that balances the sweetness of raisins. If you don’t have cultured buttermilk, a simple DIY version (1 tbsp lemon juice + 180 ml milk) works perfectly.
Golden Raisins
Raisins add natural sweetness and chewy pockets that contrast beautifully with the crumbly texture. Opt for plump, sun‑dried golden raisins for a milder flavor; regular dark raisins can be used if you prefer a richer, caramel‑like note.
🔄 Quick Substitutions
| If you don’t have... | Use instead... |
|---|---|
| Buttermilk | Milk + 1 tbsp lemon juice (let sit 5 min) |
| Unsalted butter | Salted butter (reduce added salt by 2 g) |
| Golden raisins | Regular raisins or chopped dried apricots |
👨🍳 Step‑by‑Step Instructions
Follow these detailed steps to achieve perfectly risen, buttery scones every time.
📋 Phase 1: Preparation and Mise en Place
Gather and measure all ingredients before you start. This ensures a smooth workflow and prevents over‑mixing.
Prepare the Dry Ingredients
In a large mixing bowl, whisk together the flour, baking soda, cream of tartar (if using), salt, and sugar. Whisking incorporates air, which helps create a lighter crumb later on. The mixture should look uniformly pale and free of clumps.
Cut in the Butter
Using a pastry cutter or two knives, cut the cold butter into the dry mixture until the pieces resemble pea‑size crumbs. The butter should remain cold; if it warms up, refrigerate the bowl for a few minutes before proceeding.
🔥 Phase 2: Mixing and Baking
Combine wet and dry components carefully to avoid over‑development of gluten.
Incorporate the Wet Ingredients
Create a well in the center of the dry mixture and pour in the buttermilk. Gently stir with a wooden spoon until the dough just comes together; it should be slightly shaggy and a bit sticky.
Add the Raisins
Fold the raisins into the dough using a spatula, distributing them evenly without crushing them. The raisins should be visible on the surface after shaping.
Shape the Scones
Turn the dough onto a lightly floured surface. Pat it into a 2‑inch thick rectangle, then cut into eight even wedges using a sharp knife. Transfer the wedges to a parchment‑lined baking sheet, spacing them about 2 cm apart.
Apply the Egg Glaze
Whisk together the beaten egg and milk. Brush the tops of the scones lightly; this will give them a glossy, golden finish. Let the glaze set for a minute before baking.
Bake
Place the tray in a pre‑heated oven at 200 °C (390 °F). Bake for 18‑20 minutes, or until the tops are deep golden and a toothpick inserted near the edge comes out clean.
✨ Phase 3: Finishing Touches and Serving
Cool and present the scones for maximum enjoyment.
Check for Doneness
After the timer, lift one scone gently; the bottom should be firm and lightly browned. If the interior feels doughy, give them an extra 2‑3 minutes.
Cool Slightly
Transfer the scones to a wire rack and let them cool for 5 minutes. This short rest allows the interior to set while keeping the crust crisp.
Serve
Serve warm, split open, and spread with a pat of butter, a drizzle of honey, or a dollop of clotted cream. Pair with a hot cup of Irish tea for an authentic experience.
💡 Expert Tips and Tricks
🛒 Choosing the Right Ingredients
Look for flour that is fresh—older flour can develop off‑flavors that affect the taste. When buying butter, select a block rather than pre‑softened sticks; the higher fat content yields flakier layers. For raisins, choose those that are plump and not overly dried; a quick rinse and pat dry can revive them if they’re a bit shriveled.
🔪 Preparation Techniques
Keep all ingredients cold, especially the butter and buttermilk. Cold butter creates steam pockets during baking, which are essential for flaky texture. When mixing, use a gentle “folding” motion rather than vigorous stirring; this preserves the air you whisked into the dry ingredients.
🌡️ Mastering the Bake
Preheat the oven fully before sliding the tray in; an oven that’s still heating will cause uneven rise. Rotate the baking sheet halfway through the bake to ensure even browning. If your oven runs hot, lower the temperature by 10 °C and extend the bake by a couple of minutes.
🍽️ Presentation and Service
For a polished look, dust the cooled scones lightly with powdered sugar or drizzle a thin stream of honey. Arrange them on a rustic wooden board with a small dish of clotted cream for an authentic Irish tea‑time spread.
🏆 Pro Tips
Elevate your scones from home‑cooked goodness to bakery‑level perfection.
- 🎯 Precise Temperature Control : Use an instant‑read thermometer to verify your oven reaches exactly 200 °C before baking. Even a 5 °C variance can affect the rise and crust color.
- 🎯 Butter Layering Technique : Instead of cutting butter directly into flour, grate the cold butter using a box grater. The fine shreds melt uniformly, creating ultra‑flaky layers.
- 🎯 Hydration Ratio : Aim for a dough hydration of about 70% (liquid weight ÷ flour weight). This ratio ensures the scones are moist without being sticky.
- 🎯 Steam Boost : Place a shallow pan of hot water on the lower rack during the first 10 minutes of baking. The added steam expands the crumb and yields a glossy crust.
- 🎯 Resting the Dough : After mixing, let the dough rest for 10 minutes in the refrigerator. This relaxes gluten and allows the flour to fully absorb the buttermilk, resulting in a tender crumb.
- 🎯 Uniform Cutting : Use a bench scraper and a ruler to cut exact 8‑piece wedges. Uniform size ensures even baking and consistent portion control.
"Good food is the foundation of genuine happiness." — Julia Child
🔄 Variations and Adaptations
This classic recipe is a canvas for creativity; feel free to experiment with flavors and dietary needs.
🥬 Vegetarian / Vegan Version
Replace the butter with a plant‑based solid margarine and use a flax‑egg (1 tbsp ground flaxseed mixed with 3 tbsp water) for the glaze. The texture remains buttery, and the scones stay just as tender.
- Vegan butter (cold, cubed) – same weight as dairy butter.
- Flax‑egg – whisked and brushed on top for shine.
🌶️ Flavor Variations
Spice up the basic recipe or give it a Mediterranean twist. Below are three popular adaptations.
Spicy Version :
Add ½ tsp of ground cinnamon and a pinch of cayenne pepper to the dry mix. The warmth of cinnamon pairs beautifully with the raisins, while the cayenne provides a subtle kick.
Mediterranean Version :
Stir in ¼ cup of chopped sun‑dried tomatoes and a tablespoon of crumbled feta into the dough. Finish with a drizzle of olive oil before baking for a savory twist.
Asian‑Inspired Version :
Replace raisins with ¼ cup of finely chopped dried apricots, add 1 tsp of toasted sesame seeds, and sprinkle a light glaze of honey mixed with a dash of soy sauce after baking.
⚠️ Dietary Adaptations
Gluten‑Free :
Swap the all‑purpose flour for a 1:1 gluten‑free flour blend that contains xanthan gum. The texture may be slightly denser, so increase the buttermilk by 10 ml.
Lactose‑Free :
Use lactose‑free butter or a high‑fat coconut oil solidified in the fridge. Substitute buttermilk with lactose‑free cultured milk.
Low‑Calorie :
Reduce the butter to 80 g, replace half the raisins with diced apples, and use a sugar substitute like erythritol in place of granulated sugar.
👶 Family / Kids Version
Kids love a touch of sweetness. Add a drizzle of maple syrup on top after baking and serve with a side of vanilla yogurt for dipping. Reduce the salt to 2 g to keep the flavor mild for younger palates.
📦 Storage and Reheating
🧊 Conservation
Refrigerator :
- Duration: 3‑4 days
- Container: Airtight glass or plastic container
- Tip: Place a paper towel at the bottom to absorb excess moisture.
Freezer :
- Duration: Up to 2 months
- Method: Cool completely, then wrap each scone in parchment and place in a zip‑top bag.
- Defrosting: Transfer to the fridge overnight or microwave on low for 30 seconds per scone.
💡 For best flavor, reheat from frozen rather than thawed; this preserves the flaky crust.
♨️ Reheating
🔥 Oven (Recommended) :
- Preheat to 180 °C (350 °F).
- Cover scones loosely with aluminum foil to prevent over‑browning.
- Heat for 8‑10 minutes.
- Remove foil and bake an additional 2‑3 minutes for a crisp top.
⚡ Microwave (Quick) :
- Place scone on a microwave‑safe plate.
- Cover with a microwave‑safe lid.
- Heat on medium power for 30‑45 seconds.
- Check softness; add 10‑second bursts if needed.
🍳 Skillet :
Heat a non‑stick skillet over medium heat, add a tiny pat of butter, and warm each scone for 2‑3 minutes per side. This method revives the crust nicely.
🍷 Perfect Pairings
🥗 Accompaniments
- Irish Smoked Salmon : The smoky richness balances the sweet raisins and buttery scone.
- Soft Cheddar Cheese : A sharp cheddar slice adds a savory contrast that highlights the scone’s subtle tang.
- Apple Butter : Its deep, caramel notes echo the raisins, creating a harmonious sweet‑savory duo.
🍷 Wine & Drink Pairings
- Irish Red Ale : The maltiness complements the dough’s buttery flavor while the carbonation cuts through the richness.
- Chardonnay (unoaked) : Its crisp acidity mirrors the buttermilk’s tang, refreshing the palate between bites.
- Non‑Alcoholic : A traditional Irish tea with a splash of honey pairs beautifully.
🍰 To Complete the Meal
Start with a light mixed green salad dressed with a lemon vinaigrette, follow with the scones as the main component, and finish with a simple vanilla custard or a slice of lemon tart for a balanced dining experience.
❓ Frequently Asked Questions
Q: Can I use whole‑wheat flour instead of all‑purpose?
Yes, you can substitute up to 50% of the all‑purpose flour with whole‑wheat flour. Whole‑wheat adds a nutty flavor and extra fiber, but it also absorbs more liquid, so you may need to increase the buttermilk by 15‑20 ml to maintain a soft dough.
Q: Why does my scone turn out dense?
A dense texture often results from over‑mixing, which develops gluten, or from using warm butter that melts before baking. Ensure the butter stays cold, mix only until ingredients are just combined, and handle the dough gently when shaping.
Q: How can I make the scones extra fluffy?
Incorporate a small amount of baking powder (½ tsp) alongside the soda for an extra lift. Additionally, let the dough rest in the fridge for 10 minutes before shaping; this allows the leavening agents to activate fully.
Q: What if I don’t have a pastry cutter?
Use two knives to cut the butter, or grate the cold butter using a box grater. Both methods create the tiny butter pieces needed for flakiness. A food processor on pulse can also work, but be careful not to puree the butter.
Q: Can I add other dried fruits or nuts?
Absolutely! Dried cranberries, chopped dates, or toasted walnuts make excellent additions. Keep the total volume of add‑ins around 150 g to avoid weighing down the dough.
Q: Is it possible to make these ahead of time?
Yes, you can shape the scones, brush with glaze, and freeze them raw on a tray. When ready, bake them straight from the freezer, adding an extra 2‑3 minutes to the baking time.
🎉 To Your Oven!
These Traditional Irish Soda Bread Scones with Raisins combine the simplicity of a quick‑rise dough with the comforting sweetness of golden raisins. By mastering the cold‑butter technique, respecting the gentle mixing process, and paying attention to temperature, you’ll create scones that are fluffy inside, crisp on the edges, and irresistibly fragrant. Whether you serve them for a casual brunch or a festive tea, they are sure to become a beloved staple in your kitchen.
Give the recipe a try, snap a photo, and share your results in the comments below. Your feedback helps us refine the recipe and inspires other home bakers. Happy baking!
Did you try this recipe?
Leave a comment and rating below! Share your photos on Instagram with #IrishSconeLove for a chance to be featured.
Traditional Irish Soda Bread Scones with Raisins
Buttery, raisin‑studded scones that capture the spirit of Irish kitchens.
📝 Ingredients
Dough
Glaze
👨🍳 Instructions
- 1
Whisk flour, baking soda, cream of tartar, salt, and sugar together in a large bowl.
- 2
Cut cold butter into the dry mixture until it resembles coarse crumbs.
- 3
Create a well, pour in buttermilk, and stir gently until just combined.
- 4
Fold in the raisins, distributing them evenly.
- 5
Pat the dough into a 2‑inch thick rectangle and cut into eight wedges.
- 6
Brush each scone with the beaten egg mixed with milk.
- 7
Bake at 200 °C for 18‑20 minutes until golden.
- 8
Cool briefly on a wire rack, then serve warm with butter or honey.
- 9
Optional: Store leftovers in an airtight container for up to four days.
- 10
Enjoy with a cup of tea and share the joy!
🥗 Nutritional Information (per serving)
*Values are estimates based on standard ingredients.
📚 You Might Also Like
Classic Irish Soda Bread
Raspberry Lemon Scones
Apple Cinnamon Bread


💬 Comments and Reviews
Leave a Comment
[Reader comments will appear here]