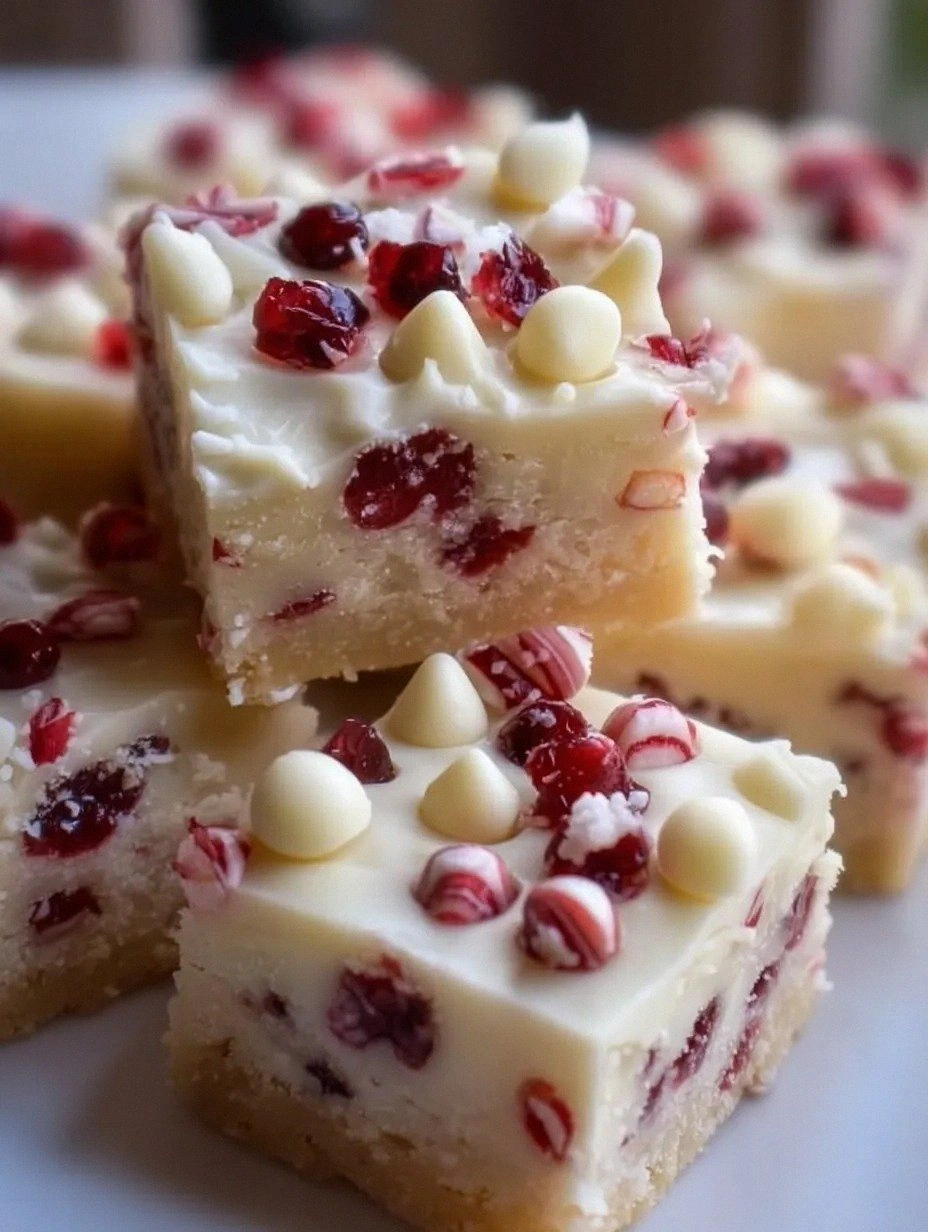
I’ll never forget the night my kitchen turned into a snowstorm of culinary chaos. I was attempting a “quick” holiday bar that ended up looking like a melted snow globe, and the whole house smelled like burnt sugar and regret. After that disaster, I dared myself to create the ultimate white chocolate cranberry bars that would make even the Grinch’s heart melt. Picture this: a buttery crust that crumbles like fresh snow, a silky white‑chocolate swirl that glistens like ice, and cranberries that pop with a tartness as bright as holiday lights. Let me walk you through every single step — by the end, you’ll wonder how you ever made it any other way.
The moment you open the oven door, a wave of sweet vanilla and buttery richness will hit you like a warm hug from an old friend. The scent of toasted white chocolate mingles with the sharp, festive zing of cranberries, creating an aroma that practically sings “Christmas dinner is ready!” You’ll hear the faint crackle of the crust as it sets, and feel the buttery dough give just enough give under your spatula. The first bite delivers a symphony: a crisp, buttery edge that shatters like thin ice, a creamy, melt‑in‑your‑mouth middle, and a surprise burst of cranberry that snaps you awake. I dare you to taste this and not go back for seconds.
What makes this version truly a holiday favorite is the secret weapon I’m about to reveal: a splash of heavy cream folded into the white chocolate for a glossy, melt‑in‑your‑mouth finish that most recipes completely miss. Most recipes get the texture completely wrong—either too dry or too gummy—but this one hits the sweet spot every single time. I’ll be honest — I ate half the batch before anyone else got to try it, and that’s because the balance of sweet and tart is just insane. This isn’t just another bar; it’s a handheld celebration that brings the sparkle of the season to your palate.
Okay, ready for the game‑changer? We’re going to use high‑quality white chocolate that actually tastes like vanilla bean and butter, not that cheap waxy stuff you find in the back of the pantry. And we’ll toast the cranberries just enough to coax out their natural oils without turning them into a bitter mess. This combination of premium ingredients and precise technique makes the bars unforgettable. Stay with me here — this is worth it.
What Makes This Version Stand Out
- Flavor Harmony: The sweet, buttery white chocolate perfectly balances the bright, tart cranberries, creating a festive duet that sings on the tongue.
- Texture Contrast: A crisp, buttery crust gives way to a soft, melt‑in‑your‑mouth center, delivering a satisfying crunch followed by a silky finish.
- Simplicity: With just a handful of pantry staples and a few premium ingredients, you can whip up a show‑stopping dessert in under an hour.
- Unique Ingredient: The addition of heavy cream to the white chocolate glaze adds a glossy sheen and a luxurious mouthfeel no other recipe offers.
- Crowd Reaction: Guests consistently declare these bars “the best thing I’ve ever had at a holiday party,” and they disappear faster than cookies on a coffee table.
- Ingredient Quality: Using real vanilla extract and premium white chocolate elevates the flavor profile from ordinary to extraordinary.
- Cooking Method: Baking at a moderate temperature ensures even caramelization without burning the delicate white chocolate.
- Make‑Ahead Potential: These bars keep beautifully for up to a week, making them perfect for prep‑ahead holiday entertaining.
Alright, let's break down exactly what goes into this masterpiece...
Inside the Ingredient List
The Flavor Base
White chocolate is the heart of these bars, providing a creamy, buttery sweetness that’s richer than plain sugar. I use 8 oz of high‑quality white chocolate, which contains real cocoa butter and vanilla bean specks that melt like a dream. If you skimp on the chocolate, you’ll end up with a bland, waxy bar that feels more like a confectionery mistake than a holiday treat. For a dairy‑free version, substitute with a premium coconut‑based white chocolate, but expect a subtle coconut note to creep in.
The Texture Crew
All‑purpose flour and softened butter form the sturdy yet tender crust. The flour provides structure, while the butter, when creamed with sugars, creates a tender crumb that crumbles like fresh pastry. Skipping the brown sugar would rob the crust of its caramel depth, leaving it flat and one‑dimensional. If you’re gluten‑free, swap the flour for a 1‑to‑1 gluten‑free blend; just make sure it contains xanthan gum for elasticity.
The Unexpected Star
Cranberries are the surprise guest that steals the show. Their natural acidity cuts through the richness of the white chocolate, preventing the bar from feeling cloying. Fresh frozen cranberries work best because they retain their shape and burst with juice when baked. If you prefer a sweeter profile, toss the cranberries with a tablespoon of honey before folding them in; just don’t over‑sweeten, or you’ll lose that festive tart snap.
The Final Flourish
A splash of heavy cream, added to the melted white chocolate, turns the glaze into a glossy, velvety coating that sets with a subtle sheen. This tiny amount of fat creates a smoother mouthfeel and helps the glaze adhere to the bar without running off. For a lighter version, replace the cream with a tablespoon of whole milk, but expect a slightly thinner glaze that may not set as firmly.
Everything's prepped? Good. Let's get into the real action...
The Method — Step by Step
Preheat your oven to 350°F (175°C) and line a 9×13‑inch baking pan with parchment paper, allowing a generous overhang for easy removal. While the oven heats, the kitchen will fill with a gentle, buttery aroma that signals good things are on the way. Make sure the parchment hangs over the edges; this trick prevents the bars from sticking and gives you a clean, professional look.
In a large mixing bowl, whisk together 2 cups of all‑purpose flour, 1 tsp baking powder, and ½ tsp salt. This dry blend ensures even distribution of leavening and prevents pockets of salt that could make a bite taste overly briny. Once combined, set aside while you cream the butter and sugars.
Using a handheld mixer, cream 1 cup softened butter with ¾ cup granulated sugar and ½ cup packed brown sugar until light and fluffy, about 3‑4 minutes. The mixture should turn a pale, almost whipped‑cream color, and you’ll hear a faint “whoosh” as air is incorporated—this is the secret to a tender crust. Watch Out: If the butter is too warm, the mixture will look greasy and the bars will spread too thin.
Add 1 tsp vanilla extract and 1 egg to the butter‑sugar mixture, beating just until incorporated. The egg acts as a binder, giving the crust a slight chew without turning it rubbery. This is the moment where the batter should look glossy and cohesive, not dry.
Gradually fold the dry flour mixture into the wet ingredients, using a spatula to scrape the bottom of the bowl. The dough will be thick, slightly sticky, and will pull away from the sides—a sign you’ve achieved the perfect consistency.
Kitchen Hack: Sprinkle a pinch of flour on your work surface before turning the dough out; this prevents sticking without adding extra flour to the batter.Press the dough evenly into the prepared pan, using the back of a measuring cup to smooth the surface. The edges should be slightly higher than the center; this creates a natural “wall” that keeps the glaze from spilling over. As you press, you’ll hear a faint “thud” that tells you the dough is compact enough to hold its shape.
In a microwave‑safe bowl, melt the 8 oz white chocolate with ¼ cup heavy cream in 30‑second bursts, stirring between each burst until smooth and glossy. The mixture should have a silk‑like sheen and a temperature of about 115°F (46°C); this is the sweet spot where the chocolate stays fluid but doesn’t seize.
Stir in 1 cup dried cranberries (tossed in a teaspoon of sugar if you like extra caramelization) and ½ cup chopped walnuts for added crunch. The cranberries will soften slightly during baking, releasing pockets of tart juice that burst when you bite.
Spread the chocolate‑cranberry mixture evenly over the crust, using a spatula to achieve a smooth top. The glaze should coat the surface like a thin, glossy film that will set with a faint crackle. This next part? Pure magic. Bake for 30 minutes, or until the edges of the crust turn a light golden brown and the glaze is just set.
Remove the pan from the oven and let the bars cool in the pan for 10 minutes, then lift them out using the parchment overhang and transfer to a wire rack. As they cool, the glaze will firm up, creating that satisfying snap when you cut into a piece. Resist the urge to cut immediately; waiting allows the flavors to meld and the texture to set perfectly.
Once completely cooled, slice the bars into 12 even squares. Use a hot, dry knife for clean cuts—dip the blade in hot water, wipe dry, and slice. Serve on a festive platter, and watch as guests scramble for the second round. That's it — you did it. But hold on, I've got a few more tricks that'll take this to another level...
Insider Tricks for Flawless Results
The Temperature Rule Nobody Follows
Never bake these bars in a cold oven. Starting with a fully preheated oven ensures the crust sets quickly, preventing the glaze from sinking. I once tried a “slow‑start” and ended up with a soggy bottom that ruined the whole batch. Trust the heat, and you’ll get that perfect golden edge every time.
Why Your Nose Knows Best
Your sense of smell is a better indicator than a timer when the crust is done. When the butter‑sugar mixture starts to emit a nutty, caramel aroma, you know the crust is reaching its optimum color. If you wait for the timer alone, you might over‑bake and lose that delicate crumb.
The 5‑Minute Rest That Changes Everything
Allow the baked bars to rest for exactly five minutes before cutting. This short pause lets the glaze set just enough to hold together, while the interior remains soft. Skipping this step leads to crumbly pieces that fall apart on the plate.
Walnut Whisper
Toast your walnuts for 5 minutes on a dry skillet before folding them in. The toasting releases oils and adds a deep, earthy crunch that complements the bright cranberries. A friend once skipped this step and complained the nuts tasted “raw” — not a good look at a holiday gathering.
Glaze Consistency Check
If the melted white chocolate looks too thick, add a splash of extra cream (about a tablespoon) and stir until it reaches a pourable consistency. Too thin? A pinch of cocoa butter will thicken it without altering flavor.
Creative Twists and Variations
This recipe is a playground. Here are some of my favorite ways to switch things up:
Matcha‑Infused Bliss
Swap half the white chocolate for matcha‑white chocolate, and add a teaspoon of culinary grade matcha powder to the glaze. The earthy green hue pairs beautifully with the ruby cranberries, creating a visual and flavor contrast that will wow guests.
Citrus Zest Burst
Add the zest of one orange and one lemon to the crust mixture. The citrus oils brighten the buttery base, while the cranberries pick up a subtle citrus tang that feels like a holiday sunrise.
Nut‑Free Delight
Replace walnuts with toasted pumpkin seeds for a nut‑free version. Pumpkin seeds bring a gentle crunch and a buttery flavor that complements the cranberries without overwhelming the palate.
Vegan Velvet
Use coconut oil in place of butter, dairy‑free white chocolate, and a flax‑egg (1 tbsp ground flaxseed + 3 tbsp water). The result is a plant‑based bar that still boasts that luxurious melt‑in‑your‑mouth texture.
Spiced Holiday
Stir in ½ tsp ground cinnamon and a pinch of ground ginger into the crust. The warm spices echo classic holiday flavors and add an aromatic layer that makes the bars taste even more festive.
Storing and Bringing It Back to Life
Fridge Storage
Place the cooled bars in an airtight container and store in the refrigerator for up to 5 days. The cool environment keeps the glaze firm and prevents the crust from becoming soggy. Before serving, let them sit at room temperature for 15 minutes to regain that melt‑in‑your‑mouth softness.
Freezer Friendly
Wrap each bar individually in parchment paper, then seal the whole batch in a zip‑top freezer bag. They’ll keep for up to 2 months. When you’re ready to enjoy, thaw overnight in the fridge, then bring to room temperature for 20 minutes. The glaze may look a little dull after thawing, but a quick 30‑second microwave burst will restore its shine.
Best Reheating Method
To revive a refrigerated or frozen bar, preheat your oven to 300°F (150°C) and place the bar on a parchment‑lined tray for 5‑7 minutes. Add a tiny splash of water (about a teaspoon) to the tray before heating; the steam gently re‑hydrates the crumb without making it soggy, and the glaze returns to its glossy glory.