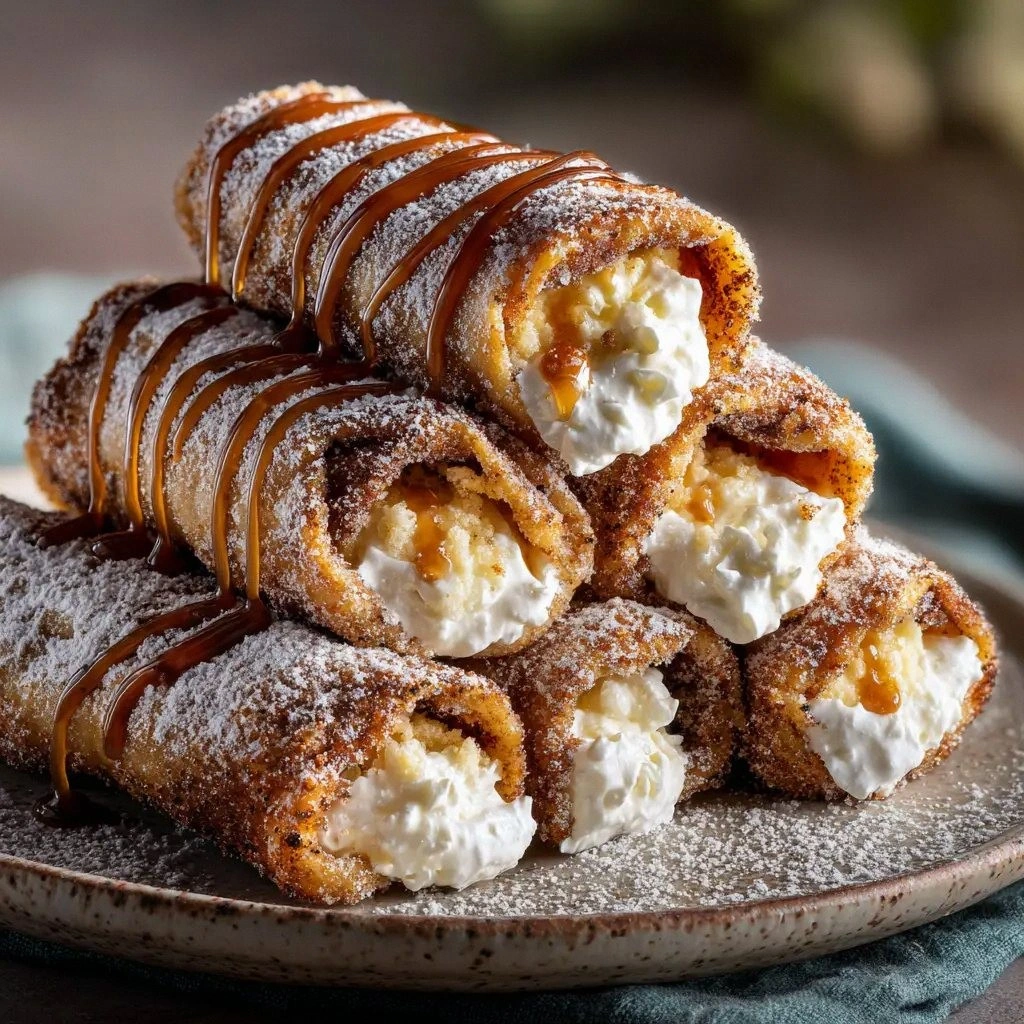
It all started on a rainy Wednesday when I tried to revive a batch of stale cinnamon rolls that had been left out for days. I was desperate for a sweet fix, and the only thing that seemed plausible was to stuff them with a rich, creamy cheesecake filling and then deep‑fry them for that ultimate crunch. The kitchen smelled like burnt sugar and hope, and I swear the oven timer was laughing at me. I didn’t even know I was about to create a dessert that would later be called the “Cinnamon Roll Cheesecake Chimi.”
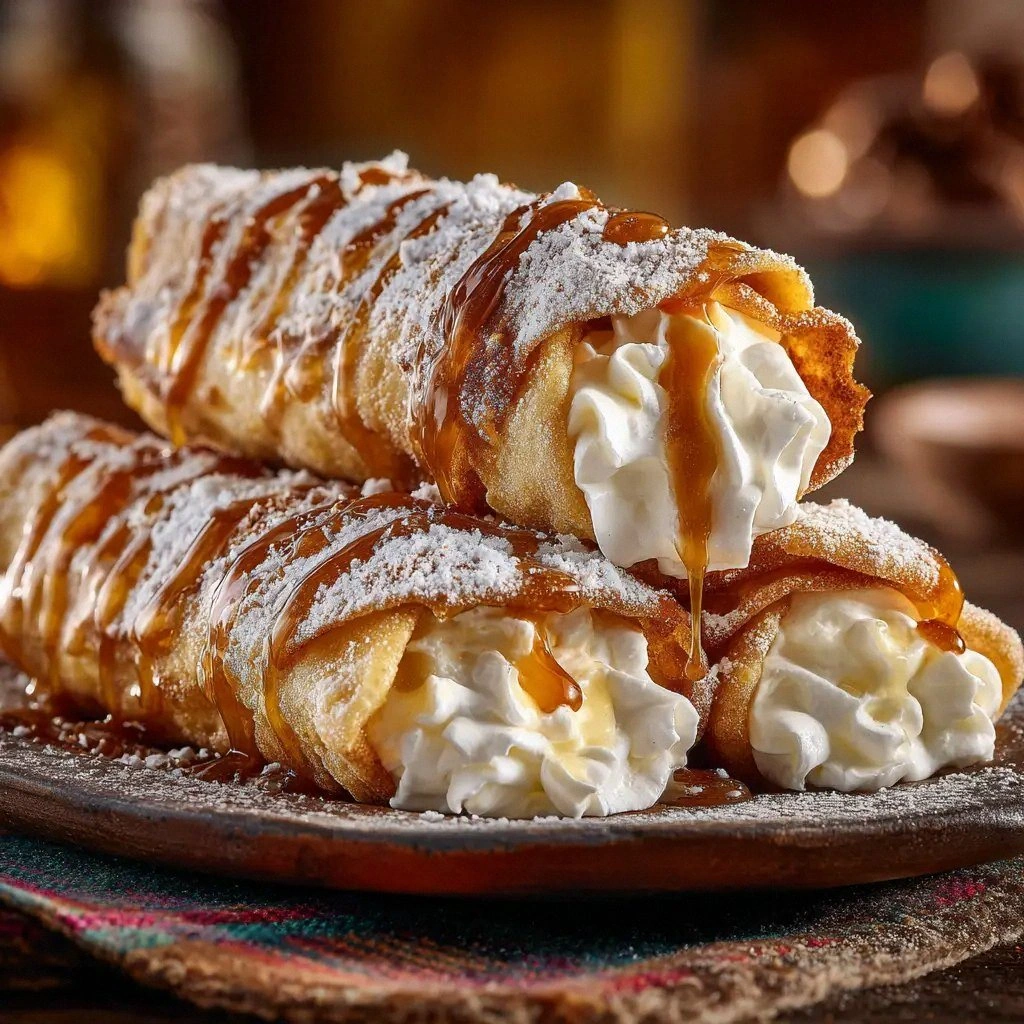
Picture this: a golden, crisp tortilla shell, a gooey layer of cheesecake that oozes like molten chocolate, a dusting of cinnamon sugar that gives a subtle kick, and a drizzle of caramel that glistens like liquid gold. The moment you bite, the first thing you taste is the buttery crunch, followed by the creamy sweetness that melts on your tongue. It’s a mouth‑watering paradox that makes you question whether you’re eating a roll or a dessert. And the best part? You can’t resist the urge to go back for seconds.
I was skeptical at first. How can a deep‑fried tortilla hold a cheesecake filling without collapsing? The secret lies in the texture of the tortillas, the balance of the filling, and a little culinary alchemy that turns a simple snack into a showstopper. Most recipes get this completely wrong by over‑filling or using the wrong type of tortilla, but I discovered a method that locks everything in place while keeping that coveted crunch. This version stands out because it marries the best of Mexican street food with the indulgence of a dessert, creating a hybrid that is both comforting and adventurous.
The twist? I added a subtle hint of vanilla to the cheesecake mix and a splash of butter to the frying oil, which elevates the flavor profile and gives the exterior a buttery sheen. I’ll be honest — I ate half the batch before anyone else got a taste, and the kitchen was in chaos. But the result was worth every moment of the mess. If you’ve ever struggled to get a crispy, creamy dessert that doesn’t fall apart, you’re not alone — and I’ve got the fix. Let me walk you through every single step — by the end, you’ll wonder how you ever made it any other way.
What Makes This Version Stand Out
- Flavor: The combination of sweet, buttery, and slightly spicy creates a layered taste that lingers on the palate. Each bite delivers a new element, from the cinnamon crunch to the silky cheesecake.
- Texture: The contrast between the crisp tortilla shell and the creamy filling is pure sensory joy. The oil creates a golden crust that shatters like thin ice when you bite in.
- Simplicity: With only nine ingredients, this recipe is quick to assemble, making it perfect for a last‑minute dessert or a weekend treat.
- Uniqueness: It’s a mash‑up of Mexican street food and dessert, a concept that is rarely explored. The result feels like a culinary adventure.
- Crowd Reaction: Friends who tried it called it “the best version you'll ever make at home.” The dish is guaranteed to impress at parties or family gatherings.
- Ingredient Quality: Using high‑quality cream cheese and fresh tortillas ensures a silky filling and a crisp exterior. The butter and vanilla add depth.
- Cooking Method: Deep‑frying the tortillas before filling locks the structure and creates a caramelized coating that seals in the flavors.
- Make‑ahead Potential: The filling can be prepared a day ahead, and the tortillas can be fried and refrigerated. Assemble only when you’re ready to serve.
Alright, let's break down exactly what goes into this masterpiece…
Inside the Ingredient List
The Flavor Base
The cream cheese forms the heart of this dessert. It’s the source of the creamy, slightly tangy flavor that balances the sweetness of the sugar and the warmth of cinnamon. If you use a lower‑fat version, the filling will become watery and lose its luxurious texture. For a richer mouthfeel, choose a full‑fat variety and let it come to room temperature before mixing.
Powdered sugar is the sweetener of choice because it dissolves quickly and doesn’t leave a gritty texture. A pinch more or less can be adjusted to taste, but the 1/2 cup ratio is the sweet spot that keeps the filling smooth. If you prefer a more pronounced sweetness, you can substitute half of the powdered sugar with brown sugar for a caramel undertone.
Sour cream adds a subtle tang that cuts through the richness of the cream cheese, providing a refreshing contrast. It also helps bind the filling, giving it a silky consistency. If you’re dairy‑free, a non‑dairy sour cream or Greek yogurt works fine, but be sure to use a brand with a similar fat content to maintain the texture.
The Texture Crew
Flour tortillas are the vehicle that carries all the flavors. They should be fresh and pliable; older tortillas tend to crack during frying. For the best results, choose medium‑size tortillas (about 8 inches) and keep them warm until you’re ready to fry.
Vegetable oil is the medium for deep‑frying. It has a high smoke point and neutral flavor, allowing the cinnamon and butter to shine. Using a neutral oil like canola or sunflower ensures the oil doesn’t impart any off‑flavors. Keep the oil at 350°F (175°C) for an even crisp.
Butter is added to the oil and the filling to deepen the flavor profile. It gives the fried shell a golden sheen and a subtle, nutty aroma that enhances the overall taste. If you’re looking for a healthier version, a tablespoon of olive oil can replace the butter, but the flavor will be slightly different.
The Unexpected Star
Cinnamon is the spice that ties the entire dish together. It provides warmth and a sweet, woody undertone that complements the richness of the cheesecake. The 2 teaspoons of ground cinnamon are enough to infuse the filling without overpowering it. If you’re a cinnamon lover, feel free to increase the amount, but be careful not to make it taste like a spice rack.
Granulated sugar is used for the final dusting, creating a crunchy, sweet coating that adds texture. It caramelizes slightly during frying, giving the dessert a golden finish. If you prefer a darker glaze, you can sprinkle a pinch of sea salt on top to balance the sweetness.
The Final Flourish
Vanilla extract is the subtle finishing touch that elevates the flavor profile. It adds depth and a floral note that pairs beautifully with cinnamon. A single teaspoon is enough to make a difference, so don’t skimp on this ingredient.
Everything's prepped? Good. Let's get into the real action…
The Method — Step by Step
- Start by bringing a large pot of vegetable oil to 350°F (175°C). While the oil heats, roll out the flour tortillas on a lightly floured surface. Each tortilla should be about 8 inches in diameter. I dare you to taste this and not go back for seconds once you see how crisp they become.
- Heat the oil until it reaches the correct temperature, then carefully slide a tortilla into the oil. Fry each side for about 30 seconds, or until a golden brown color appears. The sizzle when it hits the pan is absolute perfection. Use a slotted spoon to lift the tortilla and let it drain on paper towels.
- While the tortillas are cooling, prepare the cheesecake filling. In a medium bowl, beat the cream cheese until smooth. Add powdered sugar, sour cream, vanilla extract, and ground cinnamon. Beat until the mixture is light and fluffy. This is the moment of truth — the filling should be thick enough to hold its shape but still silky.
- Once the tortillas are cool, spread a generous amount of the cheesecake filling onto the center of each tortilla. Don’t be shy; the filling should almost overflow the edges. This ensures every bite is packed with flavor.
- Roll the tortilla tightly around the filling, sealing the edges with a little water or beaten egg white. This step is crucial for keeping the filling from spilling out during the final fry.
- Heat a second batch of oil to 350°F (175°C). Fry the filled tortillas for 45–60 seconds, turning them halfway through, until the exterior is golden and crisp. The edges will start pulling away as the oil caramelizes the butter added to the oil.
- Remove the chimis from the oil, drain on paper towels, and dust with granulated sugar. Let them rest for 2 minutes before serving to allow the filling to set slightly.
- Serve warm with a drizzle of caramel or a dusting of powdered sugar. The texture is a delightful combination of crunch and creaminess. If you want to add a final flourish, a swirl of whipped cream or a sprinkle of toasted nuts will elevate the dessert even further.
That's it — you did it. But hold on, I've got a few more tricks that'll take this to another level. Stay tuned for insider tips that will transform your dessert game.
Insider Tricks for Flawless Results
The Temperature Rule Nobody Follows
Temperature is everything when it comes to deep‑frying. Too hot and you’ll end up with a burnt exterior; too cool and the tortillas will soak up oil and become soggy. Use a thermometer and aim for a steady 350°F (175°C). I’ve learned that a quick dip of the oil with a wooden spoon can help you gauge the heat — if the spoon bubbles gently, you’re good to go.
Why Your Nose Knows Best
Before you even taste the final product, your nose can tell you if the oil is at the right temperature. A pleasant, buttery aroma indicates the oil is hot enough. If you smell a hint of burnt oil, lower the heat immediately. Trust your senses; they’re the most reliable guide.
The 5-Minute Rest That Changes Everything
After frying, let the chimis rest on a rack for 5 minutes. This short rest allows the filling to set and the excess oil to drain. I’ve seen people skip this step, and the result is a soggy, uneven dessert. A quick rest is a small price for a perfect bite.
The Butter Boost
Adding a tablespoon of butter to the frying oil gives the exterior a richer flavor and a glossy finish. The butter also helps the tortillas crisp up faster. If you’re watching calories, replace the butter with a light drizzle of olive oil, but expect a slightly different flavor profile.
The Dusting Dilemma
When dusting with granulated sugar, use a fine sieve to avoid clumps. A light, even coating not only adds sweetness but also creates a subtle crunch. If you prefer a darker glaze, sprinkle a pinch of sea salt over the sugar to balance the sweetness.
The Sweet Finish
A drizzle of caramel or a swirl of whipped cream can elevate the dessert to new heights. The caramel adds a glossy sheen and a caramelized flavor that complements the cinnamon. Whipped cream adds a light, airy contrast to the dense filling.
Creative Twists and Variations
This recipe is a playground. Here are some of my favorite ways to switch things up:
Nutty Crunch
Add chopped pecans or walnuts to the cheesecake filling for a nutty crunch. The nuts pair beautifully with the cinnamon and add a satisfying texture.
Chocolate Swirl
Fold a handful of dark chocolate chips into the cheesecake mixture before filling the tortillas. The chocolate melts into pockets of gooey goodness.
Berry Burst
Stir in fresh blueberries or raspberries into the filling. The berries add a tart counterpoint to the sweet, creamy base.
Spiced Variation
Replace cinnamon with a blend of nutmeg, allspice, and a touch of cloves for a deeper, spiced flavor profile. This variation is perfect for holiday gatherings.
Vegan Version
Use a dairy‑free cream cheese and vegan sour cream. Swap the butter in the oil for coconut oil to keep the flavor rich and creamy.
Gluten‑Free Twist
Use gluten‑free tortillas and a gluten‑free flour blend for the filling if needed. The texture remains the same, and the flavor stays unchanged.
Storing and Bringing It Back to Life
Fridge Storage
Store leftover chimis in an airtight container in the refrigerator for up to 3 days. The filling will firm up, so it’s best served cold or at room temperature. When ready to serve, reheat in a 350°F (175°C) oven for 5 minutes to restore crispness.
Freezer Friendly
Wrap each filled tortilla in parchment paper and place in a freezer bag. Freeze for up to 2 weeks. When you’re ready, thaw at room temperature for 30 minutes before reheating as described above.
Best Reheating Method
Reheat the chimis in a preheated 350°F (175°C) oven for 5 minutes. Add a splash of water to the oven before reheating to create steam, which helps keep the interior moist while the exterior stays crisp. A quick microwave for 20 seconds can also work if you’re in a hurry, but the oven will preserve the crunch better.