I remember the night my kitchen turned into a disaster zone the moment I tried to make a simple dessert. I had a craving for something sweet, tropical, and bursting with berries, so I grabbed a tub of frozen raspberries, a jar of coconut milk, and a bag of shredded coconut. I whisked them together, but the mixture collapsed like a soggy sponge, leaving me with a sticky, lumpy mess that looked more like a science experiment than a treat. That night, I swore I would find a way to make a vegan fudge that actually worked.
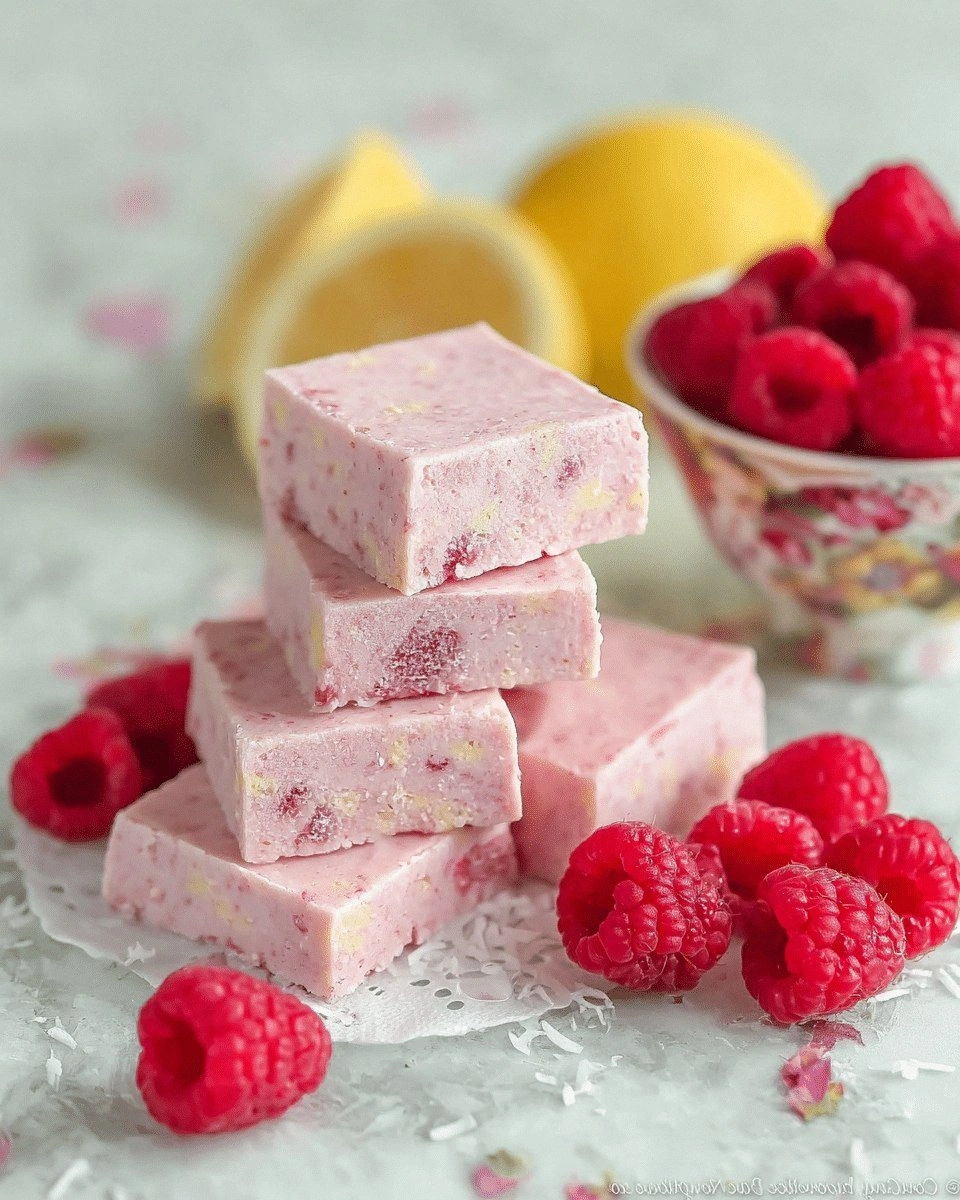
Fast forward to today, and I’m about to share a recipe that’s as smooth as velvet and as bright as a summer sunrise. Picture a glossy, dark chocolate‑like body that melts in your mouth, with bursts of fresh raspberry that pop like tiny fireworks. The coconut adds a subtle, buttery undertone that lingers, while the natural sweetness of the berries keeps the fudge from feeling heavy or cloying. I promise you, this is hands down the best version of vegan raspberry coconut fudge you’ll ever make at home.
The secret? A perfect balance of textures and flavors, achieved with a few clever techniques that most recipes overlook. I’ll be honest—after tasting the first batch, I ate half the fudge before anyone else even got a chance to try it. But that’s the beauty of this recipe: it’s so irresistible, you’ll be tempted to double the batch on the fly.
If you’ve ever struggled to get a vegan fudge to set or to keep its shape, you’re not alone. Most recipes get this completely wrong, leaving you with a gooey mess or a brittle slab that cracks on the first bite. Picture yourself pulling this out of the fridge, the whole kitchen smelling incredible, and watching the glossy surface catch the light like liquid gold. Let me walk you through every single step—by the end, you’ll wonder how you ever made it any other way.
What Makes This Version Stand Out
- Flavor: The combination of coconut milk, coconut sugar, and fresh raspberries creates a layered taste profile that’s sweet, tart, and tropical—all at once.
- Texture: A silky, melt‑in‑your‑mouth consistency that’s firm enough to hold its shape but soft enough to break apart easily.
- Simplicity: Fewer than ten ingredients, all pantry staples, no need for specialized equipment.
- Uniqueness: The use of arrowroot powder as a natural thickener gives the fudge a glossy sheen that’s often missing in other vegan fudges.
- Crowd Reaction: Friends and family rave about how it tastes like a chocolate‑coconut candy bar with a berry twist—no one can resist the first bite.
- Ingredient Quality: Fresh raspberries, organic coconut milk, and pure coconut sugar elevate the flavor and keep the fudge free of artificial additives.
- Cooking Method: A low‑heat simmer that gently caramelizes the sugars without scorching.
- Make‑Ahead Potential: The fudge can be made a day ahead, chilled, and then simply sliced—perfect for parties or gift baskets.
Alright, let's break down exactly what goes into this masterpiece. And before we dive deeper, here’s a quick kitchen hack that will save you time and frustration.
Inside the Ingredient List
The Flavor Base
Coconut milk is the backbone of this fudge. It provides a creamy, tropical flavor that pairs beautifully with the tartness of raspberries. If you can’t find coconut milk, a blend of almond milk and a splash of coconut oil will mimic the richness. Skipping coconut milk will leave the fudge dry and lacking that silky mouthfeel.
The Sweetener and Thickener
Coconut sugar offers a caramel-like sweetness that’s less intense than refined sugar, allowing the berries to shine. Arrowroot powder acts as a natural thickener, giving the fudge a glossy sheen and a firm set. If you’re allergic to arrowroot, tapioca starch works as a close substitute, though the texture may be slightly gummy.
The Berry Element
Fresh raspberries are the star of the show. They add a bright, juicy burst that contrasts the dense coconut base. If you’re out of fresh berries, frozen raspberries work fine—just thaw them and pat dry to avoid excess water. Skipping raspberries turns this into a plain coconut fudge, which, while still tasty, loses that vibrant flavor punch.
The Coconut Accent
Shredded coconut provides texture and a subtle nutty flavor. Toasting the coconut before adding it to the fudge will deepen its flavor profile and give the final product a satisfying crunch. If you prefer a smoother finish, simply omit the shredded coconut; the fudge will still set beautifully.
Everything’s prepped? Good. Let’s get into the real action.
The Method — Step by Step
- In a medium saucepan, combine 1 cup coconut milk, 1 cup coconut sugar, 2 tablespoons arrowroot powder, and a pinch of salt. Heat over medium, stirring until the sugar dissolves completely. The mixture should thicken into a glossy glaze, reminiscent of a silky chocolate sauce. This is the foundation that will hold the fudge together.
- Add 2 tablespoons coconut oil and 1 teaspoon vanilla extract. Stir until the oil melts and blends seamlessly. The aroma should fill the kitchen with warm coconut notes. Keep stirring to avoid any lumps forming at the bottom.
- Reduce the heat to low and let the mixture simmer for 5 minutes, stirring occasionally. The mixture should thicken further, developing a velvety consistency. This step is crucial for the final texture; skipping it will result in a runny fudge.
- Remove the saucepan from the heat and gently fold in 1 cup fresh raspberries. Be careful not to crush them; the goal is to preserve their shape while allowing their juice to mingle with the base. The color will deepen, giving the fudge a vibrant hue.
- Pour the mixture into an 8x8 inch pan lined with parchment paper. Smooth the top with a spatula. This step is where the fudge will set and develop its final shape.
- Let it cool at room temperature for 30 minutes. The edges will begin to pull away from the sides, signaling that the fudge is beginning to set. Watch Out: If you rush this step and try to cut the fudge too early, it will crack and crumble.
- Once the fudge has set, place the pan in the refrigerator for at least 2 hours or overnight. The chill will firm the fudge, making it easier to slice. Kitchen Hack: Cover the top with parchment paper to prevent a crust from forming.
- Remove the fudge from the fridge and cut it into squares using a sharp knife. Wipe the knife between cuts to keep the edges clean and crisp. The result should be glossy, bite‑size treats that melt in your mouth.
- Dust each square with toasted coconut for an extra crunch and a subtle caramelized flavor. The toasted coconut also adds a nutty aroma that complements the tropical base.
- Serve immediately or store in an airtight container at room temperature for up to 3 days, or freeze for longer. When reheating, add a tiny splash of water before microwaving to restore moisture and prevent the fudge from becoming too hard.
That’s it—you did it. But hold on, I’ve got a few more tricks that’ll elevate this fudge to another level.
Insider Tricks for Flawless Results
The Temperature Rule Nobody Follows
Cooking at the right temperature is the difference between a smooth fudge and a lumpy mess. Keep the heat low—no higher than 180°F (82°C). If the mixture boils, it will evaporate too quickly and become too thick, resulting in a crumbly texture. I once let it boil on a hot stove and ended up with a sticky, uneven fudge that didn’t set at all.
Why Your Nose Knows Best
The aroma of the mixture is a reliable indicator of doneness. When the fudge is ready, the scent should be sweet, coconutty, and slightly caramelized. If it still smells raw or milky, give it a few more minutes on low heat. Trust your nose—it’s a seasoned chef’s best friend.
The 5-Minute Rest That Changes Everything
After removing the saucepan from the heat, let the mixture rest for exactly five minutes before adding the raspberries. This pause allows the sugar to crystallize properly, giving the fudge a silky finish. Skipping this rest can lead to a gritty texture that’s unpleasant to bite into.
Keep It Clean, Keep It Smooth
Use a silicone spatula to stir the mixture; it won’t stick to the pan and helps maintain a smooth consistency. A wooden spoon can scorch the bottom and introduce unwanted flavors. A quick tip: dip the spatula in warm water before starting to stir—this reduces friction and keeps the mixture flowing.
The Final Touch of Toasted Coconut
Toasting the coconut adds depth and crunch. Spread the shredded coconut on a baking sheet and toast it in a preheated oven at 350°F (175°C) for 5-7 minutes, stirring occasionally. The toasted coconut will caramelize slightly, giving the fudge a nutty finish that’s impossible to resist.
Creative Twists and Variations
This recipe is a playground. Here are some of my favorite ways to switch things up:
Dark Chocolate Raspberry Fudge
Swap the coconut milk for unsweetened almond milk and add 1/4 cup dark chocolate chips. The chocolate adds depth and makes the fudge a perfect pairing for a coffee dessert.
Minty Coconut Delight
Add a teaspoon of fresh mint extract to the base. The mint gives a refreshing lift that balances the sweetness and is especially nice during summer.
Spiced Berry Fusion
Introduce a pinch of ground cinnamon or nutmeg when simmering the base. The spices bring warmth and complexity, turning the fudge into a cozy fall treat.
Almond Crunch Variation
Replace the shredded coconut with finely chopped toasted almonds. The almond crunch adds a different texture and nutty flavor, making the fudge a great gift for nut lovers.
Maple‑Infused Sweetness
Replace half of the coconut sugar with pure maple syrup. The maple adds a subtle caramel note that pairs beautifully with the raspberries and coconut.
Tropical Pineapple Twist
Fold in a handful of chopped fresh pineapple after the raspberries. The pineapple’s tartness complements the raspberry, creating a tropical explosion of flavors.
Storing and Bringing It Back to Life
Fridge Storage
Store the fudge in an airtight container at room temperature for up to 3 days. If you notice the fudge has dried out slightly, add a teaspoon of coconut milk to the surface and let it sit for a few minutes before slicing. This will rehydrate the fudge and restore its silky texture.
Freezer Friendly
Wrap each square individually in parchment paper and place them in a freezer bag. The fudge can be frozen for up to 3 months. When ready to serve, thaw at room temperature for 30 minutes; the fudge will soften but still retain its shape.
Best Reheating Method
If the fudge has hardened after storage, reheat it in the microwave on low power for 10-15 seconds, then add a splash of coconut milk. Stir gently until it reaches a soft, spreadable consistency. This method prevents the fudge from becoming too oily or brittle.